KC901 SERIES / PROGRAMMING REFERENCE
Network Analyzer
Programming Manual
ASCII commands, communication examples, calibration procedures, and measurement control.
Choose the commands for your instrument generation. Supported functions vary by model; see firmware applicability. Manual version 0.7.1 is separate from the hardware and firmware versions.
Source edition and protocol conventions
B013-008

Network Analyzer Programming Manual
Hardware version V0.2 Software version V1.5.6(KC901K)
Official edition for education, research, and technology enthusiasts
Second edition
Kexinshe
December 2025
This English edition follows the Chinese manual 0.7.1 with confirmed corrections to baud rate, calibration support, frequency format, sweep limits, and measurement descriptions. Unsupported third-generation remote user calibration procedures have been removed. Remaining response examples retain their source payloads. Text after a semicolon is explanatory and is not transmitted. In examples, \n represents the newline terminator, not a literal backslash followed by n.
TX · Host sendsRX · Instrument returnsProtocol examples are selectable text.
0. Overview
The KC901 communicates using text commands, commonly called ASCII commands. The physical connection uses the USB or Ethernet port. Inside the KC901, the data is converted to serial data for the CPU to process. You can operate the KC901 directly from a command line or write application software that communicates with the instrument using the commands in this manual.
The KC901 uses a simple, non-hierarchical command language. It can be learned quickly without studying complex protocol logic.
In this manual, the host is the PC or other controller used to operate the KC901. The instrument is the KC901.
1. Command Format and Description
Both host commands and instrument responses use packets as their basic data unit. A packet starts with "$".
A packet ends with the newline character "\n". Elements within a packet are separated by ASCII commas ",", as described below.
1.1 Command Format
$[command],[option],[parameter1],[parameterN]\n1.2 Response Format
The response format differs slightly from the command format to make it easier for the host to identify the data. In the examples, a semicolon ";" and the rest of that line indicate a comment.
$start,[packet_name]\n  ; Each line starts with "$" and ends with "\n". "start" marks the beginning.
$[packet_contents]\n        ; Packet elements are separated by commas ",".
$end\n             ; "end" marks the end of the packet.
1.3 Format Notes
1. Not every command requires options and parameters. Follow the relevant command table.
2. Square brackets [] are used only to describe placeholders in this manual. Do not type the brackets themselves.
3. Letters are case-insensitive unless stated otherwise.
4. If the contents of a command are invalid, the KC901 immediately returns an error message when it detects the error and discards the invalid packet.
5. If the command format is invalid, the KC901 discards incorrectly formatted portions and extracts only correctly formatted portions.
1.4 Communication Example
To obtain the system time, send the following command:
$[command],[option]\n
$date,get\n
The complete exchange is shown below. Purple indicates host transmissions; blue indicates instrument responses.
$date,get\n
$start,date\n
Date:2025-12-30 15:22:14  ; Year, month, day, hour, minute, second, in that order.
$end\n
1.5 Communication Parameters
Baud rate: 921600 (third-generation KC901X)
Baud rate: 460800 (fourth-generation KC901X)
Data bits: 8
Stop bits: 1
Parity: none.
Command buffer: 32kb. Commands are executed in the order they enter the buffer. No new commands are accepted when the buffer is full. Allow for command execution time to avoid congestion.
Data buffer: 32kb. Data is transmitted in the order it enters the buffer. Execution is suspended when the buffer is full.
Measurement data obtained through remote control is not strictly rounded. Select the appropriate number of significant digits in your application.
2. Connecting the Host to the KC901
2.1 Installing the USB Driver
A USB driver is required for a USB connection. Windows normally includes the driver: connect the KC901 USB port to the PC and the system should install it automatically. If installation fails, download and install the driver manually.
Download: http://www.ftdichip.com/Drivers/VCP.htm
An Ethernet connection does not require a dedicated driver.
2.2 Configuring Terminal Software
To simplify host programming, command echo is disabled and lines are terminated only by the newline character "\n". Terminal software may display the output incorrectly unless configured accordingly.
The source manual recommends SecureCRT to handle this behavior. Configure it as follows:
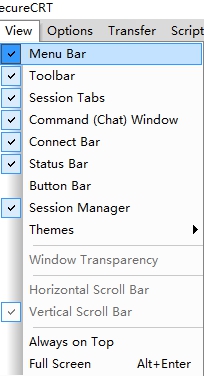
Select [View] -> [Command(Chat)Window] to open the command entry window at the bottom. Enter a command and press Enter to send it. Use the Up and Down arrow keys to recall previous commands.
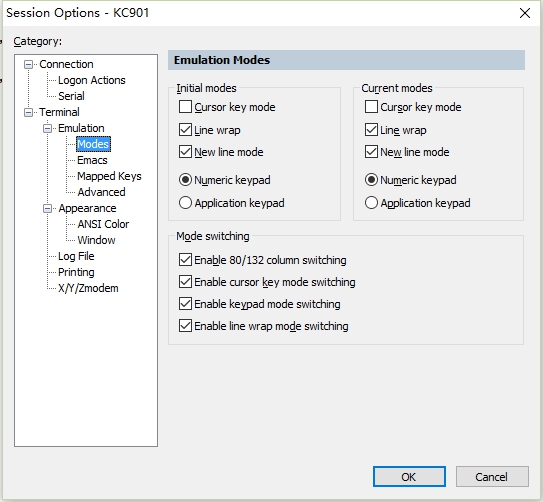
Under [Options] -> [Session Options] -> [Terminal] -> [Emulation] -> [Modes], select [New Line Mode] so that "\n" is displayed as a carriage return followed by a line feed.
2.3 Ethernet Connection
2.3.1 Enabling the Network Interface
Before connecting to a network, press FUNC to open Settings and set the Network submenu to ON. Fourth-generation KC901 instruments do not have this setting; connecting an Ethernet cable enables the interface automatically. The yellow Ethernet indicator lights when networking is enabled. Because networking consumes additional power, disable it when not in use. On fourth-generation KC901 instruments, the Ethernet interface cannot be powered off manually; unplugging the cable puts it to sleep automatically.
2.3.2 Configuring Network Parameters
Open IP SET under Settings and configure the KC901 IP parameters. Save the settings. The green Ethernet indicator flashes when the network connection is established.
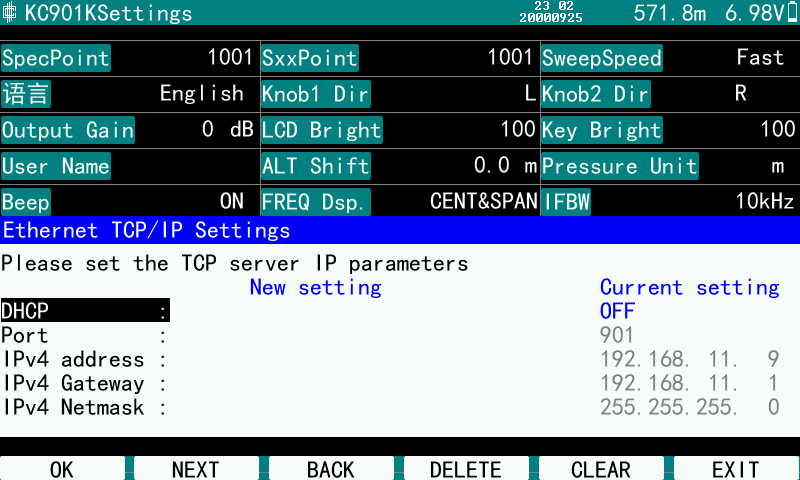
DHCP: When enabled, the instrument obtains its IP address and gateway dynamically from the router. The source manual generally recommends disabling DHCP.
DHCP is supported only by fourth-generation KC901X instruments, not by third-generation KC901X instruments.
Port: The port number in the host software must match this setting. Avoid conflicts with other applications. If the host uses a firewall, allow traffic on the corresponding port.
IPv4 address: Choose an address within the permitted range of the connected network. It must not conflict with another device.
IPv4 gateway: Use the router's gateway setting. A common LAN default is 192.168.1.1.
IPv4 subnet mask: Set this according to the connected network; a common value is 255.255.255.0.
A network with a router is generally preferable. Both the KC901 and the host act as endpoints on that network. For a direct KC901-to-PC connection, assign different IP addresses on the same subnet to the PC and KC901. With some older network adapters, try a crossover Ethernet cable if the connection fails.
2.4 Handshake with the KC901
Before the handshake, make sure that no dialog, such as About, is open on the KC901. If a dialog is open, the KC901 returns the following warning string. Fourth-generation KC901 instruments allow a handshake with a dialog open and do not return this warning.
$start,ConFail\n
$Please exit the window operation first.\n
$end\n
Close the dialog before attempting the handshake again.
Request control
Send an uppercase C.
After approximately 1 second, the instrument returns [KC901] and its serial number. The KC901 then enters remote-control mode.
2.5 Disconnecting from the KC901
There are two ways to disconnect:
1. Send a disconnect command from the host. The source refers to "3.2.16 Exiting Remote-Control Mode"; the corresponding section in this edition is 3.2.19.
2. Press [SHIFT]+[MODE] on the KC901 to disconnect locally.
If the USB cable is accidentally unplugged or communication is interrupted for another reason, the KC901 does not detect the interruption automatically. Press [SHIFT]+[MODE] to terminate remote control. On fourth-generation KC901 instruments, use [SHIFT]+[HOME] instead.
2.6 Stopping Data Output
To stop an operation while the KC901 is returning continuous data, send [Ctrl]+[C] from the host (hexadecimal 0x03). The KC901 stops executing the commands it has received, finishes transmitting all data already measured but not yet fully sent, and then stops returning data.
Note:
1. After data output is stopped, the KC901 returns fully to its initial state. For example, if [Ctrl]+[C] is sent while acquiring data with s11 RUN, send s11 init again before running s11 run.
2. When using SecureCRT, first click the data display window, then press [Ctrl]+[C].
3. Command Reference
This section describes the KC901 commands and provides practical examples. Observe the following conventions:
1. Purple indicates host transmissions; blue indicates instrument responses.
2. The line terminator "\n" is shown explicitly in transmitted and returned data. It is not visible as literal text in actual responses.
3. Separate commands, options, and parameters with commas.
4. A semicolon ";" and the remainder of the line indicate a comment and are not part of the actual protocol data.
3.1 Command Categories
Commands fall into three categories:
System setting commands
Sent from the host to the instrument, for example to set LCD brightness or transmitter output attenuation.
Measurement control commands
Sent from the host to the instrument, for example to measure S-parameters at specified frequencies in S11 mode.
Warnings
Sent from the instrument to the host, for example overload or high-temperature warnings.
3.2 System Commands
3.2.1 System Time
Command |
Option |
Description |
|---|---|---|
|
date |
get |
Read the time. |
set |
Set the time using the following format: Year Month Day Hour Minute Second XXXX-XX-XX, XX-XX-XX |
Example:
Read the KC901 system time:
$date,get\n
$start,date\n
Date:2025-12-30 15:22:14  ; Year, month, day, hour, minute, second, in that order.
$end\n
Set the time:
$date,set,2016-4-22,13-51-00\nThe year must be between 2000 and 2099.
3.2.2 LCD Language
Command |
Option |
Description |
|---|---|---|
|
lang |
en |
Simplified Chinese and English are currently supported. |
ch |
Example:
Set the display language to English.
$lang,en\n3.2.3 Knob 1 Direction (the Only Knob on Third-Generation KC901X)
Command |
Option |
Description |
|---|---|---|
|
Encoder1 |
right |
Increase the value when turned counterclockwise. Increase the value when turned clockwise. |
left |
Example:
Set the knob so that turning it counterclockwise increases the frequency:
$encoder1,right\n3.2.4 Knob 2 Direction (Fourth-Generation KC901X)
Command |
Option |
Description |
|---|---|---|
|
Encoder2 |
right |
Increase the value when turned counterclockwise. Increase the value when turned clockwise. |
left |
Example:
Set the knob so that turning it counterclockwise increases the frequency:
$encoder2,right\n3.2.5 Output Attenuation
Command |
Option |
Description |
|---|---|---|
outAtt |
None get (fourth-generation KC901X only) set (fourth-generation KC901X only) |
Parameter range: KC901K、J、R :-30~30 KC901V/RFMA : 0~25 KC901S+ :0~20 Unit: dB This output attenuation applies in the following modes: S11 (reflection), S21 (transmission), S22 (reflection; fourth-generation KC901X only), S12 (transmission; fourth-generation KC901X only), DTF (distance to fault), |
On fourth-generation KC901 instruments, this setting places the output amplitude in source gain mode.
Example:
Third-generation KC901X:
Set the output attenuator to 10dB attenuation.
$outAtt,10\nFourth-generation KC901X:
Set the output attenuator to 10dB attenuation.
$outAtt,set,10\n
$start,OutAtt,set,success\n
$end\n
Query the current output attenuation.
$outAtt,get\n
$start,OutAtt,get,success\n
$10\n
$end\n
3.2.6 Brightness
Command |
Option |
Description |
|---|---|---|
|
light |
lcd |
lcd range: 1-100 key range: 0-100 |
key |
Example:
Set display brightness to 100%.
$light,lcd,100\n3.2.7 Barometer
Command |
Option |
Parameter |
Description |
|---|---|---|---|
|
press |
set |
Value |
Set the absolute altitude compensation in m. Range: -999.9 to 999.9. After altitude compensation is set, the reported altitude changes gradually to the compensated value because a moving filter is used to stabilize the readings. |
get |
None |
Read barometric data, returned in hPa and m, respectively. |
Example:
Set altitude compensation to +100 meters.
$press,set,100.0\nRead barometric measurement data with pressure in hectopascals.
$press,get\n
$start,press\n
$950.412,536.802\n  ; Pressure (hPa), then altitude (m).
$end\n
3.2.8 Key Beep
Command |
Option |
Description |
|---|---|---|
|
beep |
off |
off -> disabled on -> enabled |
on |
Example:
Enable the key beep.
$beep,on\n3.2.9 S11 Cable Compensation
Command |
Option |
Description |
|---|---|---|
|
cable |
len |
Cable length in meters. Range: 0-99.999. |
loss |
Cable attenuation in dB. Range: 0-99.99. |
|
freq |
Frequency at which the cable attenuation is specified, in MHz. Range: 1-10000. |
Example:
Set the cable length compensation to 10.123 meters.
$cable,len,10.123\n3.2.10 S11 System Calibration Standard Parameters (Fourth-Generation KC901X; unavailable in firmware version 1.8.0 and later)
KC901K/RFMA uses the standard calibration model:
Command |
Option |
Description |
|---|---|---|
kit_s11 |
female male |
Enter the short and open standard parameters, in that order. The short standard parameters are, in order: L0,L1,L2,L3, one-way electrical length (mm), total loss (GΩ/m) The open standard parameters are, in order: C0,C1,C2,C3, one-way electrical length (mm), total loss (GΩ/m) Range: L0-L3 and C0-C3: -9999.999 to +9999.999. The exponents are the same as those displayed in the instrument's calibration standard settings and do not need to be specified. One-way electrical length: 0-999.999 Total loss: 0-9999.999 These are the calibration standard settings for system calibration. On the instrument, open Settings and press [SHIFT]+[7] to enter the system calibration screen. These are not the user calibration standard settings on the main Settings screen. |
Description:
Use female for female calibration standards and male for male calibration standards. Third-generation KC901X instruments do not have the female and male options.
Example:
Set the electrical lengths of the short and open standards to 5.25mm and 5.26mm, respectively. The load standard has no electrical length setting.
// L0,L1 , L2,L3,mm,GΩ/m C0, C1, C2, C3, mm, GΩ/m
Fourth-generation KC901X example:
$kit_s11,female,10,125,-20,15,5.25,0.201,100,125,-800,15,5.26,0.200\nThird-generation KC901X example:
$kit_s11,10,125,-20,15,5.25,0.201,100,125,-800,15,5.26,0.200\n3.2.11 S21 System Calibration Standard Parameters (Fourth-Generation KC901X; unavailable in firmware version 1.8.0 and later)
Command |
Option |
Description |
|---|---|---|
kit_s21 |
female male |
Enter the calibration standard length and attenuation, in that order. Length range: 0-999.999 (mm) Attenuation range: 0-99.9999 (dB) Frequency at which attenuation is specified: 1-10000 (MHz) |
Description:
Use female for female calibration standards and male for male calibration standards. Third-generation KC901X instruments do not have the female and male options.
Example:
Set the calibration standard length to 100.00mm and attenuation to 0.1dB at 4567MHz.
Fourth-generation KC901X example:
$kit_s21,female,100,0.1,4567\nThird-generation KC901X example:
$kit_s21,100,0.1,4567\n3.2.12 S11 User Calibration Standard Parameters (Fourth-Generation KC901X; unavailable in firmware version 1.8.0 and later)
KC901K/RFMA uses the complex calibration model:
Command |
Option |
Description |
|---|---|---|
userkit_s11 |
female male |
Enter the short and open standard parameters, in that order. The short standard parameters are, in order: L0,L1,L2,L3, one-way electrical length (mm), total loss (GΩ/m) The open standard parameters are, in order: C0,C1,C2,C3, one-way electrical length (mm), total loss (GΩ/m) Range: L0-L3 and C0-C3 range: -9999.999 to +9999.999 One-way electrical length: 0-999.999 Total loss: 0-9999.999 These are the calibration standard settings for user calibration, corresponding to the user calibration standard settings on the instrument's main Settings screen. |
Description:
Use female for female calibration standards and male for male calibration standards.
Example:
Set the electrical lengths of the short and open standards to 5.25mm and 5.26mm, respectively. The load standard has no electrical length setting.
// L0,L1 , L2,L3,mm,GΩ/m C0, C1, C2, C3, mm, GΩ/m
$userkit_s11,female,10,125,-20,15,5.25,0.201,100,125,-800,15,5.26,0.200\n3.2.13 S21 User Calibration Standard Parameters (Fourth-Generation KC901X; unavailable in firmware version 1.8.0 and later)
Command |
Option |
Description |
|---|---|---|
userkit_s21 |
female male |
Enter the calibration standard length and attenuation, in that order. Length range: 0-999.999 (mm) Attenuation range: 0-99.9999 (dB) Frequency at which attenuation is specified: 1-10000 (MHz) |
Description:
Use female for female calibration standards and male for male calibration standards.
Example:
Set the calibration standard length to 100.00mm and attenuation to 0.1dB at 4567MHz.
$userkit_s21,female,100,0.1,4567\n3.2.14 Device Information
Send command |
Option |
Description |
|---|---|---|
device |
None |
The instrument returns a descriptive string. |
For example:
$device\n
$start,device
$<----------------------KC901K network analyzer----------------->
$<-User @ :A>
$<-Software ver:V1.5.4------------------------------------>
$<-Hardware ver:MB-V0.2 RB-V0.0.3--------------------------------->
$<-Serial num:2552552552-------------------------------------->
$<-Copyright:KeXinShe Co.,Ltd & KeChuang measurement association>
$<-------------------------------------------------------------->
$end
3.2.15 Voltage Readings
Command |
Option |
Data description |
|---|---|---|
voltage |
None |
Returns external supply voltage followed by battery voltage, in V. |
Example:
Read the battery voltage.
$voltage\n
$start,voltage\n
$10.82,8.06\n  ; External supply voltage, then battery voltage.
$end\n
3.2.16 Internal Temperature
Send command |
Option |
Data description |
|---|---|---|
temp |
None |
Unit: °C |
Example:
Read the internal temperature.
$temp\n
$start,temp\n
$44.2\n
$end\n
3.2.17 Operating Time Statistics
Send command |
Option |
Data description |
|---|---|---|
times |
None |
Returns the power-on count, current session duration, and total operating time, in that order. |
Example:
Read the operating time statistics.
$times\n
$start,times\n
$1223,2,52,51,2,2,52,51\n  ; Power-on count, session duration (hours, minutes, seconds),
; Total operating time (days, hours, minutes, seconds).
$end\n
3.2.18 Spectrum Reference Level
Command |
Option |
Description |
|---|---|---|
specref |
None |
Parameter range: (+10) to (-50), in dBm. |
Example:
Set the reference level to -10dBm.
$specref,-10\n3.2.19 Exiting Remote-Control Mode
Command |
Option |
Description |
|---|---|---|
local |
None |
Release host control. |
Example:
$local\nBehavior:
Upon receiving this command, the KC901 immediately stops all current operations and returns control to its local interface.
3.2.20 Network Parameters
Command |
Option |
Description |
|---|---|---|
netinfo |
None |
Read the current network settings. |
ip |
None |
Device address |
gw |
None |
Gateway address |
msk |
None |
Subnet mask |
port |
None |
Port number (less than 65535) |
Example:
Read the current network settings:
$netinfo\n
$start,NetInfo\n
dhcp: on\n; DHCP status
192,168,1,2\n                 ; IP address
192,168,1,1\n                 ; Gateway address
255,255,255,0\n               ; Subnet mask
901\n                       ; Port number
$end\n
Set the IP address:
$ip,192.168.1.2\nSet the gateway address:
$gw,192.168.1.1\nSet the subnet mask:
$msk,255.255.255.0\nSet the port number. Only third-generation KC901X instruments allow the port number to be changed. On fourth-generation instruments, it is fixed at 901.
$port,901\n3.2.21 Bandwidth
Command |
Option |
Description |
|---|---|---|
bw |
100Hz 300Hz 1k 3k 10k 30k |
Set the intermediate-frequency filter bandwidth. |
Note:
The 100Hz and 300Hz options are not available on third-generation KC901X instruments.
Example:
Set the bandwidth to 10kHz.
$bw,10k\n3.2.22 Remote Firmware Update (USB Serial Connection Only)
Send command |
Option |
Description |
|---|---|---|
update |
None |
Update the firmware from the SD card. |
Description:
Before sending this command, make sure the update files have been loaded onto the SD card. After receiving the command, the KC901 restarts automatically in remote update mode. Update progress messages are returned over the serial port and indicate success or failure. Fourth-generation KC901 instruments require a Boot version higher than 0.0.4 to support this command; it can be updated using the V1.5.6 base firmware update package.
Example:
$update\nNote:
1. If an unexpected problem causes the instrument to freeze during a remote update, restart it to automatically retry the update.
2. During an update, the serial baud rate is fixed at 460800 on fourth-generation KC901X instruments and 921600 on third-generation KC901X instruments.
3.2.23 Restoring Factory Settings
Send command |
Option |
Description |
|---|---|---|
reset |
None |
Restore all settings and replace the system calibration with the factory calibration. |
Example:
$reset\nNote:
Restoring factory settings also resets the network configuration, which may need to be configured again.
3.2.24 S11 System Calibration (Fourth-Generation KC901X)
Send command |
Option |
Description |
|---|---|---|
cal_sys_s11 |
None |
S11 system calibration |
Description:
This command starts an interactive SOL calibration over the serial or Ethernet connection. The resulting calibration data is used by default in subsequent operation. Use the [Reset] command to restore factory calibration as the default. The procedure involves several exchanges. Host software only needs to identify packet header names; matching the message text is unnecessary.
This calibration can be performed only once after each initialization. To recalibrate, run $S11,STOP\n and initialize again with $S11,INIT\n.
The complete procedure follows:
$cal_sys_s11\n
$start,s11_SysCal_confirm\n
$******S11 System calibration******\n
$ Do you want to calibrate the device?[Yes/no]\n
$end\n
$yes\n
$start,s11_syscal_wait\n
$ waiting for the circuit to be stability...\n
$end\n
$start,port_polarity\n
$Enter female or male to specify the polarity of the PORT1:\n
$end\n
$female\n
$start,cal_open\n
$Step 1:Please connect the OPEN module to PORT1 then send 'yes'.\n
$end\n
$yes\n
$start,cal_short\n
$Step 2:Please connect the SHORT module to PORT1 then send 'yes'.\n
$end\n
$yes\n
$start,cal_load\n
$Step 3:Please connect the LOAD module to PORT1 then send 'yes'.\n
$end\n
$yes\n
$start,cal_completed\n
$Calibration completed!\n
$end\n
While the instrument is waiting for confirmation from the host, the user can enter 'exit\n' to leave calibration mode, as shown below:
$exit\n
$start,exit\n
$Exit calibration\n
$end\n
3.2.25 S21 System Calibration (Fourth-Generation KC901X)
Send command |
Option |
Description |
|---|---|---|
cal_sys_s21 |
None |
S21 system calibration |
Description:
This command starts an interactive through calibration over the serial or Ethernet connection. The resulting calibration data is used by default in subsequent operation. Use the [Reset] command to restore factory calibration as the default. The procedure involves several exchanges. Host software only needs to identify packet header names; matching the message text is unnecessary.
This calibration can be performed only once after each initialization. To recalibrate, run $S21,STOP\n and initialize again with $S21,INIT\n.
The complete procedure follows:
$cal_sys_s21\n$start,s21_SysCal_confirm\n
$******S21 System calibration******\n
$ Do you want to calibrate the device?[Yes/no]\n
$end\n$yes\n$start,s21_syscal_wait\n
$ waiting for the circuit to be stability...\n
$end\n$start,port_polarity\n
$Enter female,male or f_m to specify the polarity of the PORTS:\n
$end\n$female\n$start,cal_connect\n
$Step 1:Please connect PORT1 and PORT2 then send 'yes'.\n
$end\n$yes\n$start,cal_completed\n
$Calibration completed!\n
$end\nWhile the instrument is waiting for confirmation from the host, the user can enter 'exit\n' to leave calibration mode, as shown below:
$exit\n$start,exit\n
$Exit calibration.\n
$end\n3.2.26 S22 System Calibration (Fourth-Generation KC901X)
Send command |
Option |
Description |
|---|---|---|
cal_sys_s22 |
None |
S22 system calibration |
Description:
This command starts an interactive SOL calibration over the serial or Ethernet connection. The resulting calibration data is used by default in subsequent operation. Use the [Reset] command to restore factory calibration as the default. The procedure involves several exchanges. Host software only needs to identify packet header names; matching the message text is unnecessary.
$cal_sys_s22\n$start,s22_SysCal_confirm\n
$******S22 System calibration******\n
$Do you want to calibrate the device?[Yes/no]\n
$end\n$yes\n$start,s22_syscal_wait\n
$ waiting for the circuit to be stability...\n
$end\n$start,port_polarity\n
$Enter female or male to specify the polarity of the PORT2:\n
$end\n$female\n$start,cal_open\n
$Step 1:Please connect the OPEN module to PORT2 then send 'yes'.\n
$end\n$yes\n$start,cal_short\n
$Step 2:Please connect the SHORT module to PORT2 then send 'yes'.\n
$end\n$yes\n$start,cal_load\n
$Step 3:Please connect the LOAD module to PORT2 then send 'yes'.\n
$end\n$start,cal_completed\n
$Calibration completed!\n
$end\nWhile the instrument is waiting for confirmation from the host, the user can enter 'exit\n' to leave calibration mode, as shown below:
$exit\n$start,exit\n
$Exit calibration\n
$end\n3.2.27 S12 System Calibration (Fourth-Generation KC901X)
Send command |
Option |
Description |
|---|---|---|
cal_sys_s12 |
None |
S12 system calibration |
Description:
This command starts an interactive SOL calibration over the serial or Ethernet connection. The resulting calibration data is used by default in subsequent operation. Use the [Reset] command to restore factory calibration as the default. The procedure involves several exchanges. Host software only needs to identify packet header names; matching the message text is unnecessary.
$cal_sys_s12\n$start,s12_SysCal_confirm\n
$******S12 System calibration******\n
$Do you want to calibrate the device?[Yes/no]\n
$end$yes\n$start,s12_syscal_wait\n
$ waiting for the circuit to be stability...\n
$end\n$start,port_polarity\n
$Enter female,male or f_m to specify the polarity of the PORTS:\n
$end\n$female\n$start,cal_connect\n
$Step 1:Please connect PORT1 and PORT2 then send 'yes'.\n
$end\n$yes\n$start,cal_completed\n
$Calibration completed!\n
$end\nWhile the instrument is waiting for confirmation from the host, the user can enter 'exit\n' to leave calibration mode, as shown below:
$exit\n$start,exit\n
$Exit calibration\n
$end\n3.2.28 S11 Calibration (Fourth-Generation KC901X)
Send command |
Parameter 1 |
Parameter 2 |
Parameter 3 |
Parameter 4 |
|---|---|---|---|---|
cal_user_s11 |
Number of points |
Frequency specification mode |
Center frequency / start frequency |
Span / stop frequency |
Description:
This command starts an interactive SOL calibration over the serial or Ethernet connection. When S11 user calibration is selected during subsequent operation, this calibration data is used by default. If the frequency range exceeds the calibrated range, system calibration is used instead. The procedure involves several exchanges. Host software only needs to identify packet header names; matching the message text is unnecessary.
$cal_user_s11,10,cs,901000000,10000000\n$start,s11_Cal_confirm\n
$******S11 calibration******\n
$Do you want to calibrate the device?[Yes/no]\n
$end$yes\n$start,s11_cal_wait\n
$ waiting for the circuit to be stability...\n
$end\n$start,port_polarity\n
$Enter female or male to specify the polarity of the PORT1:\n
$end\n$female\n$start,cal_open\n
$Step 1:Please connect the OPEN module to PORT1 then send 'yes'.\n
$end\n$yes\n$start,cal_short\n
$Step 2:Please connect the SHORT module to PORT1 then send 'yes'.\n
$end\n$yes\n$start,cal_load\n
$Step 3:Please connect the LOAD module to PORT1 then send 'yes'.\n
$end\n$yes\n$start,cal_completed\n
$Calibration completed!\n
$end\nWhile the instrument is waiting for confirmation from the host, the user can enter 'exit\n' to leave calibration mode, as shown below:
$exit\n$start,exit\n
$Exit calibration\n
$end\n3.2.29 S22 Calibration (Fourth-Generation KC901X)
Send command |
Parameter 1 |
Parameter 2 |
Parameter 3 |
Parameter 4 |
|---|---|---|---|---|
cal_user_s22 |
Number of points |
Frequency specification mode |
Center frequency / start frequency |
Span / stop frequency |
Description:
This command starts an interactive SOL calibration over the serial or Ethernet connection. When S22 user calibration is selected during subsequent operation, this calibration data is used by default. If the frequency range exceeds the calibrated range, system calibration is used instead. The procedure involves several exchanges. Host software only needs to identify packet header names; matching the message text is unnecessary.
$cal_user_s22,10,cs,901000000,10000000\n$start,s22_Cal_confirm\n
$******S22 calibration******\n
$Do you want to calibrate the device?[Yes/no]\n
$end$yes\n$start,s22_cal_wait\n
$ waiting for the circuit to be stability...\n
$end\n$start,port_polarity\n
$Enter female or male to specify the polarity of the PORT2:\n
$end\n$female\n$start,cal_open\n
$Step 1:Please connect the OPEN module to PORT2 then send 'yes'.\n
$end\n$yes\n$start,cal_short\n
$Step 2:Please connect the SHORT module to PORT2 then send 'yes'.\n
$end\n$yes\n$start,cal_load\n
$Step 3:Please connect the LOAD module to PORT2 then send 'yes'.\n
$end\n$yes\n$start,cal_completed\n
$Calibration completed!\n
$end\nWhile the instrument is waiting for confirmation from the host, the user can enter 'exit\n' to leave calibration mode, as shown below:
$exit\n$start,exit\n
$Exit calibration\n
$end\n3.2.30 S21 Response Calibration (Fourth-Generation KC901X)
Send command |
Parameter 1 |
Parameter 2 |
Parameter 3 |
Parameter 4 |
|---|---|---|---|---|
response_s21_cal |
Number of points |
Frequency specification mode |
Center frequency / start frequency |
Span / stop frequency |
Description:
This command starts an interactive T calibration over the serial or Ethernet connection. When S21 response calibration is selected during subsequent operation, this calibration data is used by default. If the frequency range exceeds the calibrated range, system calibration is used instead. The procedure involves several exchanges. Host software only needs to identify packet header names; matching the message text is unnecessary.
$response_s21_cal,10,cs,901000000,10000000\n$start,s21_Cal_confirm\n
$******S21 Response calibration******\n
$Do you want to calibrate the device?[Yes/no]\n
$end$yes\n$start,s21_response_cal_wait\n
$ waiting for the circuit to be stability...\n
$end\n$start,port_polarity\n
$Enter female,male or f_m to specify the polarity of the PORTS:\n
$end\n$female\n$start,cal_connect\n
$Step 1:Please connect PORT1 and PORT2 then send 'yes'.\n
$end\n$yes\n$start,cal_completed\n
$Calibration completed!\n
$end\nWhile the instrument is waiting for confirmation from the host, the user can enter 'exit\n' to leave calibration mode, as shown below:
$exit\n$start,exit\n
$Exit calibration\n
$end\n3.2.31 S21 Response and Isolation Calibration (Fourth-Generation KC901X)
Send command |
Parameter 1 |
Parameter 2 |
Parameter 3 |
Parameter 4 |
|---|---|---|---|---|
iso_response_s21_cal |
Number of points |
Frequency specification mode |
Center frequency / start frequency |
Span / stop frequency |
Description:
This command starts an interactive T+I calibration over the serial or Ethernet connection. When S21 response and isolation calibration is selected during subsequent operation, this calibration data is used by default. If the frequency range exceeds the calibrated range, system calibration is used instead. The procedure involves several exchanges. Host software only needs to identify packet header names; matching the message text is unnecessary.
$iso_response_s21_cal,10,cs,901000000,10000000\n$start,s21_Cal_confirm\n
$******S21 Response+Isolation calibration******\n
$Do you want to calibrate the device?[Yes/no]\n
$end\n$yes\n$start,s21_response_isolation_cal_wait\n
$ waiting for the circuit to be stability...\n
$end\n$start,port_polarity\n
$Enter female,male or f_m to specify the polarity of the PORTS:\n
$end\n$female\n$start,cal_load\n
$Step 1:Please connect the LOAD module to PORT1 then send 'yes'.\n
$end\n$yes\n$start,cal_connect\n
$Step 2:Please connect PORT1 and PORT2 then send 'yes'.\n
$end\n$yes\n$start,cal_completed\n
$Calibration completed!\n
$end\nWhile the instrument is waiting for confirmation from the host, the user can enter 'exit\n' to leave calibration mode, as shown below:
$exit\n$start,exit\n
$Exit calibration\n
$end\n3.2.32 S21 Enhanced Response Calibration (Fourth-Generation KC901X)
Send command |
Parameter 1 |
Parameter 2 |
Parameter 3 |
Parameter 4 |
|---|---|---|---|---|
enresponse_s21_cal |
Number of points |
Frequency specification mode |
Center frequency / start frequency |
Span / stop frequency |
Description:
This command starts an interactive enhanced response calibration over the serial or Ethernet connection. When S21 enhanced response calibration is selected during subsequent operation, this calibration data is used by default. If the frequency range exceeds the calibrated range, system calibration is used instead. The procedure involves several exchanges. Host software only needs to identify packet header names; matching the message text is unnecessary.
$enresponse_s21_cal,10,cs,901000000,10000000\n$start,s21_Cal_confirm\n
$******S21 Enhance Response calibration******\n
$Do you want to calibrate the device?[Yes/no]\n
$end\n$yes\n$start,s21_enhance_response_cal_wait\n
$ waiting for the circuit to be stability...\n
$end\n$start,port_polarity\n
$Enter female or male to specify the polarity of the PORT1:\n
$end\n$female\n$start,cal_open\n
$Step 1:Please connect the OPEN module to PORT1 then send 'yes'.\n
$end\n$yes\n$start,cal_short\n
$Step 2:Please connect the SHORT module to PORT1 then send 'yes'.\n
$end\n$yes\n$start,cal_load\n
$Step 3:Please connect the LOAD module to PORT1 then send 'yes'.\n
$end\n$yes\n$start,port_polarity\n
$Enter female,male or f_m to specify the polarity of the PORTS:\n
$end\n$female\n$start,cal_connect\n
$Step 4:Please connect PORT1 and PORT2 then send 'yes'.\n
$end\n$yes\n$start,cal_completed\n
$Calibration completed!\n
$end\nWhile the instrument is waiting for confirmation from the host, the user can enter 'exit\n' to leave calibration mode, as shown below:
$exit\n$start,exit\n
$Exit calibration\n
$end\n3.2.33 S12 Response Calibration (Fourth-Generation KC901X)
Send command |
Parameter 1 |
Parameter 2 |
Parameter 3 |
Parameter 4 |
|---|---|---|---|---|
response_s12_cal |
Number of points |
Frequency specification mode |
Center frequency / start frequency |
Span / stop frequency |
Description:
This command starts an interactive T calibration over the serial or Ethernet connection. When S12 response calibration is selected during subsequent operation, this calibration data is used by default. If the frequency range exceeds the calibrated range, system calibration is used instead. The procedure involves several exchanges. Host software only needs to identify packet header names; matching the message text is unnecessary.
$response_s12_cal,10,cs,901000000,10000000\n$start,s12_Cal_confirm\n
$******S12 Response calibration******\n
$Do you want to calibrate the device?[Yes/no]\n
$end\n$yes\n$start,s12_response_cal_wait\n
$ waiting for the circuit to be stability...\n
$end\n$start,port_polarity\n
$Enter female,male or f_m to specify the polarity of the PORTS:\n
$end\n$female\n$start,cal_connect\n
$Step 1:Please connect PORT1 and PORT2 then send 'yes'.\n
$end\n$yes\n$start,cal_completed\n
$Calibration completed!\n
$end\nWhile the instrument is waiting for confirmation from the host, the user can enter 'exit\n' to leave calibration mode, as shown below:
$exit\n$start,exit\n
$Exit calibration\n
$end\n3.2.34 S12 Response and Isolation Calibration (Fourth-Generation KC901X)
Send command |
Parameter 1 |
Parameter 2 |
Parameter 3 |
Parameter 4 |
|---|---|---|---|---|
iso_response_s12_cal |
Number of points |
Frequency specification mode |
Center frequency / start frequency |
Span / stop frequency |
Description:
This command starts an interactive T+I calibration over the serial or Ethernet connection. When S12 response and isolation calibration is selected during subsequent operation, this calibration data is used by default. If the frequency range exceeds the calibrated range, system calibration is used instead. The procedure involves several exchanges. Host software only needs to identify packet header names; matching the message text is unnecessary.
$iso_response_s12_cal,10,cs,901000000,10000000\n$start,s12_Cal_confirm\n
$******S12 Response+Isolation calibration******\n
$Do you want to calibrate the device?[Yes/no]\n
$end\n$yes\n$start,s12_response_isolation_cal_wait\n
$ waiting for the circuit to be stability...\n
$end\n$start,port_polarity\n
$Enter female,male or f_m to specify the polarity of the PORTS:\n
$end\n$female\n$start,cal_load\n
$Step 1:Please connect the LOAD module to PORT2 then send 'yes'.\n
$end\n$yes\n$start,cal_connect\n
$Step 2:Please connect PORT1 and PORT2 then send 'yes'.\n
$end\n$yes\n$start,cal_completed\n
$Calibration completed!\n
$end\nWhile the instrument is waiting for confirmation from the host, the user can enter 'exit\n' to leave calibration mode, as shown below:
$exit\n$start,exit\n
$Exit calibration\n
$end\n3.2.35 S12 Enhanced Response Calibration (Fourth-Generation KC901X)
Send command |
Parameter 1 |
Parameter 2 |
Parameter 3 |
Parameter 4 |
|---|---|---|---|---|
enresponse_s12_cal |
Number of points |
Frequency specification mode |
Center frequency / start frequency |
Span / stop frequency |
Description:
This command starts an interactive enhanced response calibration over the serial or Ethernet connection. When S12 enhanced response calibration is selected during subsequent operation, this calibration data is used by default. If the frequency range exceeds the calibrated range, system calibration is used instead. The procedure involves several exchanges. Host software only needs to identify packet header names; matching the message text is unnecessary.
$enresponse_s12_cal,10,cs,901000000,10000000\n$start,s12_Cal_confirm\n
$******S12 Enhance Response calibration******\n
$Do you want to calibrate the device?[Yes/no]\n
$end\n$yes\n$start,s12_enhance_response_cal_wait\n
$ waiting for the circuit to be stability...\n
$end\n$start,port_polarity\n
$Enter female or male to specify the polarity of the PORT2:\n
$end\n$female\n$start,cal_open\n
$Step 1:Please connect the OPEN module to PORT2 then send 'yes'.\n
$end\n
$yes\n$start,cal_short\n
$Step 2:Please connect the SHORT module to PORT2 then send 'yes'.\n
$end\n$yes\n$start,cal_load\n
$Step 3:Please connect the LOAD module to PORT2 then send 'yes'.\n
$end\n$yes\n$start,port_polarity\n
$Enter female,male or f_m to specify the polarity of the PORTS:\n
$end\n$female\n$start,cal_connect\n
$Step 4:Please connect PORT1 and PORT2 then send 'yes'.\n
$end\n$yes\n$start,cal_completed\n
$Calibration completed!\n
$end\nWhile the instrument is waiting for confirmation from the host, the user can enter 'exit\n' to leave calibration mode, as shown below:
$exit\n$start,exit\n
$Exit calibration\n
$end\n3.2.36 Full Two-Port Calibration (Fourth-Generation KC901X)
Send command |
Parameter 1 |
Parameter 2 |
Parameter 3 |
Parameter 4 |
|---|---|---|---|---|
full2port_cal |
Number of points |
Frequency specification mode |
Center frequency / start frequency |
Span / stop frequency |
Description:
This command starts an interactive SOLT calibration over the serial or Ethernet connection. When full two-port calibration is selected during subsequent operation, this calibration data is used by default. If the frequency range exceeds the calibrated range, system calibration is used instead. The procedure involves several exchanges. Host software only needs to identify packet header names; matching the message text is unnecessary.
$full2port_cal,10,cs,901000000,10000000\n$start,full2port_Cal_confirm\n
$******Full 2-Port calibration******\n
$Do you want to calibrate the device?[Yes/no]\n
$end\n$yes\n$start,full2port_cal_wait\n
$ waiting for the circuit to be stability...\n
$end\n$start,port_polarity\n
$Enter female or male to specify the polarity of the PORT1:\n
$end\n$female\n$start,cal_open\n
$Step 1:Please connect the OPEN module to PORT1 then send 'yes'.\n
$end\n$yes\n$start,cal_short\n
$Step 2:Please connect the SHORT module to PORT1 then send 'yes'.\n
$end\n$yes\n$start,cal_load\n
$Step 3:Please connect the LOAD module to PORT1 then send 'yes'.\n
$end\n$yes\n$start,port_polarity\n
$Enter female or male to specify the polarity of the PORT2:\n
$end\n$female\n$start,cal_open\n
$Step 4:Please connect the OPEN module to PORT2 then send 'yes'.\n
$end\n$yes\n$start,cal_short\n
$Step 5:Please connect the SHORT module to PORT2 then send 'yes'.\n
$end\n$yes\n$start,cal_load\n
$Step 6:Please connect the LOAD module to PORT2 then send 'yes'.\n
$end\n$yes\n$start,cal_connect\n
$Step 7:Please connect PORT1 and PORT2 then send 'yes'.\n
$end\n$yes\n
$start,cal_completed\n
$Calibration completed!\n
$end\n
While the instrument is waiting for confirmation from the host, the user can enter 'exit\n' to leave calibration mode, as shown below:
$exit\n$start,exit\n
$Exit calibration\n
$end\n3.2.37 Reading System Warnings
Send command |
Option |
Description |
|---|---|---|
getstatus |
None |
Read system warnings. |
Description:
If warnings exist, this command returns the system warnings once over the serial or Ethernet connection. If there are no warnings, no response is returned.
Example:
$getstatus\n
$start,err_BatVolLow
$error:Low battery!
$end3.2.38 Clearing System Warning Flags
Send command |
Option |
Description |
|---|---|---|
clearstatus |
None |
Clear system warning flags. |
Description:
This command returns no response.
Example:
$clearstatus\n3.2.39 Signal Source Amplitude (Fourth-Generation KC901X)
Send command |
Option |
Parameter |
Description |
|---|---|---|---|
source_level |
get set |
level |
Operate the instrument in level mode. |
Description:
The set option sets the signal source output amplitude and places the instrument in level mode.
The get option takes no parameters and returns the signal source amplitude for level mode.
Example:
$source_level,set,-50\n
$start,source_level,set,success\n
$end\n$source_level,get\n
$start,source_level,get,success\n
$-50\n
$end\n3.2.40 Valid Source Amplitude Range at Specified Frequencies (Fourth-Generation KC901X)
Send command |
Option |
Parameter |
Description |
|---|---|---|---|
range_source_level |
get |
start freq stop freq point |
Query the valid signal source amplitude range at specified frequencies. |
Description:
Provide the start frequency, stop frequency, and number of points. The instrument returns the valid signal source amplitude range for those frequencies.
Example:
$range_source_level,get,100000000,200000000,201\n
$start,range_source_level,get,success\n
$-43,9\n
$end\n3.2.41 Power Sweep Settings (Fourth-Generation KC901X)
Send command |
Option |
Parameter |
Description |
|---|---|---|---|
power_sweep |
get set |
start level stop level |
Operate the instrument in power sweep mode. |
Description:
The set option takes the signal source start and stop amplitudes and places the instrument in power sweep mode.
The get option takes no parameters and returns the signal source start and stop amplitudes for power sweep mode.
Example:
$power_sweep,set,-50,10\n
$start,power_sweep,set,success\n
$end\n$power_sweep,get\n
$start,power_sweep,get,success\n
$-50,$10\n
$end\n3.2.42 DHCP On/Off (Fourth-Generation KC901X)
Send command |
Option |
Description |
|---|---|---|
dhcp |
on off |
Enable or disable DHCP on the instrument. |
Example:
$dhcp,on\n
$start,dhcp,on,success\n
$end\n3.2.43 Frequency List (Fourth-Generation KC901X)
Command |
Option |
Parameter 1 |
|---|---|---|
|
freq_list |
set |
Frequency range |
get |
Description:
The set option sends a frequency list to the instrument in Hz. Separate frequencies with "-". After all frequencies have been received, the instrument returns "Frequency received successfully!".
The frequency list must contain at least 2 points and no more than 10000 points. The received list is stored in RAM and must be sent again after a power cycle. All frequencies must be within the instrument’s range. Repeating this command overwrites the previous list. Do not send an oversized list; whether the instrument rejects or truncates such a list remains to be confirmed.
Example:
$freq_list,set,100000000-200000000-40000000\n$start,Frequency received successfully!
$endThe get option takes no parameters and returns the frequency list received by the instrument.
Example:
$freq_list,get\n$start,freq
100000000
200000000
40000000
$end3.2.44 Frequency-List S11 User Calibration (Fourth-Generation KC901X)
Send command |
Option |
Description |
|---|---|---|
list_user_s11_cal |
None |
Perform S11 user calibration using the frequency list. |
Description:
This command starts an interactive port 1 SOL calibration at the frequencies in the custom list, over the serial or Ethernet connection. When sweeping the frequency list with S11 user calibration selected, this calibration data is used by default. If the frequency range exceeds the calibrated range, system calibration is used instead. The procedure involves several exchanges. Host software only needs to identify packet header names; matching the message text is unnecessary.
$list_user_s11_cal\n$start,s11_Cal_confirm\n
$******S11 calibration******\n
$Do you want to calibrate the device?[Yes/no]\n
$end$yes\n$start,s11_cal_wait\n
$ waiting for the circuit to be stability...\n
$end\n$start,port_polarity\n
$Enter female or male to specify the polarity of the PORT1:\n
$end\n$female\n$start,cal_open\n
$Step 1:Please connect the OPEN module to PORT1 then send 'yes'.\n
$end\n$yes\n$start,cal_short\n
$Step 2:Please connect the SHORT module to PORT1 then send 'yes'.\n
$end\n$yes\n$start,cal_load\n
$Step 3:Please connect the LOAD module to PORT1 then send 'yes'.\n
$end\n$yes\n$start,cal_completed\n
$Calibration completed!\n
$end\nWhile the instrument is waiting for confirmation from the host, the user can enter 'exit\n' to leave calibration mode, as shown below:
$exit\n$start,exit\n
$Exit calibration\n
$end\n3.2.45 Frequency-List S22 User Calibration (Fourth-Generation KC901X)
Send command |
Option |
Description |
|---|---|---|
list_user_s22_cal |
None |
Perform S22 user calibration using the frequency list. |
Description:
This command starts an interactive port 2 SOL calibration at the frequencies in the custom list, over the serial or Ethernet connection. When sweeping the frequency list with S22 user calibration selected, this calibration data is used by default. If the frequency range exceeds the calibrated range, system calibration is used instead. The procedure involves several exchanges. Host software only needs to identify packet header names; matching the message text is unnecessary.
$list_user_s22_cal\n$start,s22_Cal_confirm\n
$******S22 calibration******\n
$Do you want to calibrate the device?[Yes/no]\n
$end$yes\n$start,s22_cal_wait\n
$ waiting for the circuit to be stability...\n
$end\n$start,port_polarity\n
$Enter female or male to specify the polarity of the PORT2:\n
$end\n$female\n$start,cal_open\n
$Step 1:Please connect the OPEN module to PORT2 then send 'yes'.\n
$end\n$yes\n$start,cal_short\n
$Step 2:Please connect the SHORT module to PORT2 then send 'yes'.\n
$end\n$yes\n$start,cal_load\n
$Step 3:Please connect the LOAD module to PORT2 then send 'yes'.\n
$end\n$yes\n$start,cal_completed\n
$Calibration completed!\n
$end\nWhile the instrument is waiting for confirmation from the host, the user can enter 'exit\n' to leave calibration mode, as shown below:
$exit\n$start,exit\n
$Exit calibration\n
$end\n3.2.46 Frequency-List S21 Response Calibration (Fourth-Generation KC901X)
Send command |
Option |
Description |
|---|---|---|
list_response_s21_cal |
None |
Perform S21 response calibration using the frequency list. |
Description:
This command starts an interactive T calibration at the frequencies in the custom list, over the serial or Ethernet connection. When sweeping the frequency list with S21 response calibration selected, this calibration data is used by default. If the frequency range exceeds the calibrated range, system calibration is used instead. The procedure involves several exchanges. Host software only needs to identify packet header names; matching the message text is unnecessary.
$list_response_s21_cal\n$start,s21_Cal_confirm\n
$******S21 Response calibration******\n
$Do you want to calibrate the device?[Yes/no]\n
$end$yes\n$start,s21_response_cal_wait\n
$ waiting for the circuit to be stability...\n
$end\n$start,port_polarity\n
$Enter female,male or f_m to specify the polarity of the PORTS:\n
$end\n$female\n$start,cal_connect\n
$Step 1:Please connect PORT1 and PORT2 then send 'yes'.\n
$end\n$yes\n$start,cal_completed\n
$Calibration completed!\n
$end\nWhile the instrument is waiting for confirmation from the host, the user can enter 'exit\n' to leave calibration mode, as shown below:
$exit\n$start,exit\n
$Exit calibration\n
$end\n3.2.47 Frequency-List S12 Response Calibration (Fourth-Generation KC901X)
Send command |
Option |
Description |
|---|---|---|
list_response_s12_cal |
None |
Perform S12 response calibration using the frequency list. |
Description:
This command starts an interactive T calibration at the frequencies in the custom list, over the serial or Ethernet connection. When sweeping the frequency list with S12 response calibration selected, this calibration data is used by default. If the frequency range exceeds the calibrated range, system calibration is used instead. The procedure involves several exchanges. Host software only needs to identify packet header names; matching the message text is unnecessary.
$list_response_s12_cal\n$start,s12_Cal_confirm\n
$******S12 Response calibration******\n
$Do you want to calibrate the device?[Yes/no]\n
$end\n$yes\n$start,s12_response_cal_wait\n
$ waiting for the circuit to be stability...\n
$end\n$start,port_polarity\n
$Enter female,male or f_m to specify the polarity of the PORTS:\n
$end\n$female\n$start,cal_connect\n
$Step 1:Please connect PORT1 and PORT2 then send 'yes'.\n
$end\n$yes\n$start,cal_completed\n
$Calibration completed!\n
$end\nWhile the instrument is waiting for confirmation from the host, the user can enter 'exit\n' to leave calibration mode, as shown below:
$exit\n$start,exit\n
$Exit calibration\n
$end\n3.2.48 Frequency-List S21 Response and Isolation Calibration (Fourth-Generation KC901X)
Send command |
Option |
Description |
|---|---|---|
list_iso_response_s21_cal |
None |
Perform S21 response and isolation calibration using the frequency list. |
Description:
This command starts an interactive T+I calibration at the frequencies in the custom list, over the serial or Ethernet connection. When sweeping the frequency list with S21 response and isolation calibration selected, this calibration data is used by default. If the frequency range exceeds the calibrated range, system calibration is used instead. The procedure involves several exchanges. Host software only needs to identify packet header names; matching the message text is unnecessary.
$list_iso_response_s21_cal\n$start,s21_Cal_confirm\n
$******S21 Response+Isolation calibration******\n
$Do you want to calibrate the device?[Yes/no]\n
$end\n$yes\n$start,s21_response_isolation_cal_wait\n
$ waiting for the circuit to be stability...\n
$end\n$start,port_polarity\n
$Enter female,male or f_m to specify the polarity of the PORTS:\n
$end\n$female\n$start,cal_load\n
$Step 1:Please connect the LOAD module to PORT1 then send 'yes'.\n
$end\n$yes\n$start,cal_connect\n
$Step 2:Please connect PORT1 and PORT2 then send 'yes'.\n
$end\n$yes\n$start,cal_completed\n
$Calibration completed!\n
$end\nWhile the instrument is waiting for confirmation from the host, the user can enter 'exit\n' to leave calibration mode, as shown below:
$exit\n$start,exit\n
$Exit calibration\n
$end\n3.2.49 Frequency-List S12 Response and Isolation Calibration (Fourth-Generation KC901X)
Send command |
Option |
Description |
|---|---|---|
list_iso_response_s12_cal |
None |
Perform S12 response and isolation calibration using the frequency list. |
Description:
This command starts an interactive T+I calibration at the frequencies in the custom list, over the serial or Ethernet connection. When sweeping the frequency list with S12 response and isolation calibration selected, this calibration data is used by default. If the frequency range exceeds the calibrated range, system calibration is used instead. The procedure involves several exchanges. Host software only needs to identify packet header names; matching the message text is unnecessary.
$list_iso_response_s12_cal\n$start,s12_Cal_confirm\n
$******S12 Response+Isolation calibration******\n
$Do you want to calibrate the device?[Yes/no]\n
$end\n$yes\n$start,s12_response_isolation_cal_wait\n
$ waiting for the circuit to be stability...\n
$end\n$start,port_polarity\n
$Enter female,male or f_m to specify the polarity of the PORTS:\n
$end\n$female\n$start,cal_load\n
$Step 1:Please connect the LOAD module to PORT2 then send 'yes'.\n
$end\n$yes\n$start,cal_connect\n
$Step 2:Please connect PORT1 and PORT2 then send 'yes'.\n
$end\n$yes\n$start,cal_completed\n
$Calibration completed!\n
$end\nWhile the instrument is waiting for confirmation from the host, the user can enter 'exit\n' to leave calibration mode, as shown below:
$exit\n$start,exit\n
$Exit calibration\n
$end\n3.2.50 Frequency-List S21 Enhanced Response Calibration (Fourth-Generation KC901X)
Send command |
Option |
Description |
|---|---|---|
list_enresponse_s21_cal |
None |
Perform S21 enhanced response calibration using the frequency list. |
Description:
This command starts an interactive enhanced response calibration at the frequencies in the custom list, over the serial or Ethernet connection. When sweeping the frequency list with S21 enhanced response calibration selected, this calibration data is used by default. If the frequency range exceeds the calibrated range, system calibration is used instead. The procedure involves several exchanges. Host software only needs to identify packet header names; matching the message text is unnecessary.
$list_enresponse_s21_cal\n$start,s21_Cal_confirm\n
$******S21 Enhance Response calibration******\n
$Do you want to calibrate the device?[Yes/no]\n
$end\n$yes\n$start,s21_enhance_response_cal_wait\n
$ waiting for the circuit to be stability...\n
$end\n$start,port_polarity\n
$Enter female or male to specify the polarity of the PORT1:\n
$end\n$female\n$start,cal_open\n
$Step 1:Please connect the OPEN module to PORT1 then send 'yes'.\n
$end\n$yes\n$start,cal_short\n
$Step 2:Please connect the SHORT module to PORT1 then send 'yes'.\n
$end\n$yes\n$start,cal_load\n
$Step 3:Please connect the LOAD module to PORT1 then send 'yes'.\n
$end\n$yes\n$start,port_polarity\n
$Enter female,male or f_m to specify the polarity of the PORTS:\n
$end\n$female\n$start,cal_connect\n
$Step 4:Please connect PORT1 and PORT2 then send 'yes'.\n
$end\n$yes\n$start,cal_completed\n
$Calibration completed!\n
$end\nWhile the instrument is waiting for confirmation from the host, the user can enter 'exit\n' to leave calibration mode, as shown below:
$exit\n$start,exit\n
$Exit calibration\n
$end\n3.2.51 Frequency-List S12 Enhanced Response Calibration (Fourth-Generation KC901X)
Send command |
Option |
Description |
|---|---|---|
list_enresponse_s12_cal |
None |
Perform S12 enhanced response calibration using the frequency list. |
Description:
This command starts an interactive enhanced response calibration at the frequencies in the custom list, over the serial or Ethernet connection. When sweeping the frequency list with S12 enhanced response calibration selected, this calibration data is used by default. If the frequency range exceeds the calibrated range, system calibration is used instead. The procedure involves several exchanges. Host software only needs to identify packet header names; matching the message text is unnecessary.
$list_enresponse_s12_cal\n$start,s12_Cal_confirm\n
$******S12 Enhance Response calibration******\n
$Do you want to calibrate the device?[Yes/no]\n
$end\n$yes\n$start,s12_enhance_response_cal_wait\n
$ waiting for the circuit to be stability...\n
$end\n$start,port_polarity\n
$Enter female or male to specify the polarity of the PORT2:\n
$end\n$female\n$start,cal_open\n
$Step 1:Please connect the OPEN module to PORT2 then send 'yes'.\n
$end\n
$yes\n$start,cal_short\n
$Step 2:Please connect the SHORT module to PORT2 then send 'yes'.\n
$end\n$yes\n$start,cal_load\n
$Step 3:Please connect the LOAD module to PORT2 then send 'yes'.\n
$end\n$yes\n$start,port_polarity\n
$Enter female,male or f_m to specify the polarity of the PORTS:\n
$end\n$female\n$start,cal_connect\n
$Step 4:Please connect PORT1 and PORT2 then send 'yes'.\n
$end\n$yes\n$start,cal_completed\n
$Calibration completed!\n
$end\nWhile the instrument is waiting for confirmation from the host, the user can enter 'exit\n' to leave calibration mode, as shown below:
$exit\n$start,exit\n
$Exit calibration\n
$end\n3.2.52 Frequency-List Full Two-Port Calibration (Fourth-Generation KC901X)
Send command |
Option |
Description |
|---|---|---|
list_full2port_cal |
None |
Perform full two-port calibration using the frequency list. |
Description:
This command starts an interactive SOLT calibration at the frequencies in the custom list, over the serial or Ethernet connection. When sweeping the frequency list with full two-port calibration selected, this calibration data is used by default. If the frequency range exceeds the calibrated range, system calibration is used instead. The procedure involves several exchanges. Host software only needs to identify packet header names; matching the message text is unnecessary.
$list_full2port_cal\n$start,full2port_Cal_confirm\n
$******Full 2-Port calibration******\n
$Do you want to calibrate the device?[Yes/no]\n
$end\n$yes\n$start,full2port_cal_wait\n
$ waiting for the circuit to be stability...\n
$end\n$start,port_polarity\n
$Enter female or male to specify the polarity of the PORT1:\n
$end\n$female\n$start,cal_open\n
$Step 1:Please connect the OPEN module to PORT1 then send 'yes'.\n
$end\n$yes\n$start,cal_short\n
$Step 2:Please connect the SHORT module to PORT1 then send 'yes'.\n
$end\n$yes\n$start,cal_load\n
$Step 3:Please connect the LOAD module to PORT1 then send 'yes'.\n
$end\n$yes\n$start,port_polarity\n
$Enter female or male to specify the polarity of the PORT2:\n
$end\n$female\n$start,cal_open\n
$Step 4:Please connect the OPEN module to PORT2 then send 'yes'.\n
$end\n$yes\n$start,cal_short\n
$Step 5:Please connect the SHORT module to PORT2 then send 'yes'.\n
$end\n$yes\n$start,cal_load\n
$Step 6:Please connect the LOAD module to PORT2 then send 'yes'.\n
$end\n$yes\n$start,cal_connect\n
$Step 7:Please connect PORT1 and PORT2 then send 'yes'.\n
$end\n$yes\n
$start,cal_completed\n
$Calibration completed!\n
$end\n
While the instrument is waiting for confirmation from the host, the user can enter 'exit\n' to leave calibration mode, as shown below:
$exit\n$start,exit\n
$Exit calibration\n
$end\n3.2.53 S11 User Calibration (Third-Generation KC901X — Not Supported Remotely)
Third-generation KC901X instruments do not support user calibration in remote-control mode. The user calibration commands and interactive procedures previously listed here do not apply to remote operation and have been removed. This section number is retained for reference.
3.2.54 S21 User Calibration (Third-Generation KC901X — Not Supported Remotely)
Third-generation KC901X instruments do not support user calibration in remote-control mode. The user calibration commands and interactive procedures previously listed here do not apply to remote operation and have been removed. This section number is retained for reference.
3.2.55 S11 System Calibration (Third-Generation KC901X)
Send command |
Option |
Description |
|---|---|---|
cal_s11 |
None |
S11 system calibration |
Description:
This command starts an interactive SOL calibration over the serial or Ethernet connection. The resulting calibration data is used by default in subsequent operation. Use the [Reset] command to restore factory calibration as the default. The procedure involves several exchanges. Host software only needs to identify packet header names; matching the message text is unnecessary.
This calibration can be performed only once after each initialization. To recalibrate, run $S11,STOP\n and initialize again with $S11,INIT\n.
The complete procedure follows:
$cal_s11\n$start,s11cal_confirm\n
$******S11 calibration******\n ; Wait for the user to confirm calibration.
$ Do you want to calibrate the device?[Yes/no]\n
$end\n$yes\n$start,s11cal_wait\n ; Wait approximately 5 seconds for hardware warm-up. No data is returned during this time.
$ waiting for the circuit to be stability...\n
$end\n$start,s11cal_step\n ; Follow the steps below.
$ start calibration, please follow these steps:\n
$end\n$start,s11cal_short\n ; Connect the short standard.
$Step 1:Please connect the short module then send 'yes'.\n
$end\n$yes\n ; After confirmation, wait approximately 16 seconds for short calibration. No data is returned during this time.$start,s11cal_open\n ; Connect the open standard.
$Step 2:Please connect the open module then send 'yes'.\n
$end\n$yes\n ; After confirmation, wait approximately 16 seconds for open calibration. No data is returned during this time.$start,s11cal_load\n ; Connect the load standard.
$Step 3:Please connect the load module then send 'yes'.\n
$end\n$yes\n ; After confirmation, wait approximately 16 seconds for load calibration. No data is returned during this time.$start,s11cal_process\n ; Calculation in progress.
$Step 4: processing (Wait please).\n
$end\n$start,s11cal_save\n ; Saving.
$ saving(wait please) \n
$end\n$start,s11cal_completed\n ; Calibration complete.
$Calibration completed!\n
$end\nWhile the instrument is waiting for confirmation from the host, the user can enter 'exit\n' to leave calibration mode, as shown below:
$exit\n$start,s11cal_exit\n
$Exit calibration\n
$end\n3.2.56 S21 System Calibration (Third-Generation KC901X)
Send command |
Option |
Description |
|---|---|---|
cal_s21 |
None |
S21 system calibration |
Description:
This command starts an interactive through calibration over the serial or Ethernet connection. The resulting calibration data is used by default in subsequent operation. Use the [Reset] command to restore factory calibration as the default. The procedure involves several exchanges. Host software only needs to identify packet header names; matching the message text is unnecessary.
This calibration can be performed only once after each initialization. To recalibrate, run $S21,STOP\n and initialize again with $S21,INIT\n.
The complete procedure follows:
$cal_s21\n$start,s21cal_confirm\n
$******S21 calibration******\n ; Wait for the user to confirm calibration.
$ Do you want to calibrate the device?[Yes/no]\n
$end\n$yes\n$start,s21cal_wait\n ; Wait approximately 5 seconds for hardware warm-up. No data is returned during this time.
$ waiting for the circuit to be stability...\n
$end\n$start,s21cal_step\n ; Follow the steps below.
$ start calibration, please follow these steps::\n
$end\n$start,s21cal_connect\n ; Connect PORT1 directly to PORT2.
$Step 1: Please connect [SOURCE] port and [RF IN] port then send 'yes'.\n
$end\n$yes\n ; After confirmation, wait approximately 16 seconds for the calibration described as "short calibration" in the source. No data is returned during this time.$start,s21cal_process\n ; Calculation in progress.
$Step 3: processing (Wait please).\n
$end\n$start,s21cal_save\n ; Saving.
$ saving(wait please)\n
$end\n$start,s21cal_completed\n ; Calibration complete.
$Calibration completed!\n
$end\nWhile the instrument is waiting for confirmation from the host, the user can enter 'exit\n' to leave calibration mode, as shown below:
$exit\n$start,s21cal_exit\n
$Exit calibration.\n
$end\n3.2.57 Sweep Delay (Fourth-Generation KC901X)
Send command |
Option |
Parameter |
Description |
|---|---|---|---|
sweep_delay |
get set |
Time |
Add a sweep delay at each point (milliseconds). |
Description:
The set option sets the delay at each point for both normal and frequency-list sweeps. Range: 0-10000ms.
The get option takes no parameters and returns the current delay setting.
This setting applies only to host-controlled operation and is separate from the instrument's local sweep delay setting. It resets to 0 when remote-control mode is exited. With a nonzero sweep delay, Sxx and spectrum modes can parse host commands while sweeping. The delay does not affect calibration sweep speed. It also does not affect single-point sweeps or zero-span operation with identical start and stop frequencies.
Example:
$sweep_delay,set,1000\n
$start,sweep_delay,set,success\n
$end\n$sweep_delay,get\n
$start,sweep_delay,get,success\n
$1000\n
$end\n3.2.58 Kit File Commands (Fourth-Generation KC901X)
The following commands manage Kit files stored in fourth-generation 901X instruments. Commands start with $ and end with a newline \n; parameters are separated by commas. Kit file names must include the .kit suffix. The instrument can store up to 21 Kit files, including default.kit.
Send command |
Option |
Parameter |
Description |
|---|---|---|---|
kit_file_list |
- |
- |
Get all Kit file names stored in the instrument. |
kit_file_edit |
add delete rename |
File name |
Add, delete, or rename a Kit file. |
kit_file_select |
set get |
File name |
Set or query the Kit file used for host calibration. |
kit_file_param |
get set |
File name, calibration-kit parameters |
Read or modify calibration-kit parameters in the specified Kit file. |
kit_file_list gets all Kit file names stored in the instrument. File names are returned in the instrument's current list order.
$kit_file_list\n
$start,kit_file_list\n
default.kit\n
N_Kit_01.kit\n
N_Kit_02.kit\n
$end\nkit_file_edit adds, deletes, or renames Kit files. Adding a file copies the calibration-kit parameters from default.kit. The default.kit file cannot be deleted. The operation fails if the file already exists, the file count limit is reached, the file name is invalid, or the Flash save fails.
$kit_file_edit,add,N_Kit_01.kit\n
$start,kit_file_edit,add,success\n
$end\n$kit_file_edit,delete,N_Kit_01.kit\n
$start,kit_file_edit,delete,success\n
$end\n$kit_file_edit,rename,N_Kit_01.kit,N_Kit_02.kit\n
$start,kit_file_edit,rename,success\n
$end\nOn failure, the command returns fail for the corresponding option, for example:
$start,kit_file_edit,add,fail\n
$end\nkit_file_select sets or queries the Kit file used for host calibration. The selection is not written to Flash; after the instrument restarts, default.kit is selected by default. Set the required Kit file before running host calibration commands.
$kit_file_select,set,N_Kit_01.kit\n
$start,kit_file_select,set,success\n
$N_Kit_01.kit\n
$end\n$kit_file_select,get\n
$start,kit_file_select,get,success\n
$N_Kit_01.kit\n
$end\nIf the selected file does not exist, the instrument returns:
$start,kit_file_select,set,error\n
$end\nkit_file_param reads or modifies calibration-kit parameters in the specified Kit file. The parameter order is fixed:
L0,L1,L2,L3,ShortLen,ShortLoss,C0,C1,C2,C3,OpenLen,OpenLoss,ThruLen,ThruLoss,LossFreq
Parameter |
Description |
Unit |
|---|---|---|
L0 | Short standard L0 |
|
L1 | Short standard L1 |
|
L2 | Short standard L2 |
|
L3 | Short standard L3 |
|
ShortLen | Short standard length | mm |
ShortLoss | Short standard loss | GΩ/s |
C0 | Open standard C0 |
|
C1 | Open standard C1 |
|
C2 | Open standard C2 |
|
C3 | Open standard C3 |
|
OpenLen | Open standard length | mm |
OpenLoss | Open standard loss | GΩ/s |
ThruLen | Thru standard length | mm |
ThruLoss | Thru standard loss | dB |
LossFreq | Thru loss reference frequency | MHz |
$kit_file_param,get,N_Kit_01.kit\n
$start,kit_file_param,get,success\n
$<L0>,<L1>,<L2>,<L3>,<ShortLen>,<ShortLoss>,<C0>,<C1>,<C2>,<C3>,<OpenLen>,<OpenLoss>,<ThruLen>,<ThruLoss>,<LossFreq>\n
$end\n$kit_file_param,set,N_Kit_01.kit,0,0,0,0,0,0,0,0,0,0,0,0,0,0,1000\n
$start,kit_file_param,set,success\n
$end\nIf the command, option, or parameters cannot be parsed, the instrument may return error frames such as err_cmd, err_opt, err_par1, and err_par2. Example:
$start,err_cmd\n
$error:Command input error!\n
$end\n3.3 Measurement Control Commands
3.3.1 S11 Measurements (Fourth-Generation KC901X)
Related settings:
3.2.5 Output Attenuation; 3.2.9 Cable Compensation
Command |
Option |
Parameter 1 |
Parameter 2 |
Parameter 3 |
Parameter 4 |
Parameter 5 |
Parameter 6 |
|---|---|---|---|---|---|---|---|
|
S11 |
init |
s11cal full2portcal syscal calOff |
ri ma vswr z loss |
** |
cs ss |
** |
** |
run | |||||||
stop |
Description:
Options:
init -> Initialize S11. Required before using S11.
run -> Run an S11 frequency sweep and acquire data.
stop -> Stop and close S11. Required before switching to another operating mode.
Parameter 1:
s11cal -> Enable S11 calibration.
full2portcal -> Enable full two-port calibration.
syscal -> Enable system calibration.
caloff -> Disable system calibration.
Parameter 2:
ri -> Return real and imaginary components.
ma -> Return reflection coefficient magnitude and phase angle.
vswr -> Return voltage standing wave ratio.
z -> Return impedance.
loss -> Return return loss (logarithmic value).
Parameter 3 sets the number of sweep points. Fourth-generation KC901 instruments support up to 10000 points. To sweep more than 10000 points, use multiple S11 commands to sweep separate segments.
A single measurement point is allowed. In this case, measurement continues and the instrument continuously sends results at that frequency to the host.
Parameter 4:
cs -> Specify the sweep range using cent and span.
ss -> Specify the sweep range using start and stop.
If parameter 3 specifies a single frequency point, parameter 4 can be cs or ss. Only parameter 5 is required (cent or start); parameter 6 would be parsed as a new command by the KC901.
Parameters 5 and 6 specify center frequency and span (cs), or start and stop frequencies (ss), in Hz. Use the format selected by parameter 4.
The available frequency range depends on the instrument and is the same as the range available during local operation. Examples follow:
Center frequency range | |
|---|---|
KC901J |
9500Hz-3000000000Hz(3GHz–500Hz) |
KC901R |
5500Hz-9799999500Hz(9.8GHz–500Hz) |
KC901K |
9500Hz-6000000000Hz(6GHz – 500Hz) |
Span range | |
KC901J |
1000Hz-3000000000Hz(3GHz–9KHz) |
KC901R |
1000Hz-9799995000Hz(9.8GHz–5KHz) |
KC901K |
1000Hz-6000000000Hz(6GHz–9KHz) |
Start frequency range | |
KC901J |
9000Hz-3000000000Hz(3GHz–1KHz) |
KC901R |
5000Hz-9799999000Hz(9.8GHz–1KHz) |
KC901K |
9000Hz-6000000000Hz(6GHz-1KHz) |
Stop frequency range | |
KC901J |
10000Hz-3000000000Hz(3GHz) |
KC901R |
6000Hz-9800000000Hz(9.8GHz) |
KC901K |
10000Hz-6000000000Hz(6GHz) |
7. Example:
When the number of sweep points is greater than 1:
$s11,run,caloff,ri,2,cs,100000000,50000000\n$start,s11,ri\n
75000000,-4.1824e-01,-2.1633e-01\n ; Frequency, real component, imaginary component.
125000000,-1.1707e,3.3581e-01\n
$end\n$s11,run,caloff,ma,2,cs,100000000,50000000\n
$start,s11,ma\n
75000000,5.8471e-01,-26.4973\n ; Frequency, reflection coefficient magnitude, phase.
125000000,5.9342e-01,-51.8204\n
$end\n$s11,run,caloff,vswr,2,cs,100000000,50000000\n
$start,s11,vswr\n
75000000,1.4256\n ; Frequency, voltage standing wave ratio.
125000000,1.1521\n
$end\n$s11,run,caloff,z,2,cs,100000000,50000000\n
$start,s11,z\n; Frequency, impedance magnitude, resistance, reactance.
75000000,137.9871,109.6309,-83.7945\n
125000000,91.2070,52.7077,-74.4354\n
$end\n$s11,run,caloff,loss,2,cs,100000000,50000000\n
$start,s11,loss\n
75000000,-0.4092\n; Frequency, return loss.
125000000,-0.5743\n
$endWhen the number of sweep points is 1:
S11 performs repeated acquisition, with each acquisition returned in a separate packet, as shown below:
$s11,run,caloff,loss,1,cs,100000000\n$start,s11,loss\n
100000000,-8.9216\n
$end\n
$start,s11,loss\n
100000000,-25.9223\n
$end\n
$start,s11,loss\n
100000000,-25.7827\n
$end\n
$start,s11,loss\n
100000000,-25.6808\n
$end\n3.3.2 S21 Measurements (Fourth-Generation KC901X)
Related setting: 3.2.5 Output Attenuation.
Command |
Option |
Parameter 1 |
Parameter 2 |
Parameter 3 |
Parameter 4 |
Parameter 5 |
Parameter 6 |
Parameter 7 |
|---|---|---|---|---|---|---|---|---|
|
S21 |
init |
rescal resisocal enrescal full2portcal syscal caloff |
ri ma vswr series_z loss parallel_z |
lowlo highlo |
** |
cs ss |
** ** |
** ** |
run | ||||||||
stop |
Description:
1. Options:
init -> Initialize S21. Required before using S21.
run -> Run an S21 frequency sweep and acquire data.
stop -> Stop and close S21. Required before switching to another operating mode.
2. Parameter 1:
rescal -> Enable response calibration.
resisocal -> Enable response and isolation calibration.
enrescal -> Enable enhanced response calibration.
full2portcal -> Enable full two-port calibration.
syscal -> Enable system calibration.
caloff -> Disable system calibration.
3. Parameter 2:
ri -> Return real and imaginary components.
ma -> Return insertion loss and phase.
vswr -> Return voltage standing wave ratio.
series_z -> Return z, r, x for series impedance.
loss -> Return insertion loss (logarithmic value).
parallel_z -> Return z, r, x for parallel impedance.
4. Parameter 3:
lowlo -> Sweep using the low local-oscillator setting.
highlo -> Sweep using the high local-oscillator setting.
5. Parameter 4 sets the number of sweep points. Fourth-generation KC901 instruments support up to 10000 points. For more points, use multiple commands to sweep separate segments. With 1 point selected, the instrument operates continuously.
6. Parameter 5:
cs -> Specify the sweep range using cent and span.
ss -> Specify the sweep range using start and stop.
If parameter 4 specifies a single frequency point, parameter 5 can be cs or ss. Only parameter 6 is required (cent or start); parameter 7 would be parsed as a new command by the KC901.
Parameters 6 and 7 specify frequencies in Hz. Use the format selected by parameter 5.
The available frequency range depends on the instrument. Examples follow:
Center frequency range | |
|---|---|
KC901J |
9500Hz-2099999500Hz(2.1GHz–500Hz) |
KC901R |
5500Hz-6999999500Hz(7GHz–500Hz) |
KC901K |
9500Hz-4099999500Hz(4.1GHz – 500Hz) |
Span range | |
KC901J |
1000Hz-2099991000Hz(2.1GHz–9KHz) |
KC901R |
1000Hz-6999995000Hz(7GHz–5KHz) |
KC901K |
1000Hz-4099995000Hz(4.1GHz–9KHz) |
Start frequency range | |
KC901J |
9000Hz-2099999000Hz(2.1GHz–1KHz) |
KC901R |
5000Hz-6999999000Hz(7GHz–1KHz) |
KC901S+ |
9000Hz-4099999000Hz(4.1GHz-1KHz) |
Stop frequency range | |
KC901J |
10000Hz-2100000000Hz(2.1GHz) |
KC901R |
6000Hz-7000000000Hz(7GHz) |
KC901K |
10000Hz-4100000000Hz(4.1GHz) |
The stop frequency must be greater than the start frequency.
If parameter 4 specifies a single frequency point, parameter 6 specifies that frequency and parameter 7 must be omitted.
8. Example:
When the number of acquisition points is greater than 1:
$s21,run,caloff,ri,lowlo,3,cs,100000000,50000000\n$start,s21,ri\n
75000000,-0.4422e+00,5.2833e+00\n ; Frequency, real component, imaginary component.
100000000,4.2138e-01,5.4467e+00\n
125000000,2.3253e+00,4.8666e+00\n
$end\n
$s21,run,caloff,ma,lowlo,3,cs,100000000,50000000\n
$start,s21,ma\n
75000000,5.4076e+00,105.4079\n; Frequency, insertion loss, phase.
100000000,5.4019e+00,85.9847\n
125000000,5.3388+00,64.8484\n
$end\n$s21,run,caloff,vswr,lowlo,3,cs,100000000,50000000\n
$start,s21,vswr
75000000,-1.4390\n ; Frequency, voltage standing wave ratio.
100000000,-1.4436\n
125000000,-1.4466\n
$end$s21,run,caloff, series_z,lowlo,3,cs,100000000,50000000\n
$start,s21, series_z ; Frequency, impedance magnitude, resistance, reactance.
75000000,105.6595,-104.1509,-17.7909\n
100000000,99.5815,-97.9082,-18.1789\n
125000000,92.8389,-91.3671,-16.4656\n
$end$s21,run,caloff,parallel_z,lowlo,3,cs,100000000,50000000\n
$start,s21,parallel_z
75000000,23.5739,-23.2365,3.9740\n ; Frequency, impedance magnitude, resistance, reactance.
100000000,25.0008,-24.5743,4.5981\n
125000000,26.8217,-26.3855,4.8173\n
$end$s21,run,caloff,loss,lowlo,3,cs,100000000,50000000\n
$start,s21,loss
75000000,-116.1302 ; Frequency, return loss (as labeled in the source).
100000000,-102.0541
125000000,-112.2253
$endWhen the number of sweep points is 1:
S21 performs repeated acquisition, with each acquisition returned in a separate packet, as shown below:
$s21,run,caloff,loss,lowlo,1,cs,100000000\n$start,s21,loss\n
100000000,-65.9755\n
$end\n
$start,s21,loss\n
100000000,-65.8623\n
$end\n
$start,s21,loss\n
100000000,-64.4023\n
$end\n
$start,s21,loss\n
100000000,-64.8623\n
$end\n3.3.3 S22 Measurements (Fourth-Generation KC901X)
Related settings:
3.2.5 Output Attenuation; 3.2.9 Cable Compensation
Command |
Option |
Parameter 1 |
Parameter 2 |
Parameter 3 |
Parameter 4 |
Parameter 5 |
Parameter 6 |
|---|---|---|---|---|---|---|---|
|
S22 |
init |
s22cal full2portcal syscal calOff |
ri ma vswr z loss |
** |
cs ss |
** |
** |
run | |||||||
stop |
Description:
1. Options:
init -> Initialize S22. Required before using S22.
run -> Run an S22 frequency sweep and acquire data.
stop -> Stop and close S22. Required before switching to another operating mode.
2. Parameter 1:
s22cal -> Enable S22 calibration.
full2portcal -> Enable full two-port calibration.
syscal -> Enable system calibration.
caloff -> Disable system calibration.
3. Parameter 2:
ri -> Return real and imaginary components.
ma -> Return reflection coefficient magnitude and phase angle.
vswr -> Return voltage standing wave ratio.
z -> Return impedance.
loss -> Return return loss (logarithmic value).
4. Parameter 3 sets the number of sweep points. Fourth-generation KC901 instruments support up to 10000 points. To sweep more than 10000 points, use multiple S22 commands to sweep separate segments.
A single measurement point is allowed. In this case, measurement continues and the instrument continuously sends results at that frequency to the host.
5. Parameter 4:
cs -> Specify the sweep range using cent and span.
ss -> Specify the sweep range using start and stop.
If parameter 3 specifies a single frequency point, parameter 4 can be cs or ss. Only parameter 5 is required (cent or start); parameter 6 would be parsed as a new command by the KC901.
6. Parameters 5 and 6 specify center frequency and span (cs), or start and stop frequencies (ss), in Hz. Use the format selected by parameter 4.
The available frequency range depends on the instrument and is the same as the range available during local operation. Examples follow:
Center frequency range | |
|---|---|
KC901J |
9500Hz-2099999500Hz(2.1GHz–500Hz) |
KC901R |
5500Hz-6999999500Hz(7GHz–500Hz) |
KC901K |
9500Hz-4099999500Hz(4.1GHz – 500Hz) |
Span range | |
KC901J |
1000Hz-2099991000Hz(2.1GHz–9KHz) |
KC901R |
1000Hz-6999995000Hz(7GHz–5KHz) |
KC901K |
1000Hz-4099995000Hz(4.1GHz–9KHz) |
Start frequency range | |
KC901J |
9000Hz-2099999000Hz(2.1GHz–1KHz) |
KC901R |
5000Hz-6999999000Hz(7GHz–1KHz) |
KC901K |
9000Hz-4099999000Hz(4.1GHz-1KHz) |
Stop frequency range | |
KC901J |
10000Hz-2100000000Hz(2.1GHz) |
KC901R |
6000Hz-7000000000Hz(7GHz) |
KC901K |
10000Hz-4100000000Hz(4.1GHz) |
7. Example:
When the number of sweep points is greater than 1:
$s22,run,caloff,ri,2,cs,100000000,50000000\n$start,s22,ri\n
75000000,1.9968e-02,5.2407e-02\n; Frequency, real component, imaginary component.
125000000,-8.8592e-02,-1.7481e-01\n
$end\n$s22,run,caloff,ma,2,cs,100000000,50000000\n$start,s22,ma\n
75000000,5.5915e-02,68.3687\n ; Frequency, reflection coefficient magnitude, phase.
125000000,1.9602e-01,-117.2308\n
$end\n$s22,run,caloff,vswr,2,cs,100000000,50000000\n$start,s22,vswr\n
75000000,1.2245\n ; Frequency, voltage standing wave ratio.
125000000,1.5057\n
$end\n$s22,run,caloff,z,2,cs,100000000,50000000\n$start,s22,z\n ; Frequency, impedance magnitude, resistance, reactance.
75000000,36.0890,-35.0582,8.5663\n
125000000,41.0682,-38.7431,13.6234\n
$end\n$s22,run,caloff,loss,2,cs,100000000,50000000\n$start,s22,loss\n
75000000,13.9153\n; Frequency, return loss.
125000000,14.1164\n
$end\nWhen the number of sweep points is 1:
S22 performs repeated acquisition, with each acquisition returned in a separate packet, as shown below:
$s22,run,caloff,loss,1,cs,100000000\n$start,s22,loss\n
100000000,15.1188\n
$end\n
$start,s22,loss\n
100000000,15.1184\n
$end\n
$start,s22,loss\n
100000000,15.1167\n
$end\n
$start,s22,loss\n
100000000,15.1137\n
$end\n3.3.4 S12 Measurements (Fourth-Generation KC901X)
Related setting: 3.2.5 Output Attenuation.
Command |
Option |
Parameter 1 |
Parameter 2 |
Parameter 3 |
Parameter 4 |
Parameter 5 |
Parameter 6 |
Parameter 7 |
|---|---|---|---|---|---|---|---|---|
|
S12 |
init |
rescal resisocal enrescal full2portcal syscal caloff |
ri ma vswr series_z loss parallel_z |
lowlo highlo |
** |
cs ss |
** ** |
** ** |
run | ||||||||
stop |
Description:
1. Options:
init -> Initialize S12. Required before using S12.
run -> Run an S12 frequency sweep and acquire data.
stop -> Stop and close S12. Required before switching to another operating mode.
2. Parameter 1:
rescal -> Enable response calibration.
resisocal -> Enable response and isolation calibration.
enrescal -> Enable enhanced response calibration.
full2portcal -> Enable full two-port calibration.
syscal -> Enable system calibration.
caloff -> Disable system calibration.
3. Parameter 2:
ri -> Return real and imaginary components.
ma -> Return insertion loss and phase.
vswr -> Return voltage standing wave ratio.
series_z -> Return z, r, x for series impedance.
loss -> Return insertion loss (logarithmic value).
parallel_z -> Return z, r, x for parallel impedance.
4. Parameter 3:
lowlo -> Sweep using the low local-oscillator setting.
highlo -> Sweep using the high local-oscillator setting.
5. Parameter 4 sets the number of sweep points. Fourth-generation KC901 instruments support up to 10000 points; third-generation instruments support up to 1001 points. For more points, use multiple commands to sweep separate segments. With 1 point selected, the instrument operates continuously.
6. Parameter 5:
cs -> Specify the sweep range using cent and span.
ss -> Specify the sweep range using start and stop.
If parameter 4 specifies a single frequency point, parameter 5 can be cs or ss. Only parameter 6 is required (cent or start); parameter 7 would be parsed as a new command by the KC901.
7. Parameters 6 and 7 specify frequencies in Hz. Use the format selected by parameter 5.
The available frequency range depends on the instrument. Examples follow:
Center frequency range | |
|---|---|
KC901J |
9500Hz-2099999500Hz(2.1GHz–500Hz) |
KC901R |
5500Hz-6999999500Hz(7GHz–500Hz) |
KC901K |
9500Hz-4099999500Hz(4.1GHz – 500Hz) |
Span range | |
KC901J |
1000Hz-2099991000Hz(2.1GHz–9KHz) |
KC901R |
1000Hz-6999995000Hz(7GHz–5KHz) |
KC901K |
1000Hz-4099995000Hz(4.1GHz–9KHz) |
Start frequency range | |
KC901J |
9000Hz-2099999000Hz(2.1GHz–1KHz) |
KC901R |
5000Hz-6999999000Hz(7GHz–1KHz) |
KC901S+ |
9000Hz-4099999000Hz(4.1GHz-1KHz) |
Stop frequency range | |
KC901J |
10000Hz-2100000000Hz(2.1GHz) |
KC901R |
6000Hz-7000000000Hz(7GHz) |
KC901K |
10000Hz-4100000000Hz(4.1GHz) |
8. Example:
When the number of acquisition points is greater than 1:
$s12,run,caloff,ri,lowlo,3,cs,100000000,50000000\n$start,s12,ri\n
75000000,0.0004,0.0000\n ; Frequency, real component, imaginary component.
125000000,0.0006,-0.0000\n
$end\n$s12,run,caloff,ma,lowlo,3,cs,100000000,50000000\n$start,s12,ma\n
75000000,5.5840e+00,-80.8776\n ; Frequency, insertion loss, phase.
100000000,5.5576e+00,-99.7933\n
125000000,5.5032e+00,-120.9049\n
$end\n$s12,run,caloff,vswr,lowlo,3,cs,100000000,50000000\n
$start,s12,vswr\n
75000000,-1.4405\n ; Frequency, voltage standing wave ratio.
100000000,-1.4453\n
125000000,-1.4500\n
$end\n$s12,run,caloff,series_z,lowlo,3,cs,100000000,50000000\n
$start,s12,series_z\n
75000000,25.3365,-24.9261,-4.5422\n ; Frequency, impedance magnitude, resistance, reactance.
100000000,23.9044,-23.5575,-4.0576\n
125000000,22.6288,-22.4014,-3.2002\n
$end$s12,run,caloff,parallel_z,lowlo,3,cs,100000000,50000000\n
$start,s12,parallel_z\n
75000000,98.6349,-97.0458,17.6337\n ; Frequency, impedance magnitude, resistance, reactance.
100000000,104.4429,-102.9287,17.7202\n
125000000,110.3190,-109.2061,15.6306\n
$end$s12,run,caloff,loss ,lowlo,3,cs,100000000,50000000\n
$start,s12,loss\n
75000000,-66.7922\n ; Frequency, return loss (as labeled in the source).
125000000,-71.9411\n
$endWhen the number of sweep points is 1:
S12 performs repeated acquisition, with each acquisition returned in a separate packet, as shown below:
$s12,run,caloff,loss,lowlo,1,cs,100000000\n$start,s12,loss\n
100000000,-62.0834\n
$end\n
$start,s12,loss\n
100000000,-57.5564\n
$end\n
$start,s12,loss\n
100000000,-56.5024\n
$end\n
$start,s12,loss\n
100000000,-56.5070\n
$end\n3.3.5 Spectrum Measurements (Fourth-Generation KC901X)
Related setting: 3.2.18 Spectrum Reference Level.
Command |
Option |
Parameter 1 |
Parameter 2 |
Parameter 3 |
Parameter 4 |
Parameter 5 |
Parameter 6 |
Parameter 7 |
|---|---|---|---|---|---|---|---|---|
|
spec |
init |
calon caloff |
lowlo highlo |
** |
cs ss |
** |
** |
port1 port2 |
run | ||||||||
stop |
Description:
1. Options:
init -> Initialize SPEC. Required before using SPEC.
run -> Run a SPEC frequency sweep and acquire data.
stop -> Stop and close SPEC. Required before switching to another operating mode.
2. Parameter 1:
calon -> Enable system calibration.
caloff -> Disable system calibration.
3. Parameter 2:
lowlo -> Sweep using the low local-oscillator setting.
highlo -> Sweep using the high local-oscillator setting.
Parameter 3 sets the number of sweep points. Fourth-generation KC901 instruments support up to 10000 points. For more points, use this command multiple times. To measure a single frequency, set the point count to 1. Unlike field strength mode, this mode allows a reference level to be specified. Specifying a reference level is recommended when measuring relative values accurately.
5. Parameter 4:
cs -> Specify the sweep range using Cent and Span.
ss -> Specify the sweep range using Start and Stop.
If parameter 3 specifies a single frequency point, set parameter 4 to CS.
Parameters 5 and 6 specify center frequency and span, in Hz.
The available frequency range depends on the instrument. Examples follow:
Center frequency range | |
|---|---|
KC901J |
9500Hz-2099999500Hz(2.1GHz–500Hz) |
KC901R |
5500Hz-6999999500Hz(7GHz–500Hz) |
KC901K |
9500Hz-4099999500Hz(4.1GHz – 500Hz) |
Span range | |
KC901J |
1000Hz-2099991000Hz(2.1GHz–9KHz) |
KC901R |
1000Hz-6999995000Hz(7GHz–5KHz) |
KC901K |
1000Hz-4099995000Hz(4.1GHz–9KHz) |
Start frequency range | |
KC901J |
9000Hz-2099999000Hz(2.1GHz–1KHz) |
KC901R |
5000Hz-6999999000Hz(7GHz–1KHz) |
KC901S+ |
9000Hz-4099999000Hz(4.1GHz-1KHz) |
Stop frequency range | |
KC901J |
10000Hz-2100000000Hz(2.1GHz) |
KC901R |
6000Hz-7000000000Hz(7GHz) |
KC901K |
10000Hz-4100000000Hz(4.1GHz) |
The stop frequency must be greater than the start frequency.
If parameter 3 specifies a single frequency point, parameter 4 can be cs or ss. Only parameter 5 is required (cent or start); parameter 6 would be parsed as a new command by the KC901.
7. Parameter 7:
Port1 -> Select input port 1 (PORT1).
Port2 -> Select input port 2 (PORT2).
8. Example:
When the number of acquisition points is greater than 1:
$spec,run,calon,lowlo,3,cs,100000000,50000000,port1\n$start,spec\n
75000000,-110.573\n
100000000,-120.126\n
125000000,-113.269\n
$end\nWhen the number of sweep points is 1:
SPEC performs repeated acquisition, with each acquisition returned in a separate packet, as shown below:
$spec,run,caloff,lowlo,1,cs,100000000,port1\n$start,spec\n
100000000,-95.400\n
$end\n
$start,spec\n
100000000,-96.240\n
$end\n
$start,spec\n
100000000,-98.451\n
$end\n
$start,spec\n
100000000,-89.539\n
$end\n3.3.6 Field Strength Measurements (Fourth-Generation KC901X)
Related setting: Output Attenuation. The source cites 3.2.4; the corresponding section in this edition is 3.2.5.
Command |
Option |
Parameter 1 |
Parameter 3 |
Parameter 4 |
Parameter 5 |
Parameter 6 |
|---|---|---|---|---|---|---|
|
field |
init |
lowlo highlo |
** |
** |
port1 port2 |
single continue |
run | ||||||
stop |
Description:
1. Options:
init -> Initialize FIELD. Required before using FIELD.
run -> Run FIELD and acquire measurement data.
stop -> Stop and close FIELD. Required before switching to another operating mode.
2. Parameter 1:
lowlo -> Measure using the low local-oscillator setting.
highlo -> Measure using the high local-oscillator setting.
3. Parameter 3: Antenna gain, in dBi.
Antenna gain range: -100.00 to +100.00dBi.
4. Parameter 4: Single-point measurement frequency in Hz, with resolution down to 0.1Hz.
The available frequency range depends on the instrument, as shown in the following table:
Frequency range | |
|---|---|
KC901R |
0-7000000000Hz(7GHz) |
KC901K |
0-4100000000Hz(4.1GHz) |
KC901J |
0-2100000000Hz(2.1GHz) |
5. Parameter 5:
port1 -> Select input port 1 (PORT1).
port2 -> Select input port 2 (PORT2).
6. Parameter 6:
single -> Single acquisition.
continue -> Repeated acquisition.
7. Example:
With parameter 6 set to single, field strength is acquired once and only one packet is received, for example:
$field,run,lowlo,10,100000000,port1,single\n$start,field\n
100000000,28.792,-78.438 \n ; Frequency, field strength, absolute level (dBm).
$end\nWith parameter 6 set to continue, field strength is acquired repeatedly and data is received continuously, for example:
$field,run,lowlo,10,100000000,port1, continue\n$start,field\n
100000000,22.297,-84.933\n ; Frequency, field strength, absolute level (dBm).
$end\n
$start,field\n
100000000,21.680,-85.550\n
$end\n
$start,field\n
100000000,30.598,-76.632\n
$end\n
$start,field\n
100000000,30.598,-76.632\n
$end\n3.3.7 RF Signal Source Output (Fourth-Generation KC901X)
Command |
Option |
Parameter 1 |
Parameter 2 |
Parameter 3 |
Parameter 4 |
Parameter 5 |
Parameter 6 |
|---|---|---|---|---|---|---|---|
|
rfSource |
init |
off ask fm |
port1 port2 |
** |
** |
** |
** |
run | |||||||
stop |
Description:
1. Options:
init -> Initialize RfSource. Required before using RfSource.
run -> Run RfSource and output the signal.
stop -> Stop and close RfSource. Required before switching to another operating mode.
2. Parameter 1:
off -> Disable modulation; parameters 4 and 5 need not be entered. [Source note: the parameter numbers are retained from the source; check the command table for this instrument generation.]
ask -> Enable ASK modulation.
fm -> Use FM modulation.
3. Parameter 2:
port1 -> Select output port 1 (PORT 1).
port2 -> Select output port 2 (PORT 2).
3. Parameter 3:
The available carrier frequency range depends on the instrument, as shown in the following table:
Carrier frequency range | |
|---|---|
KC901R |
0-7000000000Hz(7GHz) |
KC901K |
0-4100000000Hz(4.1GHz) |
KC901J |
0-2100000000Hz(2.1GHz) |
When switched to audio output, the frequency range is 0-60000000Hz (60MHz).
4. Parameter 4:
Carrier output amplitude in dBm, with 1dB resolution.
The available output amplitude depends on frequency.
If the requested amplitude exceeds the available maximum, the instrument returns a warning and outputs the maximum amplitude.
$start,warn_gtr\n ; Requested value exceeds the maximum.
$warn:It is greater than the maximum output!\n
$end\nThe source states that if the requested amplitude is below the available maximum, the instrument returns a warning and outputs the minimum. [Source note: "maximum" appears inconsistent with this lower-limit description; it has not been silently changed to "minimum".]
$start,warn_lt\n ; The source comment says "requested value exceeds the maximum"; this conflicts with the lower-limit warning name.
$warn:It is less than the minimum output!\n
$end\nFor output port "port2", the approximate range is +10 to -30dBm.
For output port "port1" with RF board version "1.0.5" or later, the range is +10 to -60dBm. Otherwise, it remains +10 to -30dBm.
5. Parameter 5:
Modulation frequency in Hz. Range: 0-3000Hz.
6. Parameter 6:
For ASK, the modulation depth has the following fixed values: 0, 5, 10, 15, 20, 30, 35, 40, 45, 50, 55, 60, 65, 70, 75, 80, 85, 90.
For FM, the adjustable modulation depth varies with frequency, as shown below:
0-60M (excluding 60M) |
0 - 10MHz |
|---|---|
60M-106.25M (excluding 106.25M) |
0 – 312.5kHz |
106.25M-212.5M (excluding 212.5M) |
0 – 625kHz |
212.5M-425M (excluding 425M) |
0 – 1.25MHz |
425M-850M (excluding 850M) |
0 – 2.5MHz |
850M-1700M (excluding 1700M) |
0 – 5MHz |
1700M-3400M (excluding 3400M) |
0 – 10MHz |
>3400M |
0 – 20MHz |
7. Example:
Configure the RF signal source with modulation enabled, a 1GHz carrier, no output attenuation, a 1KHz modulation frequency, and 90% modulation depth.
Step 1: Initialize RfSource:
$rfsource,init\nStep 2: Start operation and apply the settings:
$rfsource,run,ask,port1,1000000000,0,1000,90\nStep 3: Stop the RF signal source before using another function:
$rfsource,stop\n8. Behavior:
(1) Init immediately initializes the circuits associated with the RF signal source.
(2) STOP shuts down the circuits associated with the RF signal source.
(3) RUN starts output using the specified settings.
(4) While the source is outputting, other commands that do not explicitly require the source to stop leave the output running.
3.3.8 Audio Signal Source Output (Fourth-Generation KC901X)
Command |
Option |
Parameter 1 |
Parameter 2 |
Parameter 3 |
Parameter 4 |
Parameter 5 |
Parameter 6 |
|---|---|---|---|---|---|---|---|
|
afsource |
init |
off ask fm |
afout |
** |
** |
** |
** |
run | |||||||
stop |
Description:
1. Options:
init -> Initialize AfSource. Required before using AfSource.
run -> Run AfSource and output audio.
stop -> Stop and close AfSource. Required before switching to another operating mode.
2. Parameter 1:
off -> Disable modulation; parameters 4 and 5 need not be entered. [Source note: the parameter numbers are retained from the source; check the command table for this instrument generation.]
ask -> ASK modulation.
fm -> FM modulation.
3. Parameter 2:
afout -> Select audio output (AF OUT).
3. Parameter 3:
Carrier frequency in Hz. Range: 0-2000000000Hz.
4. Parameter 4:
For output port "afout", amplitude is specified in mV peak-to-peak (VPP). Range: 0-3000mV.
The available output amplitude depends on frequency.
If the requested amplitude exceeds the available maximum, the instrument returns a warning and outputs the maximum amplitude.
$start,warn_gtr\n ; Requested value exceeds the maximum.
$warn:It is greater than the maximum output!\n
$end\nThe source states that if the requested amplitude is below the available maximum, the instrument returns a warning and outputs the minimum. [Source note: "maximum" appears inconsistent with this lower-limit description; it has not been silently changed to "minimum".]
$start,warn_lt\n ; The source comment says "requested value exceeds the maximum"; this conflicts with the lower-limit warning name.
$warn:It is less than the minimum output!\n
$end\n5. Parameter 5:
Modulation frequency in Hz.
For ASK, the range is 0-3000Hz.
For FM and PM, the range is 16-10000Hz.
6. Parameter 6:
Modulation depth / frequency deviation
For ASK, modulation depth ranges from 0 to 100%.
For FM, frequency deviation ranges from 0 to 1MHz.
7. Example:
Configure the audio signal source for ASK modulation, a 10MHz carrier, 1.3V peak-to-peak (VPP) output, a 1KHz modulation frequency, and 100% modulation depth.
Step 1: Initialize AfSource:
$afsource,init\nStep 2: Start operation and apply the settings:
$afsource,run,ask,afout,10000000,1300,1000,100\nStep 3: Exit this mode before using another function.
$afsource,stop\n8. Behavior:
(1) Init immediately initializes the circuits associated with the audio signal source.
(2) STOP immediately shuts down the circuits associated with the audio signal source.
(3) RUN starts output using the specified settings.
(4) While the source is outputting, other commands that do not explicitly require the source to stop leave the output running.
3.3.9 Frequency-List S11 Measurements (Fourth-Generation KC901X)
Related settings:
3.2.5 Output Attenuation; 3.2.9 Cable Compensation
Command |
Option |
Parameter 1 |
Parameter 2 |
|---|---|---|---|
|
sweep_list_s11 |
init |
s11cal full2portcal syscal calOff |
ri ma vswr z loss |
run | |||
stop |
Description:
Options:
init -> Initialize S11. Required before using S11.
run -> Run an S11 frequency sweep and acquire data.
stop -> Stop and close S11. Required before switching to another operating mode.
Parameter 1:
s11cal -> Enable S11 calibration.
full2portcal -> Enable full two-port calibration.
syscal -> Enable system calibration.
caloff -> Disable system calibration.
Parameter 2:
ri -> Return real and imaginary components.
ma -> Return reflection coefficient magnitude and phase angle.
vswr -> Return voltage standing wave ratio.
z -> Return impedance.
loss -> Return return loss (logarithmic value).
Example:
$sweep_list_s11,run,caloff,ri\n
$start,s11,ri\n
100000000,3.0392e+00,-4.0155e+00\n ; Frequency, real component, imaginary component.
200000000,-1.1988e+00,-5.3318e+00\n
40000000,1.5519e+00,-1.8471e+00\n
$end\n$sweep_list_s11,run,caloff,ma\n
$start,s11,ma\n
100000000,5.0388e+00,-52.8689\n ; Frequency, reflection coefficient magnitude, phase.
200000000,5.4693e+00,-102.6998\n
40000000,4.3237e+00,65.2164\n
$end\n$sweep_list_s11,run,caloff,vswr\n
$start,s11,vswr\n
100000000,-1.4951\n ; Frequency, voltage standing wave ratio.
200000000,-1.4478\n
40000000,-2.2818\n
$end\n$sweep_list_s11,run,caloff,z\n
$start,s11,z\n; Frequency, impedance magnitude, resistance, reactance.
100000000,63.2252,-60.0500,-19.7846\n
200000000,46.2477,-43.3802,-16.0313\n
40000000,49.5252,-48.0281,12.0850\n
$end\n$sweep_list_s11,run,caloff,loss\n
$start,s11,loss\n
100000000,14.0521\n; Frequency, return loss.
200000000,14.7536\n
40000000,9.9649\n
$end3.3.10 Frequency-List S21 Measurements (Fourth-Generation KC901X)
Related setting: 3.2.5 Output Attenuation.
Command |
Option |
Parameter 1 |
Parameter 2 |
Parameter 3 |
|---|---|---|---|---|
|
sweep_list_s21 |
init |
rescal resisocal enrescal full2portcal syscal caloff |
ri ma vswr series_z loss parallel_z |
lowlo highlo |
run | ||||
stop |
Description:
1. Options:
init -> Initialize S21. Required before using S21.
run -> Run an S21 frequency sweep and acquire data.
stop -> Stop and close S21. Required before switching to another operating mode.
2. Parameter 1:
rescal -> Enable response calibration.
resisocal -> Enable response and isolation calibration.
enrescal -> Enable enhanced response calibration.
full2portcal -> Enable full two-port calibration.
syscal -> Enable system calibration.
caloff -> Disable system calibration.
3. Parameter 2:
ri -> Return real and imaginary components.
ma -> Return insertion loss and phase.
vswr -> Return voltage standing wave ratio.
series_z -> Return z, r, x for series impedance.
loss -> Return insertion loss (logarithmic value).
parallel_z -> Return z, r, x for parallel impedance.
4. Parameter 3:
lowlo -> Sweep using the low local-oscillator setting.
highlo -> Sweep using the high local-oscillator setting.
5. Example:
$sweep_list_s21,run,caloff,ri,lowlo\n
$start,s21,ri\n
100000000,2.1346e-04,-2.0138e-04\n ; Frequency, real component, imaginary component.
200000000,0.9841e-03,-1.4537e-04\n
40000000,-1.7163e-01,-7.0879e-01\n
$end\n$sweep_list_s21,run,caloff,ma,lowlo\n
$start,s21,ma\n
100000000,1.9744e-04,-137.7951\n; Frequency, insertion loss, phase.
200000000,2.0163e-04,-5.8243\n
40000000,4.4581e-01,-98.9831\n
$end\n$sweep_list_s21,run,caloff,vswr,lowlo\n
$start,s21,vswr
100000000,1.0011\n ; Frequency, voltage standing wave ratio.
200000000,1.0004\n
40000000,-3.5587\n
$end$sweep_list_s21,run,caloff,series_z,lowlo\n
$start,s21, series_z ; Frequency, impedance magnitude, resistance, reactance.
100000000,105.6595,-104.1509,-17.7909\n
200000000,99.5815,-97.9082,-18.1789\n
40000000,124.7573,-121.2535,29.3591\n
$end$sweep_list_s21,run,caloff,parallel_z,lowlo\n
$start,s21,parallel_z; Frequency, impedance magnitude, resistance, reactance.
100000000,23.5739,-23.2365,3.9740\n
200000000,25.0008,-24.5743,4.5981\n
40000000,26.8217,-26.3855,4.8173\n
$end$sweep_list_s21,run,caloff,loss,lowlo\n
$start,s21,loss
100000000,-116.1302 ; Frequency, return loss (as labeled in the source).
200000000,-102.0541
40000000,-112.2253
$end3.3.11 Frequency-List S22 Measurements (Fourth-Generation KC901X)
Related settings:
3.2.5 Output Attenuation; 3.2.9 Cable Compensation
Command |
Option |
Parameter 1 |
Parameter 2 |
|---|---|---|---|
|
sweep_list_s22 |
init |
s22cal full2portcal syscal calOff |
ri ma vswr z loss |
run | |||
stop |
Description:
1. Options:
init -> Initialize S22. Required before using S22.
run -> Run an S22 frequency sweep and acquire data.
stop -> Stop and close S22. Required before switching to another operating mode.
2. Parameter 1:
s22cal -> Enable S22 calibration.
full2portcal -> Enable full two-port calibration.
syscal -> Enable system calibration.
caloff -> Disable system calibration.
3. Parameter 2:
ri -> Return real and imaginary components.
ma -> Return reflection coefficient magnitude and phase angle.
vswr -> Return voltage standing wave ratio.
z -> Return impedance.
loss -> Return return loss (logarithmic value).
4. Example:
$sweep_list_s22,run,caloff,ri\n
$start,s22,ri\n
100000000,-3.4254e+00,3.9333e+00\n; Frequency, real component, imaginary component.
200000000,7.1214e-01,5.4916e+00\n
40000000,-2.8701e+00,-1.6338e+00\n
$end\n$sweep_list_s22,run,caloff,ma\n
$start,s22,ma\n
100000000,5.2614e+00,130.9248\n ; Frequency, reflection coefficient magnitude, phase.
200000000,5.5759e+00,82.5062\n
40000000,6.7225e+00,114.1863\n
$end\n$sweep_list_s22,run,caloff,vswr\n
$start,s22,vswr\n
100000000,-1.4694\n ; Frequency, voltage standing wave ratio.
200000000,-1.4361\n
40000000,-1.2921\n
$end\n$sweep_list_s22,run,caloff,z\n
$start,s22,z\n ; Frequency, impedance magnitude, resistance, reactance.
100000000,39.1282,-37.4988,11.1738\n
200000000,52.3065,-49.1036,18.0223\n
40000000,58.5305,-58.4607,-2.8582\n
$end\n$sweep_list_s22,run,caloff,loss\n
$start,s22,loss\n
100000000,14.4200\n; Frequency, return loss.
200000000,14.9363\n
40000000,10.6300\n
$end\n3.3.12 Frequency-List S12 Measurements (Fourth-Generation KC901X)
Related setting: 3.2.5 Output Attenuation.
Command |
Option |
Parameter 1 |
Parameter 2 |
Parameter 3 |
|---|---|---|---|---|
|
sweep_list_s12 |
init |
rescal resisocal enrescal full2portcal syscal caloff |
ri ma vswr series_z loss parallel_z |
lowlo highlo |
run | ||||
stop |
Description:
1. Options:
init -> Initialize S12. Required before using S12.
run -> Run an S12 frequency sweep and acquire data.
stop -> Stop and close S12. Required before switching to another operating mode.
2. Parameter 1:
rescal -> Enable response calibration.
resisocal -> Enable response and isolation calibration.
enrescal -> Enable enhanced response calibration.
full2portcal -> Enable full two-port calibration.
syscal -> Enable system calibration.
caloff -> Disable system calibration.
3. Parameter 2:
ri -> Return real and imaginary components.
ma -> Return insertion loss and phase.
vswr -> Return voltage standing wave ratio.
series_z -> Return z, r, x for series impedance.
loss -> Return insertion loss (logarithmic value).
parallel_z -> Return z, r, x for parallel impedance.
4. Parameter 3:
lowlo -> Sweep using the low local-oscillator setting.
highlo -> Sweep using the high local-oscillator setting.
Example:
$sweep_list_s12,run,caloff,ri,lowlo\n$start,s12,ri\n
100000000,1.8822e-04,-1.1748e-05\n ; Frequency, real component, imaginary component.
200000000,4.6945e-04,1.1014e-05\n
40000000,1.1407e+00,-9.7906e-01\n
$end\n$sweep_list_s12,run,caloff,ma,lowlo\n$start,s12,ma\n
100000000,5.8546e-04,121.0800\n ; Frequency, insertion loss, phase.
200000000,5.5394e-04,77.8709\n
40000000,2.3523e+00,46.8479\n
$end\n$sweep_list_s12,run,caloff,vswr,lowlo\n
$start,s12,vswr\n
100000000,1.0013\n ; Frequency, voltage standing wave ratio.
200000000,1.0019\n
40000000,-1.4607\n
$end\n$sweep_list_s12,run,caloff,series_z,lowlo\n
$start,s12,series_z\n
100000000,0.0198,0.0191,-0.0053\n ; Frequency, impedance magnitude, resistance, reactance.
200000000,0.0082,-0.0051,0.0064\n
40000000,38.0789,-22.5371,30.6933\n
$end$sweep_list_s12,run,caloff,parallel_z,lowlo\n
$start,s12,parallel_z\n; Frequency, impedance magnitude, resistance, reactance.
100000000,98.6349,-97.0458,17.6337\n 200000000,104.4429,-102.9287,17.7202\n
40000000,110.3190,-109.2061,15.6306\n
$end$sweep_list_s12,run,caloff,loss,lowlo\n
$start,s12,loss\n
100000000,-62.2755\n ; Frequency, return loss (as labeled in the source).
200000000,-56.4208\n
40000000,-61.1893\n
$end3.3.13 Frequency-List SPEC Measurements (Fourth-Generation KC901X)
Related setting: 3.2.18 Spectrum Reference Level.
Command |
Option |
Parameter 1 |
Parameter 2 |
Parameter 3 |
|---|---|---|---|---|
|
sweep_list_spec |
init |
calon caloff |
lowlo highlo |
port1 port2 |
run | ||||
stop |
Description:
1. Options:
init -> Initialize SPEC. Required before using SPEC.
run -> Run a SPEC frequency sweep and acquire data.
stop -> Stop and close SPEC. Required before switching to another operating mode.
2. Parameter 1:
calon -> Enable system calibration.
caloff -> Disable system calibration.
3. Parameter 2:
lowlo -> Sweep using the low local-oscillator setting.
highlo -> Sweep using the high local-oscillator setting.
4. Parameter 3:
Port1 -> Select input port 1 (PORT1).
Port2 -> Select input port 2 (PORT2).
5. Example:
$sweep_list_spec,run,caloff,lowlo,port1\n$start,spec\n
100000000,2.331\n
200000000,0.119\n
40000000,-1.136\n
$end\n3.3.14 S11 Measurements (Third-Generation KC901X)
Related settings:
Output Attenuation and Cable Compensation. The source cites 3.2.4 and 3.2.8; the corresponding sections in this edition are 3.2.5 and 3.2.9.
Command |
Option |
Parameter 1 |
Parameter 2 |
Parameter 3 |
Parameter 4 |
Parameter 5 |
Parameter 6 |
|---|---|---|---|---|---|---|---|
|
S11 |
init |
caluser (not supported remotely) calsys calOff |
ri ma vswr z loss |
** |
cs ss |
** |
** |
run | |||||||
stop |
Description:
Options:
init -> Initialize S11. Required before using S11.
run -> Run an S11 frequency sweep and acquire data.
stop -> Stop and close S11. Required before switching to another operating mode.
Parameter 1:
caluser -> Not supported in remote-control mode on third-generation KC901X instruments.
calsys -> Enable system calibration.
caloff -> Disable system calibration.
Third-generation KC901X instruments do not support user calibration in remote-control mode. Do not use caluser or the remote user calibration procedures previously listed in Sections 3.2.53 and 3.2.54. Any required user calibration algorithms must be implemented on the host.
Parameter 2:
ri -> Return real and imaginary components.
ma -> Return reflection coefficient magnitude and phase angle.
vswr -> Return voltage standing wave ratio.
z -> Return impedance.
loss -> Return return loss (logarithmic value).
Parameter 3 sets the number of sweep points. Up to 1001 points are supported. To sweep more than 1001 points, use multiple S11 commands to sweep separate segments.
A single measurement point is allowed. In this case, measurement continues and the instrument continuously sends results at that frequency to the host.
Parameter 4:
cs -> Specify the sweep range using cent and span.
ss -> Specify the sweep range using start and stop.
If parameter 3 specifies a single frequency point, parameter 4 can be cs or ss. Only parameter 5 is required (cent or start); parameter 6 would be parsed as a new command by the KC901.
Parameters 5 and 6 specify center frequency and span (cs), or start and stop frequencies (ss), in Hz. Use the format selected by parameter 4.
The available frequency range depends on the instrument, as shown in the following table:
Center frequency range | |
|---|---|
KC901M(RFMA) |
9500Hz-9999999500Hz(10GHz–500Hz) |
KC901V |
5500Hz-6999999500Hz(7GHz–500Hz) |
KC901S+ |
5500Hz-4099999500Hz(4.1GHz – 500Hz) |
Span range | |
KC901M |
1000Hz-9999991000Hz(10GHz–9KHz) |
KC901V |
1000Hz-6999995000Hz(7GHz–5KHz) |
KC901S+ |
1000Hz-4099995000Hz(4.1GHz – 5KHz) |
Start frequency range | |
KC901M |
9000Hz-9999999000Hz(10GHz–1KHz) |
KC901V |
5000Hz-6999999000Hz(7GHz–1KHz) |
KC901S+ |
5000Hz-4099999000Hz(4.1GHz-1KHz) |
Stop frequency range | |
KC901M |
10000Hz-10000000000Hz(10GHz) |
KC901V |
6000Hz-7000000000Hz(7GHz) |
KC901S+ |
6000Hz-4100000000Hz(4.1GHz) |
7. Example:
When the number of sweep points is greater than 1:
$s11,run,caloff,ri,2,cs,100000000,50000000\n$start,s11,ri\n
$75000000,0.528e0,-0.269e0\n ; Frequency, real component, imaginary component.
$100000000,0.471e0,-0.406e0\n
$125000000,0.370e0,-0.475e0\n
$end\n$s11,run,caloff,ma,2,cs,100000000,50000000\n
$start,s11,ma\n
$75000000,5.847e-2,-26.497\n ; Frequency, reflection coefficient magnitude, phase.
$100000000,6.171e-1,-40.609\n
$125000000,5.934e-2,-51.820\n
$end\n$s11,run,caloff,vswr,2,cs,100000000,50000000\n
$start,s11,vswr\n
$75000000,3.7347\n ; Frequency, voltage standing wave ratio.
$100000000,4.1275\n
$125000000,3.7658\n
$end\n$s11,run,caloff,z,2,cs,100000000,50000000\n
$start,s11,z\n
$75000000,137.9871,109.6309,-83.7945\n ; Frequency, impedance magnitude, resistance, reactance.
$100000000,113.8715,70.5131,-89.4127\n
$125000000,91.2070,52.7077,-74.4354\n
$end\n$s11,run,caloff,loss,2,cs,100000000,50000000\n
$start,s11,loss\n
$75000000,-0.409\n; Frequency, return loss.
$100000000,-0.499\n
$125000000,-0.574\n
$endWhen the number of sweep points is 1:
S11 performs repeated acquisition, with each acquisition returned in a separate packet, as shown below:
$s11,run,caloff,ri,1,cs,100000000\n$start,s11,ri\n
$100000000,0.456e0,-0.391e0\n
$end\n$start,s11,ri\n
$100000000,0.458e0,-0.392e0\n
$end\n3.3.15 S21 Measurements (Third-Generation KC901X)
Related setting: Output Attenuation. The source cites 3.2.4; the corresponding section in this edition is 3.2.5.
Command |
Option |
Parameter 1 |
Parameter 2 |
Parameter 3 |
Parameter 4 |
Parameter 5 |
Parameter 6 |
Parameter 7 |
|---|---|---|---|---|---|---|---|---|
|
S21 |
init |
caluser (not supported remotely) calsys caloff |
ri ma Loss delay |
lowlo highlo |
** |
cs ss |
** ** |
** ** |
run | ||||||||
stop |
Description:
1. Options:
init -> Initialize S21. Required before using S21.
run -> Run an S21 frequency sweep and acquire data.
stop -> Stop and close S21. Required before switching to another operating mode.
2. Parameter 1:
caluser -> Not supported in remote-control mode on third-generation KC901X instruments.
calsys -> Enable system calibration.
caloff -> Disable system calibration.
3. Parameter 2:
ri -> Return real and imaginary components.
ma -> Return insertion loss and phase.
loss -> Return insertion loss (logarithmic value).
delay -> Return group delay.
4. Parameter 3:
lowlo -> Sweep using the low local-oscillator setting.
highlo -> Sweep using the high local-oscillator setting.
5. Parameter 4 sets the number of sweep points. Up to 1001 points are supported. For more points, use multiple commands to sweep separate segments. With 1 point selected, the instrument operates continuously.
6. Parameter 5:
cs -> Specify the sweep range using cent and span.
ss -> Specify the sweep range using start and stop.
If parameter 4 specifies a single frequency point, parameter 5 can be cs or ss. Only parameter 6 is required (cent or start); parameter 7 would be parsed as a new command by the KC901.
Parameters 6 and 7 specify frequencies in Hz. Use the format selected by parameter 5.
The available frequency range depends on the instrument, as shown in the following table:
Center frequency range | |
|---|---|
KC901M |
500Hz-9999999500Hz(10GHz–500Hz) |
KC901V |
500Hz-6999999500Hz(7GHz–500Hz) |
KC901S+ |
500Hz-4099999500Hz(4.1GHz -500Hz) |
Span range | |
KC901M |
1000Hz-10000000000Hz(10GHz) |
KC901V |
1000Hz-7000000000Hz(7GHz) |
KC901S+ |
1000Hz-4100000000Hz(4.1GHz) |
Start frequency range | |
KC901M |
0-9999999000Hz(10GHz–1KHz) |
KC901V |
0-6999999000Hz(7GHz–1KHz) |
KC901S+ |
0-4099999000Hz(4.1GHz-1KHz) |
Stop frequency range | |
KC901M |
10000Hz-10000000000Hz(10GHz) |
KC901V |
1000Hz-7000000000Hz(7GHz) |
KC901S+ |
1000Hz-4100000000(4.1GHz) |
The stop frequency must be greater than the start frequency.
If parameter 4 specifies a single frequency point, parameter 6 specifies that frequency and parameter 7 must be omitted.
8. Example:
When the number of acquisition points is greater than 1:
$s21,run,caloff,ri,lowlo,2,cs,100000000,50000000\n$start,s21,ri\n
$75000000,-0.442e-1,0.000e0\n ; Frequency, real component, imaginary component.
$100000000,-0.419e-1,0.174e-2\n
$125000000,-0.418e-1,0.219e-2\n
$end\n
$s21,run,caloff,ma,lowlo,2,cs,100000000,50000000\n
$start,s21,ma\n
$75000000,7.097e-1,180.000\n; Frequency, insertion loss, phase.
$100000000,6.758e0,157.210\n
$125000000,6.402e0,150.816\n
$end\n$s21,run,caloff,loss,lowlo,2,cs,100000000,50000000
$start,s21,loss
$75000000,-116.130 ; Frequency, return loss (as labeled in the source).
$100000000,-102.054
$125000000,-112.225
$end$s21,run,caloff,delay,lowlo,2,cs,100000000,50000000
$start,s21,delay
$75000000,-5.147039e-09
$100000000,2.589045e-09
$125000000,2.589045e-09
$endWhen the number of sweep points is 1:
S21 performs repeated acquisition, with each acquisition returned in a separate packet, as shown below:
$s21,run,caloff,ma,lowlo,1,cs,100000000\n$start,s21,ma\n
$100000000,6.744e-1,156.693\n
$end\n
$start,s21,ma\n
$100000000,6.766e0,156.762\n
$end\n
$start,s21,ma\n
$100000000,6.773e0,156.731\n
$end\n3.3.16 Spectrum Measurements (Third-Generation KC901X)
Related setting: Spectrum Reference Level. The source cites 3.2.15; the corresponding section in this edition is 3.2.18.
Command |
Option |
Parameter 1 |
Parameter 2 |
Parameter 3 |
Parameter 4 |
Parameter 5 |
Parameter 6 |
|---|---|---|---|---|---|---|---|
|
spec |
init |
calon caloff |
lowlo highlo |
** |
cs ss |
** |
** |
run | |||||||
stop |
Description:
1. Options:
init -> Initialize SPEC. Required before using SPEC.
run -> Run a SPEC frequency sweep and acquire data.
stop -> Stop and close SPEC. Required before switching to another operating mode.
2. Parameter 1:
calon -> Enable system calibration.
caloff -> Disable system calibration.
3. Parameter 2:
lowlo -> Sweep using the low local-oscillator setting.
highlo -> Sweep using the high local-oscillator setting.
Parameter 3 sets the number of sweep points. Up to 1001 points are supported. For more points, use this command multiple times. To measure a single frequency, set the point count to 1. Unlike field strength mode, this mode allows a reference level to be specified. Specifying a reference level is recommended when measuring relative values accurately.
5. Parameter 4:
cs -> Specify the sweep range using Cent and Span.
ss -> Specify the sweep range using Start and Stop.
If parameter 3 specifies a single frequency point, set parameter 4 to CS.
Parameters 5 and 6 specify center frequency and span, in Hz.
The available frequency range depends on the instrument, as shown in the following table:
Center frequency range | |
|---|---|
KC901M |
500Hz-9999999500Hz(10GHz–500Hz) |
KC901V |
500Hz-6999999500Hz(7GHz–500Hz) |
KC901S+ |
500Hz-4099999500Hz(4.1GHz-500Hz) |
Span range | |
KC901M |
1000Hz-10000000000Hz(10GHz) |
KC901V |
1000Hz-7000000000Hz(7GHz) |
KC901S+ |
1000Hz-4100000000Hz(4.1GHz) |
Start frequency range | |
KC901M |
0-9999999000Hz(10GHz – 1KHz) |
KC901V |
0-6999999000Hz(7GHz – 1KHz) |
KC901S+ |
0-4099999000Hz(4.1GHz – 1KHz) |
Stop frequency range | |
KC901M |
10000Hz-10000000000Hz(10GHz) |
KC901V |
1000Hz-7000000000Hz(7GHz) |
KC901S+ |
1000Hz-4100000000Hz(4.1GHz) |
The stop frequency must be greater than the start frequency.
If parameter 3 specifies a single frequency point, parameter 4 can be cs or ss. Only parameter 5 is required (cent or start); parameter 6 would be parsed as a new command by the KC901.
7. Example:
When the number of acquisition points is greater than 1:
$spec,run,caloff,lowlo,10,cs,100000000,50000000\n$start,spec\n
$75000000,-74.166\n ; Frequency, amplitude (dBm).
$80000000,-74.385\n
$85000000,-74.228\n
$90000000,-74.249\n
$95000000,-74.125\n
$100000000,-74.456\n
$105000000,-74.422\n
$110000000,-74.147\n
$115000000,-74.077\n
$120000000,-74.295\n
$125000000,-74.314\n
$end\nWhen the number of sweep points is 1:
SPEC performs repeated acquisition, with each acquisition returned in a separate packet, as shown below:
$spec,run,caloff,lowlo,1,cs,100000000\n$start,spec\n
$100000000,-74.307\n
$end\n
$start,spec\n
$100000000,-74.540\n
$end\n
$start,spec\n
$100000000,-74.310\n
$end\n3.3.17 Field Strength Measurements (Third-Generation KC901X)
Related setting: Output Attenuation. The source cites 3.2.4; the corresponding section in this edition is 3.2.5.
Command |
Option |
Parameter 1 |
Parameter 2 |
Parameter 3 |
|---|---|---|---|---|
|
field |
init |
lowlo highlo |
** |
** |
run | ||||
stop |
Description:
1. Options:
init -> Initialize FIELD. Required before using FIELD.
run -> Run FIELD and acquire measurement data.
stop -> Stop and close FIELD. Required before switching to another operating mode.
2. Parameter 1:
lowlo -> Measure using the low local-oscillator setting.
highlo -> Measure using the high local-oscillator setting.
3. Parameter 2: Antenna gain, in dBi.
Antenna gain range: -100.00 to +100.00dBi.
Parameter 3: Single-point measurement frequency in Hz, with resolution down to 0.1Hz.
The available frequency range depends on the instrument, as shown in the following table:
Frequency range | |
|---|---|
KC901M |
0Hz-10000000000Hz(10GHz) |
KC901V |
0-7000000000Hz(7GHz) |
KC901S+ |
0-4100000000Hz(4.1GHz) |
5. Example:
Field strength is measured repeatedly, with each acquisition returned in a separate packet, for example:
$field,run,lowlo,10,100000000\n$start,field\n
$100000000.0,-18.115,-121.917\n ; Frequency, field strength, absolute level (dBm).
$end\n
$start,field\n
$100000000.0,-18.875,-122.337\n
$end\n
$start,field\n
$100000000.0,-18.667,-122.087\n
$end\n3.3.18 RF Signal Source Output (Third-Generation KC901X)
Command |
Option |
Parameter 1 |
Parameter 2 |
Parameter 3 |
Parameter 4 |
Parameter 5 |
Parameter 6 |
|---|---|---|---|---|---|---|---|
|
rfSource |
init |
off ask fm |
port1 port2 afout |
** |
** |
** |
** |
run | |||||||
stop |
Description:
1. Options:
init -> Initialize RfSource. Required before using RfSource.
run -> Run RfSource and output the signal.
stop -> Stop and close RfSource. Required before switching to another operating mode.
2. Parameter 1:
off -> Disable modulation; parameters 4 and 5 need not be entered. [Source note: the parameter numbers are retained from the source; check the command table for this instrument generation.]
ask -> Enable ASK modulation.
fm -> Use FM modulation.
3. Parameter 2:
port1 -> Select output port 1 (PORT 1).
port2 -> Select output port 2 (PORT 2).
afout -> Select audio output (AFOUT).
3. Parameter 3:
The available carrier frequency range depends on the instrument, as shown in the following table:
Carrier frequency range | |
|---|---|
KC901M |
0Hz-10000000000Hz(10GHz) |
KC901V |
0-7000000000Hz(7GHz) |
KC901S+ |
0-4100000000Hz(4.1GHz) |
When switched to audio output, the frequency range is 0-60000000Hz (60MHz).
4. Parameter 4:
Carrier output amplitude in dBm, with 1dB resolution.
The available output amplitude depends on frequency.
If the requested amplitude exceeds the available maximum, the instrument returns a warning and outputs the maximum amplitude.
$start,warn_gtr\n ; Requested value exceeds the maximum.
$warn:It is greater than the maximum output!\n
$end\nThe source states that if the requested amplitude is below the available maximum, the instrument returns a warning and outputs the minimum. [Source note: "maximum" appears inconsistent with this lower-limit description; it has not been silently changed to "minimum".]
$start,warn_lt\n ; The source comment says "requested value exceeds the maximum"; this conflicts with the lower-limit warning name.
$warn:It is less than the minimum output!\n
$end\nFor output port "port2", the approximate range is +10 to -30dBm.
For output port "port1" with RF board version "1.0.5" or later, the range is +10 to -60dBm. Otherwise, it remains +10 to -30dBm.
5. Parameter 5:
Modulation frequency in Hz. Range: 0-3000Hz.
6. Parameter 6:
For ASK, the modulation depth has the following fixed values: 0, 5, 10, 15, 20, 30, 35, 40, 45, 50, 55, 60, 65, 70, 75, 80, 85, 90.
For FM, the adjustable modulation depth varies with frequency, as shown below:
0-60M (excluding 60M) |
0 - 10MHz |
|---|---|
60M-106.25M (excluding 106.25M) |
0 – 312.5KHz |
106.25M-212.5M (excluding 212.5M) |
0 – 625KHz |
212.5M-425M (excluding 425M) |
0 – 1.25MHz |
425M-850M (excluding 850M) |
0 – 2.5MHz |
850M-1700M (excluding 1700M) |
0 – 5MHz |
1700M-3400M (excluding 3400M) |
0 – 10MHz |
3400M – 7000M |
0 – 20MHz |
7. Example:
Configure the RF signal source with modulation enabled, a 1GHz carrier, no output attenuation, a 1KHz modulation frequency, and 90% modulation depth.
Step 1: Initialize RfSource:
$rfsource,init\nStep 2: Start operation and apply the settings:
$rfsource,run,ask,port1,1000000000,0,1000,90\nStep 3: Stop the RF signal source before using another function:
$rfsource,stop\n8. Behavior:
(1) Init immediately initializes the circuits associated with the RF signal source.
(2) STOP shuts down the circuits associated with the RF signal source.
(3) RUN starts output using the specified settings.
(4) While the source is outputting, other commands that do not explicitly require the source to stop leave the output running.
3.3.19 Audio Signal Source Output (Third-Generation KC901X)
Command |
Option |
Parameter 1 |
Parameter 2 |
Parameter 3 |
Parameter 4 |
Parameter 5 |
Parameter 6 |
|---|---|---|---|---|---|---|---|
|
afsource |
init |
off ask fm pm |
afout |
** |
** |
** |
** |
run |
port1 |
||||||
stop |
port2 |
Description:
1. Options:
init -> Initialize AfSource. Required before using AfSource.
run -> Run AfSource and output audio.
stop -> Stop and close AfSource. Required before switching to another operating mode.
2. Parameter 1:
off -> Disable modulation; parameters 4 and 5 need not be entered. [Source note: the parameter numbers are retained from the source; check the command table for this instrument generation.]
ask -> ASK modulation.
fm -> FM modulation.
pm -> PM modulation.
3. Parameter 2:
afout -> Select audio output (AF OUT).
port1 -> Select output port 1 (PORT 1).
port2 -> Select output port 2 (PORT 2).
3. Parameter 3:
Carrier frequency in Hz. Range: 0-2000000000Hz.
4. Parameter 4:
For output port "afout", amplitude is specified in mV peak-to-peak (VPP). Range: 0-3000mV.
For output port "port1" or "pot2" (spelled this way in the source), this parameter is the carrier output amplitude in dBm, with 1dB resolution.
The available output amplitude depends on frequency.
If the requested amplitude exceeds the available maximum, the instrument returns a warning and outputs the maximum amplitude.
$start,warn_gtr\n ; Requested value exceeds the maximum.
$warn:It is greater than the maximum output!\n
$end\nThe source states that if the requested amplitude is below the available maximum, the instrument returns a warning and outputs the minimum. [Source note: "maximum" appears inconsistent with this lower-limit description; it has not been silently changed to "minimum".]
$start,warn_lt\n ; The source comment says "requested value exceeds the maximum"; this conflicts with the lower-limit warning name.
$warn:It is less than the minimum output!\n
$end\nFor output port "port2", the approximate range is +10 to -81dBm.
For output port "port1" with RF board version "1.0.5" or later, the range is +10 to -111dBm. Otherwise, it remains +10 to -81dBm.
5. Parameter 5:
Modulation frequency in Hz.
For ASK, the range is 0-3000Hz.
For FM and PM, the range is 16-10000Hz.
6. Parameter 6:
Modulation depth / frequency deviation
For ASK, modulation depth ranges from 0 to 100%.
For FM, frequency deviation ranges from 0 to 1MHz.
For PM, the phase deviation ranges from -180° to +180°.
7. Example:
Configure the audio signal source for ASK modulation, a 10MHz carrier, 1.3V peak-to-peak (VPP) output, a 1KHz modulation frequency, and 100% modulation depth.
Step 1: Initialize AfSource:
$afsource,init\nStep 2: Start operation and apply the settings:
$afsource,run,ask,afout,10000000,1300,1000,100\nStep 3: Exit this mode before using another function.
$afsource,stop\n8. Behavior:
(1) Init immediately initializes the circuits associated with the audio signal source.
(2) STOP immediately shuts down the circuits associated with the audio signal source.
(3) RUN starts output using the specified settings.
(4) While the source is outputting, other commands that do not explicitly require the source to stop leave the output running.
3.4 Instrument Messages
Unsolicited instrument messages generally provide warnings or notifications. Each warning is a separate packet. Host software can identify the error type from the packet header without matching the message text. The messages are described below.
3.4.1 Invalid Command
$start,err_cmd\n
$error:Command input error!\n
$end\n3.4.2 Invalid Option
$start,err_opt\n
$error:Option input error!\n
$end\n3.4.3 Invalid Parameter X
$start,err_parx\n ; Invalid parameter x. Here x is a variable in the range 1-6.
$error:Parameterx input error!\n
$end\n3.4.4 Mode Must Be Initialized Before Use
$start,err_uninit\n
$error:Please initialize the mode first!\n
$end\n3.4.5 Transmitter Loss of Lock (Poll for This Warning; Source Reference: 3.2.23)
$start,err_RfUnlock\n
$error:RF PLL unLock!\n
$end\n3.4.6 Receiver Local-Oscillator Loss of Lock (Poll for This Warning; Source Reference: 3.2.23)
$start,err_LoUnlock\n
$error:Lo PLL unLock!\n
$end\n3.4.7 Stop the Active Mode Before Using Another Mode
$start,err_S11Stop\n ; Stop S11 before using another sweep mode.
$error:Please stop S11 mode first!\n
$end\n$start,err_S22Stop\n ; Stop S22 before using another sweep mode.
$error:Please stop S22 mode first!\n
$end\n$start,err_S21Stop\n ; Stop S21 before using another sweep mode.
$error:Please stop S21 mode first!\n
$end\n$start,err_S12Stop\n ; Stop S12 before using another sweep mode.
$error:Please stop S12 mode first!\n
$end\n$start,err_SpecStop\n ; Stop SPEC before using another sweep mode.
$error:Please stop Spec mode first!\n
$end\n$start,err_FieldStop\n ; Stop FIELD before using another sweep mode.
$error:Please stop Field mode first!\n
$end\n$start,err_RfStop\n ; Stop RFSource before using another sweep mode.
$error:Please stop RFSource mode first!\n
$end\n$start,err_AfStop\n ; Stop AFSource before using another sweep mode.
$error:Please stop AFSource mode first!\n
$end\n3.4.8 Low Battery Voltage (Poll for This Warning; See 3.2.37)
$start,err_BatVolLow\n
$error:Low battery!\n
$end\n3.4.9 High External Supply Voltage (Poll for This Warning; See 3.2.37)
$start,err_ExVolHigh\n
$error:External Voltage is too high!\n
$end\n3.4.10 High Temperature (Poll for This Warning; See 3.2.37)
$start,err_TempHigh\n
$error:Temperature is too high!\n
$end\n3.4.11 Frequency List Contains Out-of-Range Frequencies (Fourth-Generation KC901X)
$start,err_freq\n
$error: Frequency out of range!\n
$end\n3.4.12 Frequency List Contains Fewer Than 2 Points (Fourth-Generation KC901X)
$start,err_freq\n
$error: The number of frequencies cannot be less than 2!\n
$end\n3.4.13 Frequency List Exceeds 10000 Points (Fourth-Generation KC901X)
The confirmed frequency-list limit is 10000 points. The following source response example still says 10001; its exact firmware text and the handling of an oversized list have not yet been confirmed. Do not infer a 10001-point limit from this unverified example.
$start,err_freq\n
$error: Over 10001 points!\n
$end\n4. Firmware Applicability
This manual applies to firmware V1.5.6 or later for KC901V/M, 1.2.9 or later for KC901C+/S+, 1.2.1 or later for KC901Q, and V1.5.6 or later for KC901J/K/R/T. Refer to an older manual for earlier firmware versions.
This manual does not list every functional difference between instrument models. Commands for a function that an instrument does not support are invalid. For example, KC901V does not support S22 measurement or full two-port calibration, so any command combination involving those functions is invalid.
[End]
KC901 系列 / 编程参考
网络分析仪编程手册
ASCII命令、通信示例、校准流程与测量控制。
请根据仪器代际选择对应命令。不同机型支持的功能有所不同,详见 固件适用范围。手册版本0.7.1与硬件、固件版本分别标注。
原版信息与协议约定
B013-008
网络分析仪编程手册
硬件版本V0.2 软件版本V1.5.6(KC901K)
供教育、科研和科技爱好者用正式版本
( 第二版 )
科 新 社
二〇二五年十二月
本版本以中文版0.7.1为基础,已纳入确认的波特率、校准支持、频率格式、点数上限和测量数据说明修正。第三代远程用户校准流程已移除。保留的响应示例沿用原始协议数据。分号之后的内容为说明,不参与通信。示例中的 \n 表示换行终止符,而不是字面上的反斜杠和字母n。
TX · 上位机发送RX · 下位机返回协议示例均可选取和复制。
0、概述
KC901采用文本命令方式进行数据通信,即俗称的ASCII命令。数据通过USB端口或网口进行物理连接,在KC901内部被转换为串行数据,供CPU识别。用户可以用命令行方式直接操作KC901,也可以另外编写应用软件,使之采用本手册规定的指令与仪器通信。
目前KC901的操作指令是未分级的描述语言,简单易懂,不需学习协议逻辑知识即可迅速掌握。
在本手册中,“上位机”是指用于操控KC901的PC机或其它控制装置。“下位机”是指KC901。
1、指令格式及说明
上位机发送及下位机返回都以包作为基本数据,包头以符号“$”代表,
包尾以换行符号“\n”代表,包内容中各个元素使用英文逗号“,”分隔。说明如下:
1.1发送指令格式
$[命令],[选项],[参数1],[参数n]\n1.2返回数据格式
返回数据为便于上位机识别,其格式与发送格式略有不同,为了便于说明,分号“;”及其同一行后的内容代表注释:
$start,[包名称]\n ;每行以“$”开头“\n”结尾。“start”代表起始
$[包内容]\n ;包内容元素之间以逗号“,”分隔
$end\n ;“end”代表包结束1.3格式说明
1、不是每个命令都必须包括选项和参数,请按照指令表的规定使用。
2、双括号[]仅仅是本手册为了方便表达而添加,实际不用输入。
3、除专门说明外,字母大小写的意义相同。
4、如果输入的指令内容有错误,KC901会在发现错误之后,立刻返回错误提示,并且丢弃此错误包。
5、如果输入的指令格式有错误,KC901会丢弃掉所有错误格式,仅提取其中的正确格式。
1.4通信例程
如果需要获取系统时间,应发送如下命令:
$[命令],[选项]\n
$date,get\n下面展示整个过程,紫色代表上位机发送,蓝色代表下位机返回。
$date,get\n
$start,date\n
Date:2025-12-30 15:22:14 ;依次代表年月日时分秒
$end\n1.5、通信参数
波特率:921600(第三代KC901X)
波特率:460800(第四代KC901X)
数据位:8位
停止位:1位
无校验。
指令缓存:32kb。进入缓存的指令顺序执行,存满时不再接收新的指令。编程时应考虑到执行的速度,避免拥堵。
数据缓存:32kb。进入缓存的数据顺序发出,缓存满时中止执行。
通过远程操作获取的测量数据未严格修约,需要自行取舍有效位数。
2、上位机如何与KC901连接
2.1安装USB驱动
如果采用USB口连接,应安装USB驱动。WINDOWS操作系统通常自带驱动程序,只需将KC901的USB接口与PC机连接,系统即可自动安装驱动。如果系统未能正确安装,可以手动下载驱动程序进行安装。
下载链接:http://www.ftdichip.com/Drivers/VCP.htm
如果采用网口连接,不需要安装专门的驱动。
2.2使用合适的调试软件
为了简化上位机编程,我们取消了命令回显,且返回字符仅仅是换行符“\n”。所以调试软件若不做设定则会影响显示效果。
建议使用SecureCRT调试工具,可以很好的解决上述问题。具体如下设定:
通过勾选[View]->[Command(Chat)Window]选项,会在下方打开命令行输入窗口,输入命令后按“回车键”即可发送。并且可以通过“上下方向键”来追溯输入过的命令。
通过勾选[Options] -> [Session Options] -> [Terminal] -> [Emulation] -> [Modes]选项下的[New Line Mode]即可将回车符“\n”显示为回车加换行的效果。
2.3 关于网络连接的操作
2.3.1、打开网络功能
在进行网络连接前,应将“系统设置”(Settings,按FUNC键进入)界面下的“网络”(Network)子菜单调整为“开”(ON)状态(第4代KC901没有这项设置,插上网线自动开启)。网络功能开启后,网络接口上的黄灯点亮。由于网络连接会消耗较多电力,在不使用网络时,应当将网络功能关闭(第4代KC901不能手动关闭网口电源,拔掉网线网口自动休眠)。
2.3.2、配置网络参数
进入“系统设置”界面下的“IP设置”(“IP SET”)子菜单,设置KC901的IP参数。设置好以后保存,若成功接入网络,则网口的绿灯会闪烁。
DHCP: 开启后从路由器动态获取IP地址及网关。一般建议关闭DHCP。
(DHCP功能仅第四代KC901X支持,第三代KC901X不支持)
端口:上位机软件设置的端口号需要与此参数一致,注意避免与其它程序的端口相冲突。对于安装有防火墙的上位机,请在防火墙中放行对应的端口。
IPv4地址:请在所接入网络允许的范围内选择,并且该地址不能与网络中的其它设备冲突。
IPv4网关:请根据路由器的参数设置。通常的局域网,网关默认为192.168.1.1。
IPv4子网掩码:请根据接入网络的具体情况设置,通常为255.255.255.0。
通常网络中最好有路由器。不论KC901还是上位机,都作为该网络的一个终端。如果希望直接将KC901连接到电脑上,相当于电脑直接连电脑,需为电脑和KC901指定同一网段中的不同IP。对于某些早期的网卡,如果连接不上,可以试试反序的网线。
2.4与KC901握手
注意:请确保当前KC901没有窗口显示(比如“关于本机”),若在KC901显示窗口下进行握手,KC901会返回警告字符串(第4代KC901可以在有窗口显示的情况下进行握手不会返回警告信息):
$start,ConFail\n
$Please exit the window operation first.\n
$end\n此时请先退出窗口显示,再进行握手操作。
申请控制
发送大写的C
等待大约1秒时间,返回[KC901]及其序列号。此时KC901进入远动模式。
2.5与KC901断开
断开方式有两种:
1、上位机发送命令断开,详见:3.2.19 退出远程控制模式。
2、在901上按下[SHIFT]+[MODE]按键主动断开。
如果在通信中意外拔出USB插头或者因其它原因中断通信,901不会自动识别,仍需通过[SHIFT]+[MODE]按键来终止。(第4代KC901断开按键为[SHIFT]+[HOME])
2.6终止数据返回
在901有连续的数据返回时,如果需要终止目前操作,需要在上位机采用组合键[Ctrl]+[C](也就是16进制的0x03),此时901会终止执行已经收到的命令,并将已经测到,但尚未发送完毕的数据全部发完,然后停止返回数据。
注意:
1、当终止数据返回后,KC901会完全归回初始状态。例如,使用s11 RUN指令采集数据的过程中按下了组合键[Ctrl]+[C],则需要再次发送s11 init后,才能继续运行s11 run。
2、若使用SecureCRT调试KC901,需要用鼠标点击数据显示窗口,然后就可以直接[Ctrl]+[C]。
3.指令说明
下面将对KC901的所有指令进行详细说明,并给出实际运行例程。对于例程的格式,需要注意的是:
1、紫色代表上位机发送,蓝色代表下位机返回。
2、发送和返回都会明确标明回车符“\n”,实际返回看不见的。
3、注意指令与选项及参数之间都需要逗号做分隔。
4、使用分号“;”及同行后的内容为注释,并不属于实际格式。
3.1指令的分类
指令可以归类为以下3类:
系统设置指令
属于下行指令,例如设置液晶亮度、发射机输出衰减。
测量控制指令
属于下行指令,例如使用S11模式测量对应频率点的S参数。
警告
属于上行指令,例如过载警告、高温警告。
3.2系统指令
3.2.1系统时间
命令 |
选项 |
说明 |
|---|---|---|
|
date |
get |
获取时间 |
set |
设置时间,格式如下: 年 月 日 时 分 秒 XXXX-XX-XX, XX-XX-XX |
例程:
获取KC901系统时间:
$date,get\n
$start,date\n
Date:2025-12-30 15:22:14 ;依次代表年月日时分秒
$end\n设置时间:
$date,set,2016-4-22,13-51-00\n注意:输入年份应当在2000-2099之间。
3.2.2设置901液晶显示语言
命令 |
选项 |
说明 |
|---|---|---|
|
lang |
en |
目前支持简体中文和英语两种语言 |
ch |
例程:
设置显示语言为英语
$lang,en\n3.2.3设置旋钮1方向(第三代KC901X只有这一个旋钮)
命令 |
选项 |
说明 |
|---|---|---|
|
Encoder1 |
right |
逆时针拨动,数量增大 顺时针拨动,数量增大 |
left |
例程:
设置旋钮为逆时针拨动时,频率数据增加:
$encoder1,right\n3.2.4设置旋钮2方向(第四代KC901X)
命令 |
选项 |
说明 |
|---|---|---|
|
Encoder2 |
right |
逆时针拨动,数量增大 顺时针拨动,数量增大 |
left |
例程:
设置旋钮为逆时针拨动时,频率数据增加:
$encoder2,right\n3.2.5设置输出衰减
命令 |
选项 |
说明 |
|---|---|---|
outAtt |
无 get(仅第四代KC901X支持) set(仅第四代KC901X支持) |
参数取值范围: KC901K、J、R :-30~30 KC901V/RFMA : 0~25 KC901S+ :0~20 单位:dB 此输出衰减在以下模式中生效: S11(反射), S21(传输), S22(反射),(仅第四代KC901X支持) S12 (传输) ,(仅第四代KC901X支持) DTF(故障定位), |
说明:第四代901设置后输出幅度为源增益模式;
例程:
第三代KC901X:
输出衰减器置10dB衰减
$outAtt,10\n第四代KC901X:
输出衰减器置10dB衰减
$outAtt,set,10\n
$start,OutAtt,set,success\n
$end\n查询当前输出衰减
$outAtt,get\n
$start,OutAtt,get,success\n
$10\n
$end\n3.2.6设置亮度
命令 |
选项 |
说明 |
|---|---|---|
|
light |
lcd |
lcd取值范围1-100 key取值范围0-100 |
key |
例程:
设置显示器亮度为100%
$light,lcd,100\n3.2.7气压计
命令 |
选项 |
参数 |
说明 |
|---|---|---|---|
|
press |
set |
数值 |
设置绝对高度补偿,单位是m,范围:-999.9-999.9 注意:当设置完高度补偿后,读取的海拔数据会缓慢变化到补偿后的值(因为数据存在滑动滤波以保证稳定性) |
get |
无 |
读取气压数据,依次返回hPa和m单位 |
例程:
高度补偿正100米
$press,set,100.0\n读取气压测试数据,要求返回以百帕为单位的值
$press,get\n
$start,press\n
$950.412,536.802\n ;依次为气压(hPa)和海拔(m)
$end\n3.2.8按键提示音
命令 |
选项 |
说明 |
|---|---|---|
|
beep |
off |
off->关闭 on->打开 |
on |
例程:
打开按键提示音
$beep,on\n3.2.9 S11电缆补偿
命令 |
选项 |
说明 |
|---|---|---|
|
cable |
len |
电缆长度,单位为米,范围0-99.999 |
loss |
电缆衰减,单位为dB,范围0-99.99 |
|
freq |
电缆衰减对应的频率,单位为MHz,范围1-10000 |
例程:
设置电缆长度补偿值为10.123米
$cable,len,10.123\n3.2.10 S11系统校准件参数(第四代KC901X固件版本1.8.0 及以上不可用)
KC901K/RFMA 使用标准校准模型:
命令 |
选项 |
说明 |
|---|---|---|
kit_s11 |
female male |
依次输入短路、开路校准件参数。 其中,短路件参数依次为: L0,L1,L2,L3,单程电长度(mm),总损耗(GΩ/m) 开路校准件参数依次为: C0,C1,C2,C3,单程电长度(mm),总损耗(GΩ/m) 取值范围: L0~L3,C0~C3范围:-9999.999 - +9999.999,指数与仪器校准件设置界面显示相同,无需设置。 单程电长度范围:0 – 999.999 总损耗范围:0 – 9999.999 注意:此处设置的是系统校准的校准件数据,对应仪表界面上是在[系统设置]界面按下[SHIFT]+[7]进入的系统校准界面下的设置(而不是在[系统设置]本界面下的用户校准件设置) |
说明:
female参数用于设置阴性校准件参数,male参数用于设置阳性校准件参数;第三代KC901X没有female和male选项。
例程:
设置短路、开路校准件电长度依次为:5.25mm、5.26mm。负载校准件没有电长度设置。
// L0,L1 , L2,L3,mm,GΩ/m C0, C1, C2, C3, mm, GΩ/m
第四代KC901X示例:
$kit_s11,female,10,125,-20,15,5.25,0.201,100,125,-800,15,5.26,0.200\n第三代KC901X示例:
$kit_s11,10,125,-20,15,5.25,0.201,100,125,-800,15,5.26,0.200\n3.2.11 S21系统校准件参数(第四代KC901X固件版本1.8.0 及以上不可用)
命令 |
选项 |
说明 |
|---|---|---|
kit_s21 |
female male |
依次输入校准件长度和校准件衰减 长度范围:0—999.999(单位:mm) 衰减范围:0—99.9999(单位:dB) 衰减位于的频率:1—10000(单位:MHz) |
说明:
female参数用于设置阴性校准件参数,male参数用于设置阳性校准件参数;第三代KC901X没有female和male选项。
例程:
设置校准件长度为100.00mm,衰减0.1dB,位于频率4567MHz
第四代KC901X示例:
$kit_s21,female,100,0.1,4567\n第三代KC901X示例:
$kit_s21,100,0.1,4567\n3.2.12 S11用户校准件参数(第四代KC901X固件版本1.8.0 及以上不可用)
KC901K/RFMA 使用复杂校准模型:
命令 |
选项 |
说明 |
|---|---|---|
userkit_s11 |
female male |
依次输入短路、开路校准件参数。 其中,短路件参数依次为: L0,L1,L2,L3,单程电长度(mm),总损耗(GΩ/m) 开路校准件参数依次为: C0,C1,C2,C3,单程电长度(mm),总损耗(GΩ/m) 取值范围: L0~L3,C0~C3范围:-9999.999 - +9999.999 单程电长度范围:0 – 999.999 总损耗范围:0 – 9999.999 注意:此处设置的是用户校准的校准件数据,对应仪表界面上是在[系统设置]本界面下的用户校准件设置。 |
说明:
female参数用于设置阴性校准件参数,male参数用于设置阳性校准件参数;
例程:
设置短路、开路校准件电长度依次为:5.25mm、5.26mm。负载校准件没有电长度设置。
// L0,L1 , L2,L3,mm,GΩ/m C0, C1, C2, C3, mm, GΩ/m
$userkit_s11,female,10,125,-20,15,5.25,0.201,100,125,-800,15,5.26,0.200\n3.2.13 S21用户校准件参数(第四代KC901X固件版本1.8.0 及以上不可用)
命令 |
选项 |
说明 |
|---|---|---|
userkit_s21 |
female male |
依次输入校准件长度和校准件衰减 长度范围:0—999.999(单位:mm) 衰减范围:0—99.9999(单位:dB) 衰减位于的频率:1—10000(单位:MHz) |
说明:
female参数用于设置阴性校准件参数,male参数用于设置阳性校准件参数;
例程:
设置校准件长度为100.00mm,衰减0.1dB,位于频率4567MHz
$userkit_s21,female,100,0.1,4567\n3.2.14 获取设备信息
发送命令 |
选项 |
说明 |
|---|---|---|
device |
无 |
将会返回字符串说明 |
例如:
$device\n
$start,device
$<----------------------KC901K network analyzer----------------->
$<-User @ :A>
$<-Software ver:V1.5.4------------------------------------>
$<-Hardware ver:MB-V0.2 RB-V0.0.3--------------------------------->
$<-Serial num:2552552552-------------------------------------->
$<-Copyright:KeXinShe Co.,Ltd & KeChuang measurement association>
$<-------------------------------------------------------------->
$end3.2.15 获取电压
命令 |
选项 |
数据说明 |
|---|---|---|
voltage |
无 |
依次返回外接电压和电池电压,单位为V |
例程:
读取电池电压
$voltage\n
$start,voltage\n
$10.82,8.06\n ;依次为外接电压和电池电压
$end\n3.2.16 获取机内温度
发送命令 |
选项 |
数据说明 |
|---|---|---|
temp |
无 |
单位:℃ |
例程:
读取机内温度
$temp\n
$start,temp\n
$44.2\n
$end\n3.2.17 获取901时间参数
发送命令 |
选项 |
数据说明 |
|---|---|---|
times |
无 |
依次为开机次数,本次运行时间,总共使用时间 |
例程:
读取时间参数
$times\n
$start,times\n
$1223,2,52,51,2,2,52,51\n ;依次为开机次数,开机时间(时,分,秒),
;使用时间(天,时,分,秒)
$end\n3.2.18设置频谱模式下的参考电平
命令 |
选项 |
说明 |
|---|---|---|
specref |
无 |
参数取值范围(+10) – (-50),单位:dBm |
例程:
设置参考电平为-10dBm
$specref,-10\n3.2.19 退出远程控制模式
命令 |
选项 |
说明 |
|---|---|---|
local |
无 |
断开上位机控制 |
例程:
$local\n处理:
当接收到命令后,KC901会立即停止当前所有动作,并把控制权交给KC901本机。
3.2.20设置网络参数
命令 |
选项 |
说明 |
|---|---|---|
netinfo |
无 |
查看当前网络设置 |
ip |
无 |
设备地址 |
gw |
无 |
网关地址 |
msk |
无 |
子网掩码 |
port |
无 |
端口号(小于65535) |
例程:
查看当前网络设置:
$netinfo\n
$start,NetInfo\n
dhcp: on\n;dhcp状态
192,168,1,2\n ;IP地址
192,168,1,1\n ;网关地址
255,255,255,0\n ;子掩网码
901\n ;端口号
$end\n设置IP地址:
$ip,192.168.1.2\n设置网关地址:
$gw,192.168.1.1\n设置子掩网码:
$msk,255.255.255.0\n设置端口号:(只有第三代KC901X支持更改端口号,第四代不支持更改固定为901)
$port,901\n3.2.21设置带宽
命令 |
选项 |
说明 |
|---|---|---|
bw |
100Hz 300Hz 1k 3k 10k 30k |
设置中频滤波器带宽 |
注意:
第三代KC901X没有100Hz和300Hz这两项。
例程:
设置带宽为10kHz
$bw,10k\n3.2.22远程升级(仅适用于USB串口连接)
发送命令 |
选项 |
说明 |
|---|---|---|
update |
无 |
通过SD卡升级代码 |
说明:
在发送此命令前,请确认SD卡中已经载入升级程序。发送命令后,KC901会自动重启进入远程升级模式。升级过程中会通过串口返回升级过程提示,从中可以看出升级成功还是失败(第四代901需要将Boot版本高于0.0.4才支持该命令,可以通过V1.5.6基础固件升级包升级)。
例程:
$update\n注意:
1、当在远程升级过程中,若出现意外导致设备死机等其他情况。重启仪器便可自动重新升级。
2、升级过程中,第四代KC901X串口波特率固定为460800,第三代KC901X串口波特率固定为921600。
3.2.23恢复出厂设置
发送命令 |
选项 |
说明 |
|---|---|---|
reset |
无 |
恢复所有设置并替换系统校准为出厂校准 |
例程:
$reset\n注意:
恢复到出厂设置后,网络配置参数也会是出厂设置,可能需要重新配置。
3.2.24 S11系统校准(第四代KC901X)
发送命令 |
选项 |
说明 |
|---|---|---|
cal_sys_s11 |
无 |
S11系统校准 |
说明:
发送此命令后,KC901会通过串口或网口与用户交互实现SOL校准。以后的应用中都会默认调用此次校准数据。用户可以通过[Reset]命令,恢复默认调用出厂校准。此过程会有好几次交互,对于上位机编程而言也仅需要识别包头名即可,无需做内容字符串匹配。
注意:该校准在每次初始化后只能进行一次,如果需要重新校准,需运行$S11,STOP\n并重新初始化($S11,INIT\n)。
下面为具体流程:
$cal_sys_s11\n
$start,s11_SysCal_confirm\n
$******S11 System calibration******\n
$ Do you want to calibrate the device?[Yes/no]\n
$end\n
$yes\n
$start,s11_syscal_wait\n
$ waiting for the circuit to be stability...\n
$end\n
$start,port_polarity\n
$Enter female or male to specify the polarity of the PORT1:\n
$end\n
$female\n
$start,cal_open\n
$Step 1:Please connect the OPEN module to PORT1 then send 'yes'.\n
$end\n
$yes\n
$start,cal_short\n
$Step 2:Please connect the SHORT module to PORT1 then send 'yes'.\n
$end\n
$yes\n
$start,cal_load\n
$Step 3:Please connect the LOAD module to PORT1 then send 'yes'.\n
$end\n
$yes\n
$start,cal_completed\n
$Calibration completed!\n
$end\n在下位机等待上位机确认的过程中,用户可以输入’exit\n’,退出校准模式。如下所示:
$exit\n
$start,exit\n
$Exit calibration\n
$end\n3.2.25 S21系统校准(第四代KC901X)
发送命令 |
选项 |
说明 |
|---|---|---|
cal_sys_s21 |
无 |
S21系统校准 |
说明:
发送此命令后,KC901会通过串口或网口与用户交互实现短接校准。以后的应用中都会默认调用此次校准数据。用户可以通过[Reset]命令,恢复默认调用出厂校准。此过程会有好几次交互,对于上位机编程而言也仅需要识别包头名即可,无需做内容字符串匹配。
注意:该校准在每次初始化后只能进行一次,如果需要重新校准,需运行$S21,STOP\n并重新初始化($S21,INIT\n)。
下面为具体流程:
$cal_sys_s21\n$start,s21_SysCal_confirm\n
$******S21 System calibration******\n
$ Do you want to calibrate the device?[Yes/no]\n
$end\n$yes\n$start,s21_syscal_wait\n
$ waiting for the circuit to be stability...\n
$end\n$start,port_polarity\n
$Enter female,male or f_m to specify the polarity of the PORTS:\n
$end\n$female\n$start,cal_connect\n
$Step 1:Please connect PORT1 and PORT2 then send 'yes'.\n
$end\n$yes\n$start,cal_completed\n
$Calibration completed!\n
$end\n在下位机等待上位机确认的过程中,用户可以输入’exit\n’,退出校准模式。如下所示:
$exit\n$start,exit\n
$Exit calibration.\n
$end\n3.2.26 S22系统校准(第四代KC901X)
发送命令 |
选项 |
说明 |
|---|---|---|
cal_sys_s22 |
无 |
S22系统校准 |
说明:
发送此命令后,KC901会通过串口或网口与用户交互实现SOL校准。以后的应用中都会默认调用此次校准数据。用户可以通过[Reset]命令,恢复默认调用出厂校准。此过程会有好几次交互,对于上位机编程而言也仅需要识别包头名即可,无需做内容字符串匹配。
$cal_sys_s22\n$start,s22_SysCal_confirm\n
$******S22 System calibration******\n
$Do you want to calibrate the device?[Yes/no]\n
$end\n$yes\n$start,s22_syscal_wait\n
$ waiting for the circuit to be stability...\n
$end\n$start,port_polarity\n
$Enter female or male to specify the polarity of the PORT2:\n
$end\n$female\n$start,cal_open\n
$Step 1:Please connect the OPEN module to PORT2 then send 'yes'.\n
$end\n$yes\n$start,cal_short\n
$Step 2:Please connect the SHORT module to PORT2 then send 'yes'.\n
$end\n$yes\n$start,cal_load\n
$Step 3:Please connect the LOAD module to PORT2 then send 'yes'.\n
$end\n$start,cal_completed\n
$Calibration completed!\n
$end\n在下位机等待上位机确认的过程中,用户可以输入’exit\n’,退出校准模式。如下所示:
$exit\n$start,exit\n
$Exit calibration\n
$end\n3.2.27 S12系统校准(第四代KC901X)
发送命令 |
选项 |
说明 |
|---|---|---|
cal_sys_s12 |
无 |
S12系统校准 |
说明:
发送此命令后,KC901会通过串口或网口与用户交互实现SOL校准。以后的应用中都会默认调用此次校准数据。用户可以通过[Reset]命令,恢复默认调用出厂校准。此过程会有好几次交互,对于上位机编程而言也仅需要识别包头名即可,无需做内容字符串匹配。
$cal_sys_s12\n$start,s12_SysCal_confirm\n
$******S12 System calibration******\n
$Do you want to calibrate the device?[Yes/no]\n
$end$yes\n$start,s12_syscal_wait\n
$ waiting for the circuit to be stability...\n
$end\n$start,port_polarity\n
$Enter female,male or f_m to specify the polarity of the PORTS:\n
$end\n$female\n$start,cal_connect\n
$Step 1:Please connect PORT1 and PORT2 then send 'yes'.\n
$end\n$yes\n$start,cal_completed\n
$Calibration completed!\n
$end\n在下位机等待上位机确认的过程中,用户可以输入’exit\n’,退出校准模式。如下所示:
$exit\n$start,exit\n
$Exit calibration\n
$end\n3.2.28 S11校准(第四代KC901X)
发送命令 |
参数1 |
参数2 |
参数3 |
参数4 |
|---|---|---|---|---|
cal_user_s11 |
点数 |
频率方式 |
中心频率/起始频率 |
扫宽/终止频率 |
说明:
发送此命令后,KC901会通过串口或网口与用户交互实现SOL校准。以后的应用中,如果指定调用S11用户校准,则会默认调用此次校准数据,但如果频率范围超出校准的范围,则会调用系统校准。校准过程会有好几次交互,对于上位机编程而言也仅需要识别包头名即可,无需做内容字符串匹配。
$cal_user_s11,10,cs,901000000,10000000\n$start,s11_Cal_confirm\n
$******S11 calibration******\n
$Do you want to calibrate the device?[Yes/no]\n
$end$yes\n$start,s11_cal_wait\n
$ waiting for the circuit to be stability...\n
$end\n$start,port_polarity\n
$Enter female or male to specify the polarity of the PORT1:\n
$end\n$female\n$start,cal_open\n
$Step 1:Please connect the OPEN module to PORT1 then send 'yes'.\n
$end\n$yes\n$start,cal_short\n
$Step 2:Please connect the SHORT module to PORT1 then send 'yes'.\n
$end\n$yes\n$start,cal_load\n
$Step 3:Please connect the LOAD module to PORT1 then send 'yes'.\n
$end\n$yes\n$start,cal_completed\n
$Calibration completed!\n
$end\n在下位机等待上位机确认的过程中,用户可以输入’exit\n’,退出校准模式。如下所示:
$exit\n$start,exit\n
$Exit calibration\n
$end\n3.2.29 S22校准(第四代KC901X)
发送命令 |
参数1 |
参数2 |
参数3 |
参数4 |
|---|---|---|---|---|
cal_user_s22 |
点数 |
频率方式 |
中心频率/起始频率 |
扫宽/终止频率 |
说明:
发送此命令后,KC901会通过串口或网口与用户交互实现SOL校准。以后的应用中,如果指定调用S22用户校准,则会默认调用此次校准数据,但如果频率范围超出校准的范围,则会调用系统校准。校准过程会有好几次交互,对于上位机编程而言也仅需要识别包头名即可,无需做内容字符串匹配。
$cal_user_s22,10,cs,901000000,10000000\n$start,s22_Cal_confirm\n
$******S22 calibration******\n
$Do you want to calibrate the device?[Yes/no]\n
$end$yes\n$start,s22_cal_wait\n
$ waiting for the circuit to be stability...\n
$end\n$start,port_polarity\n
$Enter female or male to specify the polarity of the PORT2:\n
$end\n$female\n$start,cal_open\n
$Step 1:Please connect the OPEN module to PORT2 then send 'yes'.\n
$end\n$yes\n$start,cal_short\n
$Step 2:Please connect the SHORT module to PORT2 then send 'yes'.\n
$end\n$yes\n$start,cal_load\n
$Step 3:Please connect the LOAD module to PORT2 then send 'yes'.\n
$end\n$yes\n$start,cal_completed\n
$Calibration completed!\n
$end\n在下位机等待上位机确认的过程中,用户可以输入’exit\n’,退出校准模式。如下所示:
$exit\n$start,exit\n
$Exit calibration\n
$end\n3.2.30 S21响应校准(第四代KC901X)
发送命令 |
参数1 |
参数2 |
参数3 |
参数4 |
|---|---|---|---|---|
response_s21_cal |
点数 |
频率方式 |
中心频率/起始频率 |
扫宽/终止频率 |
说明:
发送此命令后,KC901会通过串口或网口与用户交互实现T校准。以后的应用中,如果指定调用S21响应校准,则会默认调用此次校准数据,但如果频率范围超出校准的范围,则会调用系统校准。校准过程会有好几次交互,对于上位机编程而言也仅需要识别包头名即可,无需做内容字符串匹配。
$response_s21_cal,10,cs,901000000,10000000\n$start,s21_Cal_confirm\n
$******S21 Response calibration******\n
$Do you want to calibrate the device?[Yes/no]\n
$end$yes\n$start,s21_response_cal_wait\n
$ waiting for the circuit to be stability...\n
$end\n$start,port_polarity\n
$Enter female,male or f_m to specify the polarity of the PORTS:\n
$end\n$female\n$start,cal_connect\n
$Step 1:Please connect PORT1 and PORT2 then send 'yes'.\n
$end\n$yes\n$start,cal_completed\n
$Calibration completed!\n
$end\n在下位机等待上位机确认的过程中,用户可以输入’exit\n’,退出校准模式。如下所示:
$exit\n$start,exit\n
$Exit calibration\n
$end\n3.2.31 S21响应加隔离校准(第四代KC901X)
发送命令 |
参数1 |
参数2 |
参数3 |
参数4 |
|---|---|---|---|---|
iso_response_s21_cal |
点数 |
频率方式 |
中心频率/起始频率 |
扫宽/终止频率 |
说明:
发送此命令后,KC901会通过串口或网口与用户交互实现T+I校准。以后的应用中,如果指定调用S21响应+隔离校准,则会默认调用此次校准数据,但如果频率范围超出校准的范围,则会调用系统校准。校准过程会有好几次交互,对于上位机编程而言也仅需要识别包头名即可,无需做内容字符串匹配。
$iso_response_s21_cal,10,cs,901000000,10000000\n$start,s21_Cal_confirm\n
$******S21 Response+Isolation calibration******\n
$Do you want to calibrate the device?[Yes/no]\n
$end\n$yes\n$start,s21_response_isolation_cal_wait\n
$ waiting for the circuit to be stability...\n
$end\n$start,port_polarity\n
$Enter female,male or f_m to specify the polarity of the PORTS:\n
$end\n$female\n$start,cal_load\n
$Step 1:Please connect the LOAD module to PORT1 then send 'yes'.\n
$end\n$yes\n$start,cal_connect\n
$Step 2:Please connect PORT1 and PORT2 then send 'yes'.\n
$end\n$yes\n$start,cal_completed\n
$Calibration completed!\n
$end\n在下位机等待上位机确认的过程中,用户可以输入’exit\n’,退出校准模式。如下所示:
$exit\n$start,exit\n
$Exit calibration\n
$end\n3.2.32 S21增强响应校准(第四代KC901X)
发送命令 |
参数1 |
参数2 |
参数3 |
参数4 |
|---|---|---|---|---|
enresponse_s21_cal |
点数 |
频率方式 |
中心频率/起始频率 |
扫宽/终止频率 |
说明:
发送此命令后,KC901会通过串口或网口与用户交互实现增强响应校准。以后的应用中,如果指定调用S21增强响应校准,则会默认调用此次校准数据,但如果频率范围超出校准的范围,则会调用系统校准。校准过程会有好几次交互,对于上位机编程而言也仅需识别包头名即可,无需做内容字符串匹配。
$enresponse_s21_cal,10,cs,901000000,10000000\n$start,s21_Cal_confirm\n
$******S21 Enhance Response calibration******\n
$Do you want to calibrate the device?[Yes/no]\n
$end\n$yes\n$start,s21_enhance_response_cal_wait\n
$ waiting for the circuit to be stability...\n
$end\n$start,port_polarity\n
$Enter female or male to specify the polarity of the PORT1:\n
$end\n$female\n$start,cal_open\n
$Step 1:Please connect the OPEN module to PORT1 then send 'yes'.\n
$end\n$yes\n$start,cal_short\n
$Step 2:Please connect the SHORT module to PORT1 then send 'yes'.\n
$end\n$yes\n$start,cal_load\n
$Step 3:Please connect the LOAD module to PORT1 then send 'yes'.\n
$end\n$yes\n$start,port_polarity\n
$Enter female,male or f_m to specify the polarity of the PORTS:\n
$end\n$female\n$start,cal_connect\n
$Step 4:Please connect PORT1 and PORT2 then send 'yes'.\n
$end\n$yes\n$start,cal_completed\n
$Calibration completed!\n
$end\n在下位机等待上位机确认的过程中,用户可以输入’exit\n’,退出校准模式。如下所示:
$exit\n$start,exit\n
$Exit calibration\n
$end\n3.2.33 S12响应校准(第四代KC901X)
发送命令 |
参数1 |
参数2 |
参数3 |
参数4 |
|---|---|---|---|---|
response_s12_cal |
点数 |
频率方式 |
中心频率/起始频率 |
扫宽/终止频率 |
说明:
发送此命令后,KC901会通过串口或网口与用户交互实现T校准。以后的应用中,如果指定调用S12响应校准,则会默认调用此次校准数据,但如果频率范围超出校准的范围,则会调用系统校准。校准过程会有好几次交互,对于上位机编程而言也仅需要识别包头名即可,无需做内容字符串匹配。
$response_s12_cal,10,cs,901000000,10000000\n$start,s12_Cal_confirm\n
$******S12 Response calibration******\n
$Do you want to calibrate the device?[Yes/no]\n
$end\n$yes\n$start,s12_response_cal_wait\n
$ waiting for the circuit to be stability...\n
$end\n$start,port_polarity\n
$Enter female,male or f_m to specify the polarity of the PORTS:\n
$end\n$female\n$start,cal_connect\n
$Step 1:Please connect PORT1 and PORT2 then send 'yes'.\n
$end\n$yes\n$start,cal_completed\n
$Calibration completed!\n
$end\n在下位机等待上位机确认的过程中,用户可以输入’exit\n’,退出校准模式。如下所示:
$exit\n$start,exit\n
$Exit calibration\n
$end\n3.2.34 S12响应加隔离校准(第四代KC901X)
发送命令 |
参数1 |
参数2 |
参数3 |
参数4 |
|---|---|---|---|---|
iso_response_s12_cal |
点数 |
频率方式 |
中心频率/起始频率 |
扫宽/终止频率 |
说明:
发送此命令后,KC901会通过串口或网口与用户交互实现T+I校准。以后的应用中,如果指定调用S12响应+隔离校准,则会默认调用此次校准数据,但如果频率范围超出校准的范围,则会调用系统校准。校准过程会有好几次交互,对于上位机编程而言也仅需要识别包头名即可,无需做内容字符串匹配。
$iso_response_s12_cal,10,cs,901000000,10000000\n$start,s12_Cal_confirm\n
$******S12 Response+Isolation calibration******\n
$Do you want to calibrate the device?[Yes/no]\n
$end\n$yes\n$start,s12_response_isolation_cal_wait\n
$ waiting for the circuit to be stability...\n
$end\n$start,port_polarity\n
$Enter female,male or f_m to specify the polarity of the PORTS:\n
$end\n$female\n$start,cal_load\n
$Step 1:Please connect the LOAD module to PORT2 then send 'yes'.\n
$end\n$yes\n$start,cal_connect\n
$Step 2:Please connect PORT1 and PORT2 then send 'yes'.\n
$end\n$yes\n$start,cal_completed\n
$Calibration completed!\n
$end\n在下位机等待上位机确认的过程中,用户可以输入’exit\n’,退出校准模式。如下所示:
$exit\n$start,exit\n
$Exit calibration\n
$end\n3.2.35 S12增强响应校准(第四代KC901X)
发送命令 |
参数1 |
参数2 |
参数3 |
参数4 |
|---|---|---|---|---|
enresponse_s12_cal |
点数 |
频率方式 |
中心频率/起始频率 |
扫宽/终止频率 |
说明:
发送此命令后,KC901会通过串口或网口与用户交互实现增强响应校准。以后的应用中,如果指定调用S12增强响应校准,则会默认调用此次校准数据,但如果频率范围超出校准的范围,则会调用系统校准。校准过程会有好几次交互,对于上位机编程而言也仅需要识别包头名即可,无需做内容字符串匹配。
$enresponse_s12_cal,10,cs,901000000,10000000\n$start,s12_Cal_confirm\n
$******S12 Enhance Response calibration******\n
$Do you want to calibrate the device?[Yes/no]\n
$end\n$yes\n$start,s12_enhance_response_cal_wait\n
$ waiting for the circuit to be stability...\n
$end\n$start,port_polarity\n
$Enter female or male to specify the polarity of the PORT2:\n
$end\n$female\n$start,cal_open\n
$Step 1:Please connect the OPEN module to PORT2 then send 'yes'.\n
$end\n
$yes\n$start,cal_short\n
$Step 2:Please connect the SHORT module to PORT2 then send 'yes'.\n
$end\n$yes\n$start,cal_load\n
$Step 3:Please connect the LOAD module to PORT2 then send 'yes'.\n
$end\n$yes\n$start,port_polarity\n
$Enter female,male or f_m to specify the polarity of the PORTS:\n
$end\n$female\n$start,cal_connect\n
$Step 4:Please connect PORT1 and PORT2 then send 'yes'.\n
$end\n$yes\n$start,cal_completed\n
$Calibration completed!\n
$end\n在下位机等待上位机确认的过程中,用户可以输入’exit\n’,退出校准模式。如下所示:
$exit\n$start,exit\n
$Exit calibration\n
$end\n3.2.36 全双端口校准(第四代KC901X)
发送命令 |
参数1 |
参数2 |
参数3 |
参数4 |
|---|---|---|---|---|
full2port_cal |
点数 |
频率方式 |
中心频率/起始频率 |
扫宽/终止频率 |
说明:
发送此命令后,KC901会通过串口或网口与用户交互实现SOLT校准。以后的应用中,如果指定调用全双端口校准,则会默认调用此次校准数据,但如果频率范围超出校准的范围,则会调用系统校准。校准过程会有好几次交互,对于上位机编程而言也仅需要识别包头名即可,无需做内容字符串匹配。
$full2port_cal,10,cs,901000000,10000000\n$start,full2port_Cal_confirm\n
$******Full 2-Port calibration******\n
$Do you want to calibrate the device?[Yes/no]\n
$end\n$yes\n$start,full2port_cal_wait\n
$ waiting for the circuit to be stability...\n
$end\n$start,port_polarity\n
$Enter female or male to specify the polarity of the PORT1:\n
$end\n$female\n$start,cal_open\n
$Step 1:Please connect the OPEN module to PORT1 then send 'yes'.\n
$end\n$yes\n$start,cal_short\n
$Step 2:Please connect the SHORT module to PORT1 then send 'yes'.\n
$end\n$yes\n$start,cal_load\n
$Step 3:Please connect the LOAD module to PORT1 then send 'yes'.\n
$end\n$yes\n$start,port_polarity\n
$Enter female or male to specify the polarity of the PORT2:\n
$end\n$female\n$start,cal_open\n
$Step 4:Please connect the OPEN module to PORT2 then send 'yes'.\n
$end\n$yes\n$start,cal_short\n
$Step 5:Please connect the SHORT module to PORT2 then send 'yes'.\n
$end\n$yes\n$start,cal_load\n
$Step 6:Please connect the LOAD module to PORT2 then send 'yes'.\n
$end\n$yes\n$start,cal_connect\n
$Step 7:Please connect PORT1 and PORT2 then send 'yes'.\n
$end\n$yes\n
$start,cal_completed\n
$Calibration completed!\n
$end\n在下位机等待上位机确认的过程中,用户可以输入’exit\n’,退出校准模式。如下所示:
$exit\n$start,exit\n
$Exit calibration\n
$end\n3.2.37 获取系统警告信息
发送命令 |
选项 |
说明 |
|---|---|---|
getstatus |
无 |
获取系统警告信息 |
说明:
发送此命令后,如有警告信息,KC901会通过串口或网口返回一次系统警告信息,无警告信息时无返回。
例程:
$getstatus\n
$start,err_BatVolLow
$error:Low battery!
$end3.2.38 清除系统警告信息标志位
发送命令 |
选项 |
说明 |
|---|---|---|
clearstatus |
无 |
清除系统警告信息标志位 |
说明:
此命令无返回。
例程:
$clearstatus\n3.2.39 输出电平设置(第四代KC901X)
发送命令 |
选项 |
参数 |
说明 |
|---|---|---|---|
source_level |
get set |
level |
使设备在电平模式下运行 |
说明:
set选项设置信号源输出幅度,使设备在电平模式下运行;
get选项不需要传入参数,返回电平模式信号源幅度值;
例程:
$source_level,set,-50\n
$start,source_level,set,success\n
$end\n$source_level,get\n
$start,source_level,get,success\n
$-50\n
$end\n3.2.40 指定频率信号源幅度有效范围查询(第四代KC901X)
发送命令 |
选项 |
参数 |
说明 |
|---|---|---|---|
range_source_level |
get |
start freq stop freq point |
查询指定频率信号源幅度有效范围 |
说明:
传入起始频率,终止频率及点数,返回此频率信号源幅度的有效范围;
例程:
$range_source_level,get,100000000,200000000,201\n
$start,range_source_level,get,success\n
$-43,9\n
$end\n3.2.41 功率扫描设置(第四代KC901X)
发送命令 |
选项 |
参数 |
说明 |
|---|---|---|---|
power_sweep |
get set |
start level stop level |
使设备在功率扫描模式下运行 |
说明:
set选项传入信号源起始幅度和终止幅度,使设备在功率扫描模式下运行;
get选项不需要填入参数,返回仪器在功率扫描模式信号源的起始幅度和终止幅度;
例程:
$power_sweep,set,-50,10\n
$start,power_sweep,set,success\n
$end\n$power_sweep,get\n
$start,power_sweep,get,success\n
$-50,$10\n
$end\n3.2.42 DHCP开关(第四代KC901X)
发送命令 |
选项 |
说明 |
|---|---|---|
dhcp |
on off |
控制仪器dhcp功能开关 |
例程:
$dhcp,on\n
$start,dhcp,on,success\n
$end\n3.2.43 频率列表设置(第四代KC901X)
命令 |
选项 |
参数1 |
|---|---|---|
|
freq_list |
set |
频率范围 |
get |
说明:
set选项给下位机下发频率列表单位Hz,频率与频率之间用“-”分割,下位机接受完所以频率后返回“Frequency received successfully!”;
频率列表至少包含2个点,最多包含10000个点。下位机接收的频率列表保存在RAM中,关机后需要重新下发。列表中的频率不能超出设备支持的范围。重复执行此命令会覆盖之前的列表。请勿下发超限列表;超限时是拒绝还是截断,尚待确认。
例程:
$freq_list,set,100000000-200000000-40000000\n$start,Frequency received successfully!
$endget选项不需要传入参数,返回下位机收到的频率列表;
例程:
$freq_list,get\n$start,freq
100000000
200000000
40000000
$end3.2.44 列表S11用户校准(第四代KC901X)
发送命令 |
选项 |
说明 |
|---|---|---|
list_user_s11_cal |
无 |
使用列表频率进行S11用户校准 |
说明:
发送此命令后,KC901会通过串口或网口与用户交互实现用自定义列表里的频率进行一端口SOL校准。在使用列表里的频率进行扫频时,如果指定调用S11用户校准,则会默认调用此次校准数据,但如果频率范围超出校准的范围,则会调用系统校准。校准过程会有好几次交互,对于上位机编程而言也仅需要识别包头名即可,无需做内容字符串匹配。
$list_user_s11_cal\n$start,s11_Cal_confirm\n
$******S11 calibration******\n
$Do you want to calibrate the device?[Yes/no]\n
$end$yes\n$start,s11_cal_wait\n
$ waiting for the circuit to be stability...\n
$end\n$start,port_polarity\n
$Enter female or male to specify the polarity of the PORT1:\n
$end\n$female\n$start,cal_open\n
$Step 1:Please connect the OPEN module to PORT1 then send 'yes'.\n
$end\n$yes\n$start,cal_short\n
$Step 2:Please connect the SHORT module to PORT1 then send 'yes'.\n
$end\n$yes\n$start,cal_load\n
$Step 3:Please connect the LOAD module to PORT1 then send 'yes'.\n
$end\n$yes\n$start,cal_completed\n
$Calibration completed!\n
$end\n在下位机等待上位机确认的过程中,用户可以输入’exit\n’,退出校准模式。如下所示:
$exit\n$start,exit\n
$Exit calibration\n
$end\n3.2.45 列表S22用户校准(第四代KC901X)
发送命令 |
选项 |
说明 |
|---|---|---|
list_user_s22_cal |
无 |
使用列表频率进行S22用户校准 |
说明:
发送此命令后,KC901会通过串口或网口与用户交互实现用自定义列表里的频率进行二端口SOL校准。在使用列表里的频率进行扫频时,如果指定调用S22用户校准,则会默认调用此次校准数据,但如果频率范围超出校准的范围,则会调用系统校准。校准过程会有好几次交互,对于上位机编程而言也仅需要识别包头名即可,无需做内容字符串匹配。
$list_user_s22_cal\n$start,s22_Cal_confirm\n
$******S22 calibration******\n
$Do you want to calibrate the device?[Yes/no]\n
$end$yes\n$start,s22_cal_wait\n
$ waiting for the circuit to be stability...\n
$end\n$start,port_polarity\n
$Enter female or male to specify the polarity of the PORT2:\n
$end\n$female\n$start,cal_open\n
$Step 1:Please connect the OPEN module to PORT2 then send 'yes'.\n
$end\n$yes\n$start,cal_short\n
$Step 2:Please connect the SHORT module to PORT2 then send 'yes'.\n
$end\n$yes\n$start,cal_load\n
$Step 3:Please connect the LOAD module to PORT2 then send 'yes'.\n
$end\n$yes\n$start,cal_completed\n
$Calibration completed!\n
$end\n在下位机等待上位机确认的过程中,用户可以输入’exit\n’,退出校准模式。如下所示:
$exit\n$start,exit\n
$Exit calibration\n
$end\n3.2.46 列表S21响应校准(第四代KC901X)
发送命令 |
选项 |
说明 |
|---|---|---|
list_response_s21_cal |
无 |
使用列表频率进行S21响应校准 |
说明:
发送此命令后,KC901会通过串口或网口与用户交互实现用自定义列表里的频率进行T校准。在使用列表里的频率进行扫频时,如果指定调用S21响应校准,则会默认调用此次校准数据,但如果频率范围超出校准的范围,则会调用系统校准。校准过程会有好几次交互,对于上位机编程而言也仅需要识别包头名即可,无需做内容字符串匹配。
$list_response_s21_cal\n$start,s21_Cal_confirm\n
$******S21 Response calibration******\n
$Do you want to calibrate the device?[Yes/no]\n
$end$yes\n$start,s21_response_cal_wait\n
$ waiting for the circuit to be stability...\n
$end\n$start,port_polarity\n
$Enter female,male or f_m to specify the polarity of the PORTS:\n
$end\n$female\n$start,cal_connect\n
$Step 1:Please connect PORT1 and PORT2 then send 'yes'.\n
$end\n$yes\n$start,cal_completed\n
$Calibration completed!\n
$end\n在下位机等待上位机确认的过程中,用户可以输入’exit\n’,退出校准模式。如下所示:
$exit\n$start,exit\n
$Exit calibration\n
$end\n3.2.47 列表S12响应校准(第四代KC901X)
发送命令 |
选项 |
说明 |
|---|---|---|
list_response_s12_cal |
无 |
使用列表频率进行S12响应校准 |
说明:
发送此命令后,KC901会通过串口或网口与用户交互实现用自定义列表里的频率进行T校准。在使用列表里的频率进行扫频时,如果指定调用S12响应校准,则会默认调用此次校准数据,但如果频率范围超出校准的范围,则会调用系统校准。校准过程会有好几次交互,对于上位机编程而言也仅需要识别包头名即可,无需做内容字符串匹配。
$list_response_s12_cal\n$start,s12_Cal_confirm\n
$******S12 Response calibration******\n
$Do you want to calibrate the device?[Yes/no]\n
$end\n$yes\n$start,s12_response_cal_wait\n
$ waiting for the circuit to be stability...\n
$end\n$start,port_polarity\n
$Enter female,male or f_m to specify the polarity of the PORTS:\n
$end\n$female\n$start,cal_connect\n
$Step 1:Please connect PORT1 and PORT2 then send 'yes'.\n
$end\n$yes\n$start,cal_completed\n
$Calibration completed!\n
$end\n在下位机等待上位机确认的过程中,用户可以输入’exit\n’,退出校准模式。如下所示:
$exit\n$start,exit\n
$Exit calibration\n
$end\n3.2.48 列表S21响应加隔离校准(第四代KC901X)
发送命令 |
选项 |
说明 |
|---|---|---|
list_iso_response_s21_cal |
无 |
使用列表频率进行S21响应+隔离校准 |
说明:
发送此命令后,KC901会通过串口或网口与用户交互实现用自定义列表里的频率进行T校准T+I校准。在使用列表里的频率进行扫频时,如果指定调用S21响应+隔离校准,则会默认调用此次校准数据,但如果频率范围超出校准的范围,则会调用系统校准。校准过程会有好几次交互,对于上位机编程而言也仅需要识别包头名即可,无需做内容字符串匹配。
$list_iso_response_s21_cal\n$start,s21_Cal_confirm\n
$******S21 Response+Isolation calibration******\n
$Do you want to calibrate the device?[Yes/no]\n
$end\n$yes\n$start,s21_response_isolation_cal_wait\n
$ waiting for the circuit to be stability...\n
$end\n$start,port_polarity\n
$Enter female,male or f_m to specify the polarity of the PORTS:\n
$end\n$female\n$start,cal_load\n
$Step 1:Please connect the LOAD module to PORT1 then send 'yes'.\n
$end\n$yes\n$start,cal_connect\n
$Step 2:Please connect PORT1 and PORT2 then send 'yes'.\n
$end\n$yes\n$start,cal_completed\n
$Calibration completed!\n
$end\n在下位机等待上位机确认的过程中,用户可以输入’exit\n’,退出校准模式。如下所示:
$exit\n$start,exit\n
$Exit calibration\n
$end\n3.2.49 列表S12响应加隔离校准(第四代KC901X)
发送命令 |
选项 |
说明 |
|---|---|---|
list_iso_response_s12_cal |
无 |
使用列表频率进行S12响应+隔离校准 |
说明:
发送此命令后,KC901会通过串口或网口与用户交互实现用自定义列表里的频率进行T+I校准。在使用列表里的频率进行扫频时,如果指定调用S12响应+隔离校准,则会默认调用此次校准数据,但如果频率范围超出校准的范围,则会调用系统校准。校准过程会有好几次交互,对于上位机编程而言也仅需要识别包头名即可,无需做内容字符串匹配。
$list_iso_response_s12_cal\n$start,s12_Cal_confirm\n
$******S12 Response+Isolation calibration******\n
$Do you want to calibrate the device?[Yes/no]\n
$end\n$yes\n$start,s12_response_isolation_cal_wait\n
$ waiting for the circuit to be stability...\n
$end\n$start,port_polarity\n
$Enter female,male or f_m to specify the polarity of the PORTS:\n
$end\n$female\n$start,cal_load\n
$Step 1:Please connect the LOAD module to PORT2 then send 'yes'.\n
$end\n$yes\n$start,cal_connect\n
$Step 2:Please connect PORT1 and PORT2 then send 'yes'.\n
$end\n$yes\n$start,cal_completed\n
$Calibration completed!\n
$end\n在下位机等待上位机确认的过程中,用户可以输入’exit\n’,退出校准模式。如下所示:
$exit\n$start,exit\n
$Exit calibration\n
$end\n3.2.50 列表S21增强响应校准(第四代KC901X)
发送命令 |
选项 |
说明 |
|---|---|---|
list_enresponse_s21_cal |
无 |
使用列表频率进行S21增强响应校准 |
说明:
发送此命令后,KC901会通过串口或网口与用户交互实现用自定义列表里的频率进行增强响应校准。在使用列表里的频率进行扫频时,如果指定调用S21增强响应校准,则会默认调用此次校准数据,但如果频率范围超出校准的范围,则会调用系统校准。校准过程会有好几次交互,对于上位机编程而言也仅需识别包头名即可,无需做内容字符串匹配。
$list_enresponse_s21_cal\n$start,s21_Cal_confirm\n
$******S21 Enhance Response calibration******\n
$Do you want to calibrate the device?[Yes/no]\n
$end\n$yes\n$start,s21_enhance_response_cal_wait\n
$ waiting for the circuit to be stability...\n
$end\n$start,port_polarity\n
$Enter female or male to specify the polarity of the PORT1:\n
$end\n$female\n$start,cal_open\n
$Step 1:Please connect the OPEN module to PORT1 then send 'yes'.\n
$end\n$yes\n$start,cal_short\n
$Step 2:Please connect the SHORT module to PORT1 then send 'yes'.\n
$end\n$yes\n$start,cal_load\n
$Step 3:Please connect the LOAD module to PORT1 then send 'yes'.\n
$end\n$yes\n$start,port_polarity\n
$Enter female,male or f_m to specify the polarity of the PORTS:\n
$end\n$female\n$start,cal_connect\n
$Step 4:Please connect PORT1 and PORT2 then send 'yes'.\n
$end\n$yes\n$start,cal_completed\n
$Calibration completed!\n
$end\n在下位机等待上位机确认的过程中,用户可以输入’exit\n’,退出校准模式。如下所示:
$exit\n$start,exit\n
$Exit calibration\n
$end\n3.2.51 列表S12增强响应校准(第四代KC901X)
发送命令 |
选项 |
说明 |
|---|---|---|
list_enresponse_s12_cal |
无 |
使用列表频率进行S12增强响应校准 |
说明:
发送此命令后,KC901会通过串口或网口与用户交互实现用自定义列表里的频率进行增强响应校准。在使用列表里的频率进行扫频时,如果指定调用S12增强响应校准,则会默认调用此次校准数据,但如果频率范围超出校准的范围,则会调用系统校准。校准过程会有好几次交互,对于上位机编程而言也仅需要识别包头名即可,无需做内容字符串匹配。
$list_enresponse_s12_cal\n$start,s12_Cal_confirm\n
$******S12 Enhance Response calibration******\n
$Do you want to calibrate the device?[Yes/no]\n
$end\n$yes\n$start,s12_enhance_response_cal_wait\n
$ waiting for the circuit to be stability...\n
$end\n$start,port_polarity\n
$Enter female or male to specify the polarity of the PORT2:\n
$end\n$female\n$start,cal_open\n
$Step 1:Please connect the OPEN module to PORT2 then send 'yes'.\n
$end\n
$yes\n$start,cal_short\n
$Step 2:Please connect the SHORT module to PORT2 then send 'yes'.\n
$end\n$yes\n$start,cal_load\n
$Step 3:Please connect the LOAD module to PORT2 then send 'yes'.\n
$end\n$yes\n$start,port_polarity\n
$Enter female,male or f_m to specify the polarity of the PORTS:\n
$end\n$female\n$start,cal_connect\n
$Step 4:Please connect PORT1 and PORT2 then send 'yes'.\n
$end\n$yes\n$start,cal_completed\n
$Calibration completed!\n
$end\n在下位机等待上位机确认的过程中,用户可以输入’exit\n’,退出校准模式。如下所示:
$exit\n$start,exit\n
$Exit calibration\n
$end\n3.2.52 列表全双端口校准(第四代KC901X)
发送命令 |
选项 |
说明 |
|---|---|---|
list_full2port_cal |
无 |
使用列表频率进行全双端口校准 |
说明:
发送此命令后,KC901会通过串口或网口与用户交互实现用自定义列表里的频率进行SOLT校准。在使用列表里的频率进行扫频时,如果指定调用全双端口校准,则会默认调用此次校准数据,但如果频率范围超出校准的范围,则会调用系统校准。校准过程会有好几次交互,对于上位机编程而言也仅需要识别包头名即可,无需做内容字符串匹配。
$list_full2port_cal\n$start,full2port_Cal_confirm\n
$******Full 2-Port calibration******\n
$Do you want to calibrate the device?[Yes/no]\n
$end\n$yes\n$start,full2port_cal_wait\n
$ waiting for the circuit to be stability...\n
$end\n$start,port_polarity\n
$Enter female or male to specify the polarity of the PORT1:\n
$end\n$female\n$start,cal_open\n
$Step 1:Please connect the OPEN module to PORT1 then send 'yes'.\n
$end\n$yes\n$start,cal_short\n
$Step 2:Please connect the SHORT module to PORT1 then send 'yes'.\n
$end\n$yes\n$start,cal_load\n
$Step 3:Please connect the LOAD module to PORT1 then send 'yes'.\n
$end\n$yes\n$start,port_polarity\n
$Enter female or male to specify the polarity of the PORT2:\n
$end\n$female\n$start,cal_open\n
$Step 4:Please connect the OPEN module to PORT2 then send 'yes'.\n
$end\n$yes\n$start,cal_short\n
$Step 5:Please connect the SHORT module to PORT2 then send 'yes'.\n
$end\n$yes\n$start,cal_load\n
$Step 6:Please connect the LOAD module to PORT2 then send 'yes'.\n
$end\n$yes\n$start,cal_connect\n
$Step 7:Please connect PORT1 and PORT2 then send 'yes'.\n
$end\n$yes\n
$start,cal_completed\n
$Calibration completed!\n
$end\n在下位机等待上位机确认的过程中,用户可以输入’exit\n’,退出校准模式。如下所示:
$exit\n$start,exit\n
$Exit calibration\n
$end\n3.2.53 S11用户校准(第三代KC901X,远程模式不支持)
第三代KC901X在远程模式下不支持用户校准。原先列于本节的用户校准命令和交互流程不适用于远程操作,现已移除。保留本节编号以便查阅。
3.2.54 S21用户校准(第三代KC901X,远程模式不支持)
第三代KC901X在远程模式下不支持用户校准。原先列于本节的用户校准命令和交互流程不适用于远程操作,现已移除。保留本节编号以便查阅。
3.2.55 S11系统校准(第三代KC901X)
发送命令 |
选项 |
说明 |
|---|---|---|
cal_s11 |
无 |
S11系统校准 |
说明:
发送此命令后,KC901会通过串口或网口与用户交互实现SOL校准。以后的应用中都会默认调用此次校准数据。用户可以通过[Reset]命令,恢复默认调用出厂校准。此过程会有好几次交互,对于上位机编程而言也仅需要识别包头名即可,无需做内容字符串匹配。
注意:该校准在每次初始化后只能进行一次,如果需要重新校准,需运行$S11,STOP\n并重新初始化($S11,INIT\n)。
下面为具体流程:
$cal_s11\n$start,s11cal_confirm\n
$******S11 calibration******\n ;等待用户确认是否校准
$ Do you want to calibrate the device?[Yes/no]\n
$end\n$yes\n$start,s11cal_wait\n ;等待硬件预热,时间约5秒,期间下位机无数据返回
$ waiting for the circuit to be stability...\n
$end\n$start,s11cal_step\n ;提示按照下面的步骤操作
$ start calibration, please follow these steps:\n
$end\n$start,s11cal_short\n ;连接短路校准件
$Step 1:Please connect the short module then send 'yes'.\n
$end\n$yes\n (注意:确认后需要等待约16秒进行短路校准,期间下位机无数据返回)$start,s11cal_open\n ;连接开路校准件
$Step 2:Please connect the open module then send 'yes'.\n
$end\n$yes\n(注意:确认后需要等待约16秒进行开路校准,期间下位机无数据返回)$start,s11cal_load\n ;连接负载校准件
$Step 3:Please connect the load module then send 'yes'.\n
$end\n$yes\n(注意:确认后需要等待约16秒进行负载校准,期间下位机无数据返回)$start,s11cal_process\n ;提示正在计算
$Step 4: processing (Wait please).\n
$end\n$start,s11cal_save\n ;正在保存
$ saving(wait please) \n
$end\n$start,s11cal_completed\n ;校准完成
$Calibration completed!\n
$end\n在下位机等待上位机确认的过程中,用户可以输入’exit\n’,退出校准模式。如下所示:
$exit\n$start,s11cal_exit\n
$Exit calibration\n
$end\n3.2.56 S21系统校准(第三代KC901X)
发送命令 |
选项 |
说明 |
|---|---|---|
cal_s21 |
无 |
S21系统校准 |
说明:
发送此命令后,KC901会通过串口或网口与用户交互实现短接校准。以后的应用中都会默认调用此次校准数据。用户可以通过[Reset]命令,恢复默认调用出厂校准。此过程会有好几次交互,对于上位机编程而言也仅需要识别包头名即可,无需做内容字符串匹配。
注意:该校准在每次初始化后只能进行一次,如果需要重新校准,需运行$S21,STOP\n并重新初始化($S21,INIT\n)。
下面为具体流程:
$cal_s21\n$start,s21cal_confirm\n
$******S21 calibration******\n ;等待用户确认是否校准
$ Do you want to calibrate the device?[Yes/no]\n
$end\n$yes\n$start,s21cal_wait\n ;等待硬件预热,时间约5秒,期间下位机无数据返回
$ waiting for the circuit to be stability...\n
$end\n$start,s21cal_step\n ;提示按照下面的步骤操作
$ start calibration, please follow these steps::\n
$end\n$start,s21cal_connect\n ;短接PORT1和PORT2
$Step 1: Please connect [SOURCE] port and [RF IN] port then send 'yes'.\n
$end\n$yes\n(注意:确认后需要等待约16秒进行短路校准,期间下位机无数据返回)$start,s21cal_process\n ;提示正在计算
$Step 3: processing (Wait please).\n
$end\n$start,s21cal_save\n ;正在保存
$ saving(wait please)\n
$end\n$start,s21cal_completed\n ;校准完成
$Calibration completed!\n
$end\n在下位机等待上位机确认的过程中,用户可以输入’exit\n’,退出校准模式。如下所示:
$exit\n$start,s21cal_exit\n
$Exit calibration.\n
$end\n3.2.57扫描延时(第四代KC901X)
发送命令 |
选项 |
参数 |
说明 |
|---|---|---|---|
sweep_delay |
get set |
时间 |
增加每个点扫描的延时时间(单位毫秒) |
说明:
set选项设置普通扫描和列表扫描每个点的延时时间,设置范围为0—10000ms。
get选项不需要填入参数,返回当前设置的延时时间。
注意:该指令的值只用于上位机使用,不与下位机的扫描延时功能共享同一套值,退出远程模式后此命令的值会被清0。扫描延时时间为非0值时,在扫描状态下Sxx模式和频谱模式可以解析上位机指令。运行校准的扫描速度不受延时值影响。扫描点数为1和起始终止频率相同的zerospan模式的扫描速度不受延时值影响。
例程:
$sweep_delay,set,1000\n
$start,sweep_delay,set,success\n
$end\n$sweep_delay,get\n
$start,sweep_delay,get,success\n
$1000\n
$end\n3.2.58 Kit文件指令(第四代KC901X)
以下指令用于管理第四代KC901X设备中的Kit文件。指令以$开头,以换行符\n结束;参数使用英文逗号,分隔;Kit文件名必须带.kit后缀。设备最多保存21个Kit文件,包括default.kit。
发送命令 |
选项 |
参数 |
说明 |
|---|---|---|---|
kit_file_list |
- |
- |
获取设备中保存的全部Kit文件名称。 |
kit_file_edit |
add delete rename |
文件名 |
新增、删除或重命名Kit文件。 |
kit_file_select |
set get |
文件名 |
设置或查询上位机校准所使用的Kit文件。 |
kit_file_param |
get set |
文件名,校准件参数 |
读取或修改指定Kit文件的校准件参数。 |
kit_file_list用于获取设备中保存的全部Kit文件名称,文件名按照设备当前保存的列表顺序返回。
$kit_file_list\n
$start,kit_file_list\n
default.kit\n
N_Kit_01.kit\n
N_Kit_02.kit\n
$end\nkit_file_edit用于新增、删除或重命名Kit文件。新增文件会复制default.kit的校准件参数;default.kit不能删除。文件已存在、文件数量达到上限、文件名不符合规则或Flash保存失败时,操作失败。
$kit_file_edit,add,N_Kit_01.kit\n
$start,kit_file_edit,add,success\n
$end\n$kit_file_edit,delete,N_Kit_01.kit\n
$start,kit_file_edit,delete,success\n
$end\n$kit_file_edit,rename,N_Kit_01.kit,N_Kit_02.kit\n
$start,kit_file_edit,rename,success\n
$end\n失败时返回对应选项的fail结果,例如:
$start,kit_file_edit,add,fail\n
$end\nkit_file_select用于设置或查询上位机校准所使用的Kit文件。选择状态不写入Flash;设备重新启动后,默认选择default.kit。建议在执行上位机校准指令前设置需要使用的Kit文件。
$kit_file_select,set,N_Kit_01.kit\n
$start,kit_file_select,set,success\n
$N_Kit_01.kit\n
$end\n$kit_file_select,get\n
$start,kit_file_select,get,success\n
$N_Kit_01.kit\n
$end\n设置的文件不存在时返回:
$start,kit_file_select,set,error\n
$end\nkit_file_param用于读取或修改指定Kit文件的校准件参数。参数顺序固定为:
L0,L1,L2,L3,ShortLen,ShortLoss,C0,C1,C2,C3,OpenLen,OpenLoss,ThruLen,ThruLoss,LossFreq
参数 |
含义 |
单位 |
|---|---|---|
L0 | 短路校准件L0 |
|
L1 | 短路校准件L1 |
|
L2 | 短路校准件L2 |
|
L3 | 短路校准件L3 |
|
ShortLen | 短路校准件长度 | mm |
ShortLoss | 短路校准件损耗 | GΩ/s |
C0 | 开路校准件C0 |
|
C1 | 开路校准件C1 |
|
C2 | 开路校准件C2 |
|
C3 | 开路校准件C3 |
|
OpenLen | 开路校准件长度 | mm |
OpenLoss | 开路校准件损耗 | GΩ/s |
ThruLen | 直通校准件长度 | mm |
ThruLoss | 直通校准件损耗 | dB |
LossFreq | 直通损耗参考频率 | MHz |
$kit_file_param,get,N_Kit_01.kit\n
$start,kit_file_param,get,success\n
$<L0>,<L1>,<L2>,<L3>,<ShortLen>,<ShortLoss>,<C0>,<C1>,<C2>,<C3>,<OpenLen>,<OpenLoss>,<ThruLen>,<ThruLoss>,<LossFreq>\n
$end\n$kit_file_param,set,N_Kit_01.kit,0,0,0,0,0,0,0,0,0,0,0,0,0,0,1000\n
$start,kit_file_param,set,success\n
$end\n命令、选项或参数无法通过解析时,设备可能返回err_cmd、err_opt、err_par1、err_par2等错误帧。例如:
$start,err_cmd\n
$error:Command input error!\n
$end\n3.3控制指令
3.3.1 获取S11测量参数(第四代KC901X)
与此功能还有关联的参数还有:
3.2.5 设置输出衰减,3.2.9 电缆补偿
命令 |
选项 |
参数1 |
参数2 |
参数3 |
参数4 |
参数5 |
参数6 |
|---|---|---|---|---|---|---|---|
|
S11 |
init |
s11cal full2portcal syscal calOff |
ri ma vswr z loss |
** |
cs ss |
** |
** |
run | |||||||
stop |
说明:
选项:
init->初始化S11功能(在使用S11功能前必须使用此命令)
run->运行S11进行扫频采集
stop->停止并关闭S11功能(在使用其它工作模式前必须使用此命令)
参数1:
s11cal->打开s11校准
full2portcal->打开全双端口校准
syscal->打开系统校准
caloff->关闭系统校准
参数2:
ri->以实部和虚部返回数据
ma->以反射系数和角度返回数据
vswr->以电压驻波比返回数据
z->以阻抗返回数据
loss->以回波损耗(对数值)返回数据
参数3用于设置扫描点数,第四代KC901最大支持10000点。如果需要扫描超过10000点,可以多次使用S11命令进行分段扫描。
可以只测量1点,此时测量连续进行,仪器持续向上位机发送一个频率的测量结果。
参数4:
cs->以cent和span的方式确定扫频范围
ss->以start和stop的方式确定扫频范围
如果参数3设置为仅扫描1个频率点,则参数4选择cs和ss都可以,且仅需要输入参数5就可以了(cent \ start均可),参数6会被KC901解析为新的命令。
参数5和6用于设置中心频率及扫宽(cs)或者起始及终止频率(ss),以Hz为单位。根据参数4的设置,只需要用其中一种方式输入数据。
根据设备的不同,频率可操作范围有所不同,但与仪器就地操作时可以使用的频率范围相同,举例如下:
中心频率范围 | |
|---|---|
KC901J |
9500Hz-3000000000Hz(3GHz–500Hz) |
KC901R |
5500Hz-9799999500Hz(9.8GHz–500Hz) |
KC901K |
9500Hz-6000000000Hz(6GHz – 500Hz) |
扫宽范围 | |
KC901J |
1000Hz-3000000000Hz(3GHz–9KHz) |
KC901R |
1000Hz-9799995000Hz(9.8GHz–5KHz) |
KC901K |
1000Hz-6000000000Hz(6GHz–9KHz) |
起始频率范围 | |
KC901J |
9000Hz-3000000000Hz(3GHz–1KHz) |
KC901R |
5000Hz-9799999000Hz(9.8GHz–1KHz) |
KC901K |
9000Hz-6000000000Hz(6GHz-1KHz) |
终止频率范围 | |
KC901J |
10000Hz-3000000000Hz(3GHz) |
KC901R |
6000Hz-9800000000Hz(9.8GHz) |
KC901K |
10000Hz-6000000000Hz(6GHz) |
7、例程:
当扫描点数大于1时:
$s11,run,caloff,ri,2,cs,100000000,50000000\n$start,s11,ri\n
75000000,-4.1824e-01,-2.1633e-01\n ;依次为频率,实部,虚部
125000000,-1.1707e,3.3581e-01\n
$end\n$s11,run,caloff,ma,2,cs,100000000,50000000\n
$start,s11,ma\n
75000000,5.8471e-01,-26.4973\n ;依次为频率,反射系数,相位
125000000,5.9342e-01,-51.8204\n
$end\n$s11,run,caloff,vswr,2,cs,100000000,50000000\n
$start,s11,vswr\n
75000000,1.4256\n ;依次为频率,电压驻波比
125000000,1.1521\n
$end\n$s11,run,caloff,z,2,cs,100000000,50000000\n
$start,s11,z\n;依次为频率,阻抗的模,电阻,电抗
75000000,137.9871,109.6309,-83.7945\n
125000000,91.2070,52.7077,-74.4354\n
$end\n$s11,run,caloff,loss,2,cs,100000000,50000000\n
$start,s11,loss\n
75000000,-0.4092\n;依次为频率,回波损耗
125000000,-0.5743\n
$end当扫描点数等于1时:
S11属于循环采样,每次采样结果都为一个包,如下所示:
$s11,run,caloff,loss,1,cs,100000000\n$start,s11,loss\n
100000000,-8.9216\n
$end\n
$start,s11,loss\n
100000000,-25.9223\n
$end\n
$start,s11,loss\n
100000000,-25.7827\n
$end\n
$start,s11,loss\n
100000000,-25.6808\n
$end\n3.3.2 获取S21测量参数(第四代KC901X)
注意:与此功能还有关联的参数还有:3.2.5 设置输出衰减
命令 |
选项 |
参数1 |
参数2 |
参数3 |
参数4 |
参数5 |
参数6 |
参数7 |
|---|---|---|---|---|---|---|---|---|
|
S21 |
init |
rescal resisocal enrescal full2portcal syscal caloff |
ri ma vswr series_z loss parallel_z |
lowlo highlo |
** |
cs ss |
** ** |
** ** |
run | ||||||||
stop |
说明:
1、选项:
init->初始化S21功能(在使用S21前必须使用此命令)
run-> 运行S21功能进行扫频采集
stop->停止并关闭S21功能(在使用其他工作模式前必须使用此命令)
2、参数1:
rescal->打开响应校准
resisocal->打开响应加隔离校准
enrescal->打开增强响应校准
full2portcal->打开全双端口校准
syscal->打开系统校准
caloff->关闭系统校准
3、参数2:
ri->以实部和虚部返回数据
ma->以插损和相位返回数据
vswr->以电压驻波比返回数据
series_z->以串联阻抗返回z、r、x数据
loss->以插入损耗(对数值)返回数据
parallel_z->以并联阻抗返回z、r、x数据
4、参数3:
lowlo->以低本振方式扫描
highlo->以高本振方式扫描
5、参数4用于设置扫描点数,第四代KC901最大支持10000点。需要扫描更多频点时,可以分成多个指令进行分段扫描。可以设置为1点,此时仪器将连续工作。
6、参数5:
cs->以cent和span的方式确定扫频范围
ss->以start和stop的方式确定扫频范围
如果参数4设置为仅扫描1个频率点,则参数5选择cs和ss都可以,且仅需要输入参数6就可以了(cent \ start均可),参数7会被KC901解析为新的命令。
参数6和7用于传输具体频率,以Hz为单位。根据参数5的设置,只需要采用其中一种格式。
根据设备的不同,频率可操作范围有所不同,举例如下:
中心频率范围 | |
|---|---|
KC901J |
9500Hz-2099999500Hz(2.1GHz–500Hz) |
KC901R |
5500Hz-6999999500Hz(7GHz–500Hz) |
KC901K |
9500Hz-4099999500Hz(4.1GHz – 500Hz) |
扫宽范围 | |
KC901J |
1000Hz-2099991000Hz(2.1GHz–9KHz) |
KC901R |
1000Hz-6999995000Hz(7GHz–5KHz) |
KC901K |
1000Hz-4099995000Hz(4.1GHz–9KHz) |
起始频率范围 | |
KC901J |
9000Hz-2099999000Hz(2.1GHz–1KHz) |
KC901R |
5000Hz-6999999000Hz(7GHz–1KHz) |
KC901S+ |
9000Hz-4099999000Hz(4.1GHz-1KHz) |
终止频率范围 | |
KC901J |
10000Hz-2100000000Hz(2.1GHz) |
KC901R |
6000Hz-7000000000Hz(7GHz) |
KC901K |
10000Hz-4100000000Hz(4.1GHz) |
终止频率应当大于起始频率。
如果参数4设置为仅扫描1个频率点,则参数6为该频率点的值,参数7不用输入。
8、例程:
当采样点数大于1时:
$s21,run,caloff,ri,lowlo,3,cs,100000000,50000000\n$start,s21,ri\n
75000000,-0.4422e+00,5.2833e+00\n ;依次为频率,实部,虚部
100000000,4.2138e-01,5.4467e+00\n
125000000,2.3253e+00,4.8666e+00\n
$end\n
$s21,run,caloff,ma,lowlo,3,cs,100000000,50000000\n
$start,s21,ma\n
75000000,5.4076e+00,105.4079\n;依次为频率,插损,相位
100000000,5.4019e+00,85.9847\n
125000000,5.3388+00,64.8484\n
$end\n$s21,run,caloff,vswr,lowlo,3,cs,100000000,50000000\n
$start,s21,vswr
75000000,-1.4390\n ;依次为频率,电压驻波比
100000000,-1.4436\n
125000000,-1.4466\n
$end$s21,run,caloff, series_z,lowlo,3,cs,100000000,50000000\n
$start,s21, series_z ;依次为频率,阻抗的摸,电阻,电抗
75000000,105.6595,-104.1509,-17.7909\n
100000000,99.5815,-97.9082,-18.1789\n
125000000,92.8389,-91.3671,-16.4656\n
$end$s21,run,caloff,parallel_z,lowlo,3,cs,100000000,50000000\n
$start,s21,parallel_z
75000000,23.5739,-23.2365,3.9740\n ;依次为频率,阻抗的摸,电阻,电抗
100000000,25.0008,-24.5743,4.5981\n
125000000,26.8217,-26.3855,4.8173\n
$end$s21,run,caloff,loss,lowlo,3,cs,100000000,50000000\n
$start,s21,loss
75000000,-116.1302 ;依次为频率,回拨损耗
100000000,-102.0541
125000000,-112.2253
$end当扫描点数等于1时:
S21属于循环采样,每次采样结果都为一个包,如下所示:
$s21,run,caloff,loss,lowlo,1,cs,100000000\n$start,s21,loss\n
100000000,-65.9755\n
$end\n
$start,s21,loss\n
100000000,-65.8623\n
$end\n
$start,s21,loss\n
100000000,-64.4023\n
$end\n
$start,s21,loss\n
100000000,-64.8623\n
$end\n3.3.3 获取S22测量参数(第四代KC901X)
与此功能还有关联的参数还有:
3.2.5 设置输出衰减,3.2.9 电缆补偿
命令 |
选项 |
参数1 |
参数2 |
参数3 |
参数4 |
参数5 |
参数6 |
|---|---|---|---|---|---|---|---|
|
S22 |
init |
s22cal full2portcal syscal calOff |
ri ma vswr z loss |
** |
cs ss |
** |
** |
run | |||||||
stop |
说明:
1、选项:
init->初始化S22功能(在使用S22功能前必须使用此命令)
run->运行S22进行扫频采集
stop->停止并关闭S22功能(在使用其它工作模式前必须使用此命令)
2、参数1:
s22cal->打开s22校准
full2portcal->打开全双端口校准
syscal->打开系统校准
caloff->关闭系统校准
3、参数2:
ri->以实部和虚部返回数据
ma->以反射系数和角度返回数据
vswr->以电压驻波比返回数据
z->以阻抗返回数据
loss->以回波损耗(对数值)返回数据
4、参数3用于设置扫描点数,第四代KC901最大支持10000点。如果需要扫描超过10000点,可以多次使用S22命令进行分段扫描。
可以只测量1点,此时测量连续进行,仪器持续向上位机发送一个频率的测量结果。
5、参数4:
cs->以cent和span的方式确定扫频范围
ss->以start和stop的方式确定扫频范围
如果参数3设置为仅扫描1个频率点,则参数4选择cs和ss都可以,且仅需要输入参数5就可以了(cent \ start均可),参数6会被KC901解析为新的命令。
6、参数5和6用于设置中心频率及扫宽(cs)或者起始及终止频率(ss),以Hz为单位。根据参数4的设置,只需要用其中一种方式输入数据。
根据设备的不同,频率可操作范围有所不同,但与仪器就地操作时可以使用的频率范围相同,举例如下:
中心频率范围 | |
|---|---|
KC901J |
9500Hz-2099999500Hz(2.1GHz–500Hz) |
KC901R |
5500Hz-6999999500Hz(7GHz–500Hz) |
KC901K |
9500Hz-4099999500Hz(4.1GHz – 500Hz) |
扫宽范围 | |
KC901J |
1000Hz-2099991000Hz(2.1GHz–9KHz) |
KC901R |
1000Hz-6999995000Hz(7GHz–5KHz) |
KC901K |
1000Hz-4099995000Hz(4.1GHz–9KHz) |
起始频率范围 | |
KC901J |
9000Hz-2099999000Hz(2.1GHz–1KHz) |
KC901R |
5000Hz-6999999000Hz(7GHz–1KHz) |
KC901K |
9000Hz-4099999000Hz(4.1GHz-1KHz) |
终止频率范围 | |
KC901J |
10000Hz-2100000000Hz(2.1GHz) |
KC901R |
6000Hz-7000000000Hz(7GHz) |
KC901K |
10000Hz-4100000000Hz(4.1GHz) |
7、例程:
当扫描点数大于1时:
$s22,run,caloff,ri,2,cs,100000000,50000000\n$start,s22,ri\n
75000000,1.9968e-02,5.2407e-02\n;依次为频率,实部,虚部
125000000,-8.8592e-02,-1.7481e-01\n
$end\n$s22,run,caloff,ma,2,cs,100000000,50000000\n$start,s22,ma\n
75000000,5.5915e-02,68.3687\n ;依次为频率,反射系数,相位
125000000,1.9602e-01,-117.2308\n
$end\n$s22,run,caloff,vswr,2,cs,100000000,50000000\n$start,s22,vswr\n
75000000,1.2245\n ;依次为频率,电压驻波比
125000000,1.5057\n
$end\n$s22,run,caloff,z,2,cs,100000000,50000000\n$start,s22,z\n ;依次为频率,阻抗的模,电阻,电抗
75000000,36.0890,-35.0582,8.5663\n
125000000,41.0682,-38.7431,13.6234\n
$end\n$s22,run,caloff,loss,2,cs,100000000,50000000\n$start,s22,loss\n
75000000,13.9153\n;依次为频率,回波损耗
125000000,14.1164\n
$end\n当扫描点数等于1时:
S22属于循环采样,每次采样结果都为一个包,如下所示:
$s22,run,caloff,loss,1,cs,100000000\n$start,s22,loss\n
100000000,15.1188\n
$end\n
$start,s22,loss\n
100000000,15.1184\n
$end\n
$start,s22,loss\n
100000000,15.1167\n
$end\n
$start,s22,loss\n
100000000,15.1137\n
$end\n3.3.4 获取S12测量参数(第四代KC901X)
注意:与此功能还有关联的参数还有:3.2.5 设置输出衰减
命令 |
选项 |
参数1 |
参数2 |
参数3 |
参数4 |
参数5 |
参数6 |
参数7 |
|---|---|---|---|---|---|---|---|---|
|
S12 |
init |
rescal resisocal enrescal full2portcal syscal caloff |
ri ma vswr series_z loss parallel_z |
lowlo highlo |
** |
cs ss |
** ** |
** ** |
run | ||||||||
stop |
说明:
1、选项:
init->初始化S12功能(在使用S12前必须使用此命令)
run-> 运行S12功能进行扫频采集
stop->停止并关闭S12功能(在使用其他工作模式前必须使用此命令)
2、参数1:
rescal->打开响应校准
resisocal->打开响应加隔离校准
enrescal->打开增强响应校准
full2portcal->打开全双端口校准
syscal->打开系统校准
caloff->关闭系统校准
3、参数2:
ri->以实部和虚部返回数据
ma->以插损和相位返回数据
vswr->以电压驻波比返回数据
series_z->以串联阻抗返回z、r、x数据
loss->以插入损耗(对数值)返回数据
parallel_z->以并联阻抗返回z、r、x数据
4、参数3:
lowlo->以低本振方式扫描
highlo->以高本振方式扫描
5、参数4用于设置扫描点数,第四代KC901最大支持10000点,第三代最大支持1001点。需要扫描更多频点时,可以分成多个指令进行分段扫描。可以设置为1点,此时仪器将连续工作。
6、参数5:
cs->以cent和span的方式确定扫频范围
ss->以start和stop的方式确定扫频范围
如果参数4设置为仅扫描1个频率点,则参数5选择cs和ss都可以,且仅需要输入参数6就可以了(cent \ start均可),参数7会被KC901解析为新的命令。
7、参数6和7用于传输具体频率,以Hz为单位。根据参数5的设置,只需要采用其中一种格式。
根据设备的不同,频率可操作范围有所不同,举例如下:
中心频率范围 | |
|---|---|
KC901J |
9500Hz-2099999500Hz(2.1GHz–500Hz) |
KC901R |
5500Hz-6999999500Hz(7GHz–500Hz) |
KC901K |
9500Hz-4099999500Hz(4.1GHz – 500Hz) |
扫宽范围 | |
KC901J |
1000Hz-2099991000Hz(2.1GHz–9KHz) |
KC901R |
1000Hz-6999995000Hz(7GHz–5KHz) |
KC901K |
1000Hz-4099995000Hz(4.1GHz–9KHz) |
起始频率范围 | |
KC901J |
9000Hz-2099999000Hz(2.1GHz–1KHz) |
KC901R |
5000Hz-6999999000Hz(7GHz–1KHz) |
KC901S+ |
9000Hz-4099999000Hz(4.1GHz-1KHz) |
终止频率范围 | |
KC901J |
10000Hz-2100000000Hz(2.1GHz) |
KC901R |
6000Hz-7000000000Hz(7GHz) |
KC901K |
10000Hz-4100000000Hz(4.1GHz) |
8、例程:
当采样点数大于1时:
$s12,run,caloff,ri,lowlo,3,cs,100000000,50000000\n$start,s12,ri\n
75000000,0.0004,0.0000\n ;依次为频率,实部,虚部
125000000,0.0006,-0.0000\n
$end\n$s12,run,caloff,ma,lowlo,3,cs,100000000,50000000\n$start,s12,ma\n
75000000,5.5840e+00,-80.8776\n ;依次为频率,插损,相位
100000000,5.5576e+00,-99.7933\n
125000000,5.5032e+00,-120.9049\n
$end\n$s12,run,caloff,vswr,lowlo,3,cs,100000000,50000000\n
$start,s12,vswr\n
75000000,-1.4405\n ;依次为频率,电压驻波比
100000000,-1.4453\n
125000000,-1.4500\n
$end\n$s12,run,caloff,series_z,lowlo,3,cs,100000000,50000000\n
$start,s12,series_z\n
75000000,25.3365,-24.9261,-4.5422\n ;依次为频率,阻抗的摸,电阻,电抗
100000000,23.9044,-23.5575,-4.0576\n
125000000,22.6288,-22.4014,-3.2002\n
$end$s12,run,caloff,parallel_z,lowlo,3,cs,100000000,50000000\n
$start,s12,parallel_z\n
75000000,98.6349,-97.0458,17.6337\n ;依次为频率,阻抗的摸,电阻,电抗
100000000,104.4429,-102.9287,17.7202\n
125000000,110.3190,-109.2061,15.6306\n
$end$s12,run,caloff,loss ,lowlo,3,cs,100000000,50000000\n
$start,s12,loss\n
75000000,-66.7922\n ;依次为频率,回拨损耗
125000000,-71.9411\n
$end当扫描点数等于1时:
S12属于循环采样,每次采样结果都为一个包,如下所示:
$s12,run,caloff,loss,lowlo,1,cs,100000000\n$start,s12,loss\n
100000000,-62.0834\n
$end\n
$start,s12,loss\n
100000000,-57.5564\n
$end\n
$start,s12,loss\n
100000000,-56.5024\n
$end\n
$start,s12,loss\n
100000000,-56.5070\n
$end\n3.3.5 获取频谱测量参数(第四代KC901X)
注意:与此功能还有关联的参数还有:设置频谱模式的参考电平 3.2.18。
命令 |
选项 |
参数1 |
参数2 |
参数3 |
参数4 |
参数5 |
参数6 |
参数7 |
|---|---|---|---|---|---|---|---|---|
|
spec |
init |
calon caloff |
lowlo highlo |
** |
cs ss |
** |
** |
port1 port2 |
run | ||||||||
stop |
说明:
1、选项:
init->初始化SPEC功能(在使用SPEC前必须使用此命令)
run->运行SPEC进行扫频采集
stop->停止并关闭SPEC功能(在使用其他模式前必须使用此命令)
2、参数1:
calon->打开系统校准
caloff->关闭系统校准
3、参数2:
lowlo->以低本振方式扫描
highlo->以高本振方式扫描
参数3用于设置扫描点数,第四代KC901最大支持10000点。需要超过该点数时,可以多次使用本指令。如果只需扫描1个频率,可以设置为1。与场强功能的区别是本模式可以指定参考电平,而场强功能不能指定参考电平。需要精确测量相对值时,建议指定参考电平。
5、参数4:
cs->以Cent和Span的方式确定扫频范围
ss->以Start和Stop的方式确定扫频范围
如果参数3设置为仅扫描1个频率点,则参数4应当设置为CS。
参数5和6设置中心频率及扫宽,以Hz为单位
根据设备的不同,频率可操作范围有所不同,举例如下:
中心频率范围 | |
|---|---|
KC901J |
9500Hz-2099999500Hz(2.1GHz–500Hz) |
KC901R |
5500Hz-6999999500Hz(7GHz–500Hz) |
KC901K |
9500Hz-4099999500Hz(4.1GHz – 500Hz) |
扫宽范围 | |
KC901J |
1000Hz-2099991000Hz(2.1GHz–9KHz) |
KC901R |
1000Hz-6999995000Hz(7GHz–5KHz) |
KC901K |
1000Hz-4099995000Hz(4.1GHz–9KHz) |
起始频率范围 | |
KC901J |
9000Hz-2099999000Hz(2.1GHz–1KHz) |
KC901R |
5000Hz-6999999000Hz(7GHz–1KHz) |
KC901S+ |
9000Hz-4099999000Hz(4.1GHz-1KHz) |
终止频率范围 | |
KC901J |
10000Hz-2100000000Hz(2.1GHz) |
KC901R |
6000Hz-7000000000Hz(7GHz) |
KC901K |
10000Hz-4100000000Hz(4.1GHz) |
终止频率应当大于起始频率。
如果参数3设置为仅扫描1个频率点,则参数4选择cs和ss都可以,且仅需要输入参数5就可以了(cent \ start均可),参数6会被KC901解析为新的命令。
7、参数7:
Port1->选择输入端口为端口1(PORT1)
Port2->选择输入端口为端口2(PORT2)
8、例程:
当采样点数大于1时:
$spec,run,calon,lowlo,3,cs,100000000,50000000,port1\n$start,spec\n
75000000,-110.573\n
100000000,-120.126\n
125000000,-113.269\n
$end\n当扫描点数等于1时:
SPEC属于循环采样,每次采样结果都为一个包,如下所示:
$spec,run,caloff,lowlo,1,cs,100000000,port1\n$start,spec\n
100000000,-95.400\n
$end\n
$start,spec\n
100000000,-96.240\n
$end\n
$start,spec\n
100000000,-98.451\n
$end\n
$start,spec\n
100000000,-89.539\n
$end\n3.3.6 获取场强测量参数(第四代KC901X)
注意:与此功能相关的参数还有:3.2.5 设置输出衰减。
命令 |
选项 |
参数1 |
参数3 |
参数4 |
参数5 |
参数6 |
|---|---|---|---|---|---|---|
|
field |
init |
lowlo highlo |
** |
** |
port1 port2 |
single continue |
run | ||||||
stop |
说明:
1、选项:
init->初始化FIELD功能(在使用FIELD前必须使用此命令)
run->运行FIELD进行扫频采集
stop->停止并关闭FIELD功能(在使用其他工作模式前必须使用此命令)
2、参数1:
lowlo->以低本振方式测试
highlo->以高本振方式测试
3、参数3:天线增益,以dBi为单位。
天线增益范围:-100.00…+100.00dBi
4、参数4:扫描单点频率以Hz为单位,可以精确到0.1Hz。
根据设备的不同,频率可操作范围有所不同,如下表所示:
频率范围 | |
|---|---|
KC901R |
0-7000000000Hz(7GHz) |
KC901K |
0-4100000000Hz(4.1GHz) |
KC901J |
0-2100000000Hz(2.1GHz) |
5、参数5:
port1->选择输入端口为端口1(PORT1)
port2->选择输入端口为端口2(PORT2)
6、参数6:
single->单次采样
continue->循环采样
7、例程:
参数6选择single是场强数据是单次采样,所以每次接受到的数据都只有一个单独的包,比如:
$field,run,lowlo,10,100000000,port1,single\n$start,field\n
100000000,28.792,-78.438 \n ;依次为频率,场强,绝对强度(dBm)
$end\n参数6选择continue是场强数据是循环采样,所以会连续接受到的数据,比如:
$field,run,lowlo,10,100000000,port1, continue\n$start,field\n
100000000,22.297,-84.933\n ;依次为频率,场强,绝对强度(dBm)
$end\n
$start,field\n
100000000,21.680,-85.550\n
$end\n
$start,field\n
100000000,30.598,-76.632\n
$end\n
$start,field\n
100000000,30.598,-76.632\n
$end\n3.3.7 控制射频信号源输出(第四代KC901X)
命令 |
选项 |
参数1 |
参数2 |
参数3 |
参数4 |
参数5 |
参数6 |
|---|---|---|---|---|---|---|---|
|
rfSource |
init |
off ask fm |
port1 port2 |
** |
** |
** |
** |
run | |||||||
stop |
说明:
1、选项:
init->初始化RfSource(在使用RfSource前必须使用此命令)
run->运行RfSource并输出信号
stop->停止并关闭RfSource功能(在使用其他工作模式前必须使用此命令)
2、参数1:
off->关闭调制功能,此时参数4和参数5不需要输入
ask->打开ASK调制
fm->使用FM调制
3、参数2:()
port1->选择输出口为端口1输出(PORT 1)
port2->选择输出口为端口2输出(PORT 2)
3、参数3:
根据设备的不同,载波频率可操作范围有所不同,如下表所示:
载波频率范围 | |
|---|---|
KC901R |
0-7000000000Hz(7GHz) |
KC901K |
0-4100000000Hz(4.1GHz) |
KC901J |
0-2100000000Hz(2.1GHz) |
但切换为音频输出时,频率范围为 0-60000000Hz(60MHz)
4、参数4:
载波输出幅度 单位dBm,精度 1dB
端口的输出幅度根据频率不同而不同。
当用户输入幅度高于实际可以输出的最大值时,下位机返回警告,并且以最大值输出。
$start,warn_gtr\n ;用户输入大于最大值
$warn:It is greater than the maximum output!\n
$end\n当用户输入幅度低于实际可以输出的最大值时,下位机返回警告,并且以最小值输出。
$start,warn_lt\n ;用户输入大于最大值
$warn:It is less than the minimum output!\n
$end\n当输出端口为“port2”时,大致取值范围:+10至-30dBm
当输出端口为“port1”,且射频板版本不低于“1.0.5”时,取值范围:+10至-60dBm,否则取值范围依然为:+10至-30dBm
5、参数5:
调制频率 单位Hz 取值范围:0-3000Hz
6、参数6:
当为ASK调试时调制深度,仅有几个固定取值:0,5,10,15,20,30,35,40,45,50,55,60,65,70,75,80,85,90。
当为FM调制时,其可调深度随频率而变化,如下表所示
0 – 60M(不包含60M) |
0 - 10MHz |
|---|---|
60M – 106.25M(不含106.25M) |
0 – 312.5kHz |
106.25M – 212.5M(不含212.5M) |
0 – 625kHz |
212.5M – 425M(不含425M) |
0 – 1.25MHz |
425M – 850M(不含850M) |
0 – 2.5MHz |
850M – 1700M(不含1700M) |
0 – 5MHz |
1700M – 3400M(不含3400M) |
0 – 10MHz |
>3400M |
0 – 20MHz |
7、例程:
控制射频信号源输出,要求打开调制,载波频率1GHz,输出不衰减,调制频率1KHz,调制深度90%。
第一步 初始化RfSource功能:
$rfsource,init\n第二步 开始运行和设置:
$rfsource,run,ask,port1,1000000000,0,1000,90\n第三步 如果需要使用其它功能,需先退出射频信号源:
$rfsource,stop\n8、处理:
(1)当输入选项为Init时,KC901会立即初始化与射频信号源相关的电路。
(2)当输入选项为STOP时,KC901会关闭与射频信号源相关的电路。
(3)当输入选项为RUN时,此时KC901根据用户设置进行输出。
(4)在信号源输出时,如果下发其它没有明确要求终止信号源输出的命令,信号源继续输出。
3.3.8 控制音频信号源输出(第四代KC901X)
命令 |
选项 |
参数1 |
参数2 |
参数3 |
参数4 |
参数5 |
参数6 |
|---|---|---|---|---|---|---|---|
|
afsource |
init |
off ask fm |
afout |
** |
** |
** |
** |
run | |||||||
stop |
说明:
1、选项:
init->初始化AfSource(在使用AfSource前必须使用此命令)
run->运行AfSource功能进行音频输出
stop->停止并关闭AfSource功能(在使用其他工作模式前必须使用此命令)
2、参数1:
off->关闭调制功能,此时参数4和参数5不需要输入
ask->ASK调制
fm->FM调制
3、参数2:
afout->输出口为音频输出(AF OUT)
3、参数3:
载波频率,单位Hz,取值范围:0-2000000000Hz
4、参数4:
当输出端口为“afout”时,单位mV(VPP),取值范围:0-3000mV
端口的输出幅度根据频率不同而不同。
当用户输入幅度高于实际可以输出的最大值时,下位机返回警告,并且以最大值输出。
$start,warn_gtr\n ;用户输入大于最大值
$warn:It is greater than the maximum output!\n
$end\n当用户输入幅度低于实际可以输出的最大值时,下位机返回警告,并且以最小值输出。
$start,warn_lt\n ;用户输入大于最大值
$warn:It is less than the minimum output!\n
$end\n5、参数5:
调制频率,单位Hz.
在ASK下,取值范围:0-3000Hz
在FM以及PM下,取值范围:16-10000Hz
6、参数6:
调制深度/调制频偏
在ASK下,调制深度范围为0-100%
在FM下,调制频偏为0-1MHz
7、例程:
控制音频信号源输出,要求ASK调制,载波频率10MHz,输出1.3V(VPP),调制频率1KHz,调制深度100%。
第一步 初始化AfSource功能:
$afsource,init\n第二步 开始运行并设置:
$afsource,run,ask,afout,10000000,1300,1000,100\n第三步 如需使用其它功能,应先退出本模式。
$afsource,stop\n8、处理:
(1)当输入选项为Init时,KC901会立即初始化与音频信号源相关的电路。
(2)当输入选项为STOP时,KC901会立即关闭音频信号源相关的电路。
(3)当输入选项为RUN时,KC901根据用户设置进行输出。
(4)在信号源输出时,如果下达其它没有明确要求终止信号源输出的命令,信号源继续输出。
3.3.9 列表S11测量参数(第四代KC901X)
与此功能还有关联的参数还有:
3.2.5 设置输出衰减,3.2.9 电缆补偿
命令 |
选项 |
参数1 |
参数2 |
|---|---|---|---|
|
sweep_list_s11 |
init |
s11cal full2portcal syscal calOff |
ri ma vswr z loss |
run | |||
stop |
说明:
选项:
init->初始化S11功能(在使用S11功能前必须使用此命令)
run->运行S11进行扫频采集
stop->停止并关闭S11功能(在使用其它工作模式前必须使用此命令)
参数1:
s11cal->打开s11校准
full2portcal->打开全双端口校准
syscal->打开系统校准
caloff->关闭系统校准
参数2:
ri->以实部和虚部返回数据
ma->以反射系数和角度返回数据
vswr->以电压驻波比返回数据
z->以阻抗返回数据
loss->以回波损耗(对数值)返回数据
例程:
$sweep_list_s11,run,caloff,ri\n
$start,s11,ri\n
100000000,3.0392e+00,-4.0155e+00\n ;依次为频率,实部,虚部
200000000,-1.1988e+00,-5.3318e+00\n
40000000,1.5519e+00,-1.8471e+00\n
$end\n$sweep_list_s11,run,caloff,ma\n
$start,s11,ma\n
100000000,5.0388e+00,-52.8689\n ;依次为频率,反射系数,相位
200000000,5.4693e+00,-102.6998\n
40000000,4.3237e+00,65.2164\n
$end\n$sweep_list_s11,run,caloff,vswr\n
$start,s11,vswr\n
100000000,-1.4951\n ;依次为频率,电压驻波比
200000000,-1.4478\n
40000000,-2.2818\n
$end\n$sweep_list_s11,run,caloff,z\n
$start,s11,z\n;依次为频率,阻抗的模,电阻,电抗
100000000,63.2252,-60.0500,-19.7846\n
200000000,46.2477,-43.3802,-16.0313\n
40000000,49.5252,-48.0281,12.0850\n
$end\n$sweep_list_s11,run,caloff,loss\n
$start,s11,loss\n
100000000,14.0521\n;依次为频率,回波损耗
200000000,14.7536\n
40000000,9.9649\n
$end3.3.10 列表S21测量参数(第四代KC901X)
注意:与此功能还有关联的参数还有:3.2.5 设置输出衰减
命令 |
选项 |
参数1 |
参数2 |
参数3 |
|---|---|---|---|---|
|
sweep_list_s21 |
init |
rescal resisocal enrescal full2portcal syscal caloff |
ri ma vswr series_z loss parallel_z |
lowlo highlo |
run | ||||
stop |
说明:
1、选项:
init->初始化S21功能(在使用S21前必须使用此命令)
run-> 运行S21功能进行扫频采集
stop->停止并关闭S21功能(在使用其他工作模式前必须使用此命令)
2、参数1:
rescal->打开响应校准
resisocal->打开响应加隔离校准
enrescal->打开增强响应校准
full2portcal->打开全双端口校准
syscal->打开系统校准
caloff->关闭系统校准
3、参数2:
ri->以实部和虚部返回数据
ma->以插损和相位返回数据
vswr->以电压驻波比返回数据
series_z->以串联阻抗返回z、r、x数据
loss->以插入损耗(对数值)返回数据
parallel_z->以并联阻抗返回z、r、x数据
4、参数3:
lowlo->以低本振方式扫描
highlo->以高本振方式扫描
5、例程:
$sweep_list_s21,run,caloff,ri,lowlo\n
$start,s21,ri\n
100000000,2.1346e-04,-2.0138e-04\n ;依次为频率,实部,虚部
200000000,0.9841e-03,-1.4537e-04\n
40000000,-1.7163e-01,-7.0879e-01\n
$end\n$sweep_list_s21,run,caloff,ma,lowlo\n
$start,s21,ma\n
100000000,1.9744e-04,-137.7951\n;依次为频率,插损,相位
200000000,2.0163e-04,-5.8243\n
40000000,4.4581e-01,-98.9831\n
$end\n$sweep_list_s21,run,caloff,vswr,lowlo\n
$start,s21,vswr
100000000,1.0011\n ;依次为频率,电压驻波比
200000000,1.0004\n
40000000,-3.5587\n
$end$sweep_list_s21,run,caloff,series_z,lowlo\n
$start,s21, series_z ;依次为频率,阻抗的摸,电阻,电抗
100000000,105.6595,-104.1509,-17.7909\n
200000000,99.5815,-97.9082,-18.1789\n
40000000,124.7573,-121.2535,29.3591\n
$end$sweep_list_s21,run,caloff,parallel_z,lowlo\n
$start,s21,parallel_z;依次为频率,阻抗的摸,电阻,电抗
100000000,23.5739,-23.2365,3.9740\n
200000000,25.0008,-24.5743,4.5981\n
40000000,26.8217,-26.3855,4.8173\n
$end$sweep_list_s21,run,caloff,loss,lowlo\n
$start,s21,loss
100000000,-116.1302 ;依次为频率,回拨损耗
200000000,-102.0541
40000000,-112.2253
$end3.3.11 列表S22测量参数(第四代KC901X)
与此功能还有关联的参数还有:
3.2.5 设置输出衰减,3.2.9 电缆补偿
命令 |
选项 |
参数1 |
参数2 |
|---|---|---|---|
|
sweep_list_s22 |
init |
s22cal full2portcal syscal calOff |
ri ma vswr z loss |
run | |||
stop |
说明:
1、选项:
init->初始化S22功能(在使用S22功能前必须使用此命令)
run->运行S22进行扫频采集
stop->停止并关闭S22功能(在使用其它工作模式前必须使用此命令)
2、参数1:
s22cal->打开s22校准
full2portcal->打开全双端口校准
syscal->打开系统校准
caloff->关闭系统校准
3、参数2:
ri->以实部和虚部返回数据
ma->以反射系数和角度返回数据
vswr->以电压驻波比返回数据
z->以阻抗返回数据
loss->以回波损耗(对数值)返回数据
4、例程:
$sweep_list_s22,run,caloff,ri\n
$start,s22,ri\n
100000000,-3.4254e+00,3.9333e+00\n;依次为频率,实部,虚部
200000000,7.1214e-01,5.4916e+00\n
40000000,-2.8701e+00,-1.6338e+00\n
$end\n$sweep_list_s22,run,caloff,ma\n
$start,s22,ma\n
100000000,5.2614e+00,130.9248\n ;依次为频率,反射系数,相位
200000000,5.5759e+00,82.5062\n
40000000,6.7225e+00,114.1863\n
$end\n$sweep_list_s22,run,caloff,vswr\n
$start,s22,vswr\n
100000000,-1.4694\n ;依次为频率,电压驻波比
200000000,-1.4361\n
40000000,-1.2921\n
$end\n$sweep_list_s22,run,caloff,z\n
$start,s22,z\n ;依次为频率,阻抗的模,电阻,电抗
100000000,39.1282,-37.4988,11.1738\n
200000000,52.3065,-49.1036,18.0223\n
40000000,58.5305,-58.4607,-2.8582\n
$end\n$sweep_list_s22,run,caloff,loss\n
$start,s22,loss\n
100000000,14.4200\n;依次为频率,回波损耗
200000000,14.9363\n
40000000,10.6300\n
$end\n3.3.12 列表S12测量参数(第四代KC901X)
注意:与此功能还有关联的参数还有:3.2.5 设置输出衰减
命令 |
选项 |
参数1 |
参数2 |
参数3 |
|---|---|---|---|---|
|
sweep_list_s12 |
init |
rescal resisocal enrescal full2portcal syscal caloff |
ri ma vswr series_z loss parallel_z |
lowlo highlo |
run | ||||
stop |
说明:
1、选项:
init->初始化S12功能(在使用S12前必须使用此命令)
run-> 运行S12功能进行扫频采集
stop->停止并关闭S12功能(在使用其他工作模式前必须使用此命令)
2、参数1:
rescal->打开响应校准
resisocal->打开响应加隔离校准
enrescal->打开增强响应校准
full2portcal->打开全双端口校准
syscal->打开系统校准
caloff->关闭系统校准
3、参数2:
ri->以实部和虚部返回数据
ma->以插损和相位返回数据
vswr->以电压驻波比返回数据
series_z->以串联阻抗返回z、r、x数据
loss->以插入损耗(对数值)返回数据
parallel_z->以并联阻抗返回z、r、x数据
4、参数3:
lowlo->以低本振方式扫描
highlo->以高本振方式扫描
例程:
$sweep_list_s12,run,caloff,ri,lowlo\n$start,s12,ri\n
100000000,1.8822e-04,-1.1748e-05\n ;依次为频率,实部,虚部
200000000,4.6945e-04,1.1014e-05\n
40000000,1.1407e+00,-9.7906e-01\n
$end\n$sweep_list_s12,run,caloff,ma,lowlo\n$start,s12,ma\n
100000000,5.8546e-04,121.0800\n ;依次为频率,插损,相位
200000000,5.5394e-04,77.8709\n
40000000,2.3523e+00,46.8479\n
$end\n$sweep_list_s12,run,caloff,vswr,lowlo\n
$start,s12,vswr\n
100000000,1.0013\n ;依次为频率,电压驻波比
200000000,1.0019\n
40000000,-1.4607\n
$end\n$sweep_list_s12,run,caloff,series_z,lowlo\n
$start,s12,series_z\n
100000000,0.0198,0.0191,-0.0053\n ;依次为频率,阻抗的摸,电阻,电抗
200000000,0.0082,-0.0051,0.0064\n
40000000,38.0789,-22.5371,30.6933\n
$end$sweep_list_s12,run,caloff,parallel_z,lowlo\n
$start,s12,parallel_z\n;依次为频率,阻抗的摸,电阻,电抗
100000000,98.6349,-97.0458,17.6337\n 200000000,104.4429,-102.9287,17.7202\n
40000000,110.3190,-109.2061,15.6306\n
$end$sweep_list_s12,run,caloff,loss,lowlo\n
$start,s12,loss\n
100000000,-62.2755\n ;依次为频率,回拨损耗
200000000,-56.4208\n
40000000,-61.1893\n
$end3.3.13 列表SPEC测量参数(第四代KC901X)
注意:与此功能还有关联的参数还有:设置频谱模式的参考电平 3.2.18。
命令 |
选项 |
参数1 |
参数2 |
参数3 |
|---|---|---|---|---|
|
sweep_list_spec |
init |
calon caloff |
lowlo highlo |
port1 port2 |
run | ||||
stop |
说明:
1、选项:
init->初始化SPEC功能(在使用SPEC前必须使用此命令)
run->运行SPEC进行扫频采集
stop->停止并关闭SPEC功能(在使用其他模式前必须使用此命令)
2、参数1:
calon->打开系统校准
caloff->关闭系统校准
3、参数2:
lowlo->以低本振方式扫描
highlo->以高本振方式扫描
4、参数3:
Port1->选择输入端口为端口1(PORT1)
Port2->选择输入端口为端口2(PORT2)
5、例程:
$sweep_list_spec,run,caloff,lowlo,port1\n$start,spec\n
100000000,2.331\n
200000000,0.119\n
40000000,-1.136\n
$end\n3.3.14 获取S11测量参数(第三代KC901X)
与此功能还有关联的参数还有:
3.2.5 设置输出衰减,3.2.9 电缆补偿
命令 |
选项 |
参数1 |
参数2 |
参数3 |
参数4 |
参数5 |
参数6 |
|---|---|---|---|---|---|---|---|
|
S11 |
init |
caluser(远程模式不支持) calsys calOff |
ri ma vswr z loss |
** |
cs ss |
** |
** |
run | |||||||
stop |
说明:
选项:
init->初始化S11功能(在使用S11功能前必须使用此命令)
run->运行S11进行扫频采集
stop->停止并关闭S11功能(在使用其它工作模式前必须使用此命令)
参数1:
caluser->第三代KC901X远程模式不支持用户校准,请勿使用此选项。
calsys->打开系统校准
caloff->关闭系统校准
第三代KC901X在远程模式下不支持用户校准。请勿使用caluser或原3.2.53、3.2.54中的远程用户校准流程。如果需要用户校准,应在上位机上实现相关校准算法。
参数2:
ri->以实部和虚部返回数据
ma->以反射系数和角度返回数据
vswr->以电压驻波比返回数据
z->以阻抗返回数据
loss->以回波损耗(对数值)返回数据
参数3用于设置扫描点数,第三代KC901最大支持1001点。如果需要扫描超过1001点,可以多次使用S11命令进行分段扫描。
可以只测量1点,此时测量连续进行,仪器持续向上位机发送一个频率的测量结果。
参数4:
cs->以cent和span的方式确定扫频范围
ss->以start和stop的方式确定扫频范围
如果参数3设置为仅扫描1个频率点,则参数4选择cs和ss都可以,且仅需要输入参数5就可以了(cent \ start均可),参数6会被KC901解析为新的命令。
参数5和6用于设置中心频率及扫宽(cs)或者起始及终止频率(ss),以Hz为单位。根据参数4的设置,只需要用其中一种方式输入数据。
根据设备的不同,频率可操作范围有所不同,如下表所示:
中心频率范围 | |
|---|---|
KC901M(RFMA) |
9500Hz-9999999500Hz(10GHz–500Hz) |
KC901V |
5500Hz-6999999500Hz(7GHz–500Hz) |
KC901S+ |
5500Hz-4099999500Hz(4.1GHz – 500Hz) |
扫宽范围 | |
KC901M |
1000Hz-9999991000Hz(10GHz–9KHz) |
KC901V |
1000Hz-6999995000Hz(7GHz–5KHz) |
KC901S+ |
1000Hz-4099995000Hz(4.1GHz – 5KHz) |
起始频率范围 | |
KC901M |
9000Hz-9999999000Hz(10GHz–1KHz) |
KC901V |
5000Hz-6999999000Hz(7GHz–1KHz) |
KC901S+ |
5000Hz-4099999000Hz(4.1GHz-1KHz) |
终止频率范围 | |
KC901M |
10000Hz-10000000000Hz(10GHz) |
KC901V |
6000Hz-7000000000Hz(7GHz) |
KC901S+ |
6000Hz-4100000000Hz(4.1GHz) |
7、例程:
当扫描点数大于1时:
$s11,run,caloff,ri,2,cs,100000000,50000000\n$start,s11,ri\n
$75000000,0.528e0,-0.269e0\n ;依次为频率,实部,虚部
$100000000,0.471e0,-0.406e0\n
$125000000,0.370e0,-0.475e0\n
$end\n$s11,run,caloff,ma,2,cs,100000000,50000000\n
$start,s11,ma\n
$75000000,5.847e-2,-26.497\n ;依次为频率,反射系数,相位
$100000000,6.171e-1,-40.609\n
$125000000,5.934e-2,-51.820\n
$end\n$s11,run,caloff,vswr,2,cs,100000000,50000000\n
$start,s11,vswr\n
$75000000,3.7347\n ;依次为频率,电压驻波比
$100000000,4.1275\n
$125000000,3.7658\n
$end\n$s11,run,caloff,z,2,cs,100000000,50000000\n
$start,s11,z\n
$75000000,137.9871,109.6309,-83.7945\n ;依次为频率,阻抗的模,电阻,电抗
$100000000,113.8715,70.5131,-89.4127\n
$125000000,91.2070,52.7077,-74.4354\n
$end\n$s11,run,caloff,loss,2,cs,100000000,50000000\n
$start,s11,loss\n
$75000000,-0.409\n;依次为频率,回波损耗
$100000000,-0.499\n
$125000000,-0.574\n
$end当扫描点数等于1时:
S11属于循环采样,每次采样结果都为一个包,如下所示:
$s11,run,caloff,ri,1,cs,100000000\n$start,s11,ri\n
$100000000,0.456e0,-0.391e0\n
$end\n$start,s11,ri\n
$100000000,0.458e0,-0.392e0\n
$end\n3.3.15 获取S21测量参数(第三代KC901X)
注意:与此功能相关的参数还有:3.2.5 设置输出衰减。
命令 |
选项 |
参数1 |
参数2 |
参数3 |
参数4 |
参数5 |
参数6 |
参数7 |
|---|---|---|---|---|---|---|---|---|
|
S21 |
init |
caluser(远程模式不支持) calsys caloff |
ri ma Loss delay |
lowlo highlo |
** |
cs ss |
** ** |
** ** |
run | ||||||||
stop |
说明:
1、选项:
init->初始化S21功能(在使用S21前必须使用此命令)
run-> 运行S21功能进行扫频采集
stop->停止并关闭S21功能(在使用其他工作模式前必须使用此命令)
2、参数1:
caluser->第三代KC901X远程模式不支持用户校准,请勿使用此选项。
calsys->打开系统校准
caloff->关闭系统校准
3、参数2:
ri->以实部和虚部返回数据
ma->以插损和相位返回数据
loss->以插入损耗(对数值)返回数据
delay->以群延时返回数据
4、参数3:
lowlo->以低本振方式扫描
highlo->以高本振方式扫描
5、参数4用于设置扫描点数,第三代KC901最大支持1001点。需要扫描更多频点时,可以分成多个指令进行分段扫描。可以设置为1点,此时仪器将连续工作。
6、参数5:
cs->以cent和span的方式确定扫频范围
ss->以start和stop的方式确定扫频范围
如果参数4设置为仅扫描1个频率点,则参数5选择cs和ss都可以,且仅需要输入参数6就可以了(cent \ start均可),参数7会被KC901解析为新的命令。
参数6和7用于传输具体频率,以Hz为单位。根据参数5的设置,只需要采用其中一种格式。
根据设备的不同,频率可操作范围有所不同,如下表所示:
中心频率范围 | |
|---|---|
KC901M |
500Hz-9999999500Hz(10GHz–500Hz) |
KC901V |
500Hz-6999999500Hz(7GHz–500Hz) |
KC901S+ |
500Hz-4099999500Hz(4.1GHz -500Hz) |
扫宽范围 | |
KC901M |
1000Hz-10000000000Hz(10GHz) |
KC901V |
1000Hz-7000000000Hz(7GHz) |
KC901S+ |
1000Hz-4100000000Hz(4.1GHz) |
起始频率范围 | |
KC901M |
0-9999999000Hz(10GHz–1KHz) |
KC901V |
0-6999999000Hz(7GHz–1KHz) |
KC901S+ |
0-4099999000Hz(4.1GHz-1KHz) |
终止频率范围 | |
KC901M |
10000Hz-10000000000Hz(10GHz) |
KC901V |
1000Hz-7000000000Hz(7GHz) |
KC901S+ |
1000Hz-4100000000(4.1GHz) |
终止频率应当大于起始频率。
如果参数4设置为仅扫描1个频率点,则参数6为该频率点的值,参数7不用输入。
8、例程:
当采样点数大于1时:
$s21,run,caloff,ri,lowlo,2,cs,100000000,50000000\n$start,s21,ri\n
$75000000,-0.442e-1,0.000e0\n ;依次为频率,实部,虚部
$100000000,-0.419e-1,0.174e-2\n
$125000000,-0.418e-1,0.219e-2\n
$end\n
$s21,run,caloff,ma,lowlo,2,cs,100000000,50000000\n
$start,s21,ma\n
$75000000,7.097e-1,180.000\n;依次为频率,插损,相位
$100000000,6.758e0,157.210\n
$125000000,6.402e0,150.816\n
$end\n$s21,run,caloff,loss,lowlo,2,cs,100000000,50000000
$start,s21,loss
$75000000,-116.130 ;依次为频率,回拨损耗
$100000000,-102.054
$125000000,-112.225
$end$s21,run,caloff,delay,lowlo,2,cs,100000000,50000000
$start,s21,delay
$75000000,-5.147039e-09
$100000000,2.589045e-09
$125000000,2.589045e-09
$end当扫描点数等于1时:
S21属于循环采样,每次采样结果都为一个包,如下所示:
$s21,run,caloff,ma,lowlo,1,cs,100000000\n$start,s21,ma\n
$100000000,6.744e-1,156.693\n
$end\n
$start,s21,ma\n
$100000000,6.766e0,156.762\n
$end\n
$start,s21,ma\n
$100000000,6.773e0,156.731\n
$end\n3.3.16 获取频谱测量参数(第三代KC901X)
注意:与此功能相关的参数还有:3.2.18 设置频谱模式的参考电平。
命令 |
选项 |
参数1 |
参数2 |
参数3 |
参数4 |
参数5 |
参数6 |
|---|---|---|---|---|---|---|---|
|
spec |
init |
calon caloff |
lowlo highlo |
** |
cs ss |
** |
** |
run | |||||||
stop |
说明:
1、选项:
init->初始化SPEC功能(在使用SPEC前必须使用此命令)
run->运行SPEC进行扫频采集
stop->停止并关闭SPEC功能(在使用其他模式前必须使用此命令)
2、参数1:
calon->打开系统校准
caloff->关闭系统校准
3、参数2:
lowlo->以低本振方式扫描
highlo->以高本振方式扫描
参数3用于设置扫描点数,第三代KC901最大支持1001点。需要超过该点数时,可以多次使用本指令。如果只需扫描1个频率,可以设置为1。与场强功能的区别是本模式可以指定参考电平,而场强功能不能指定参考电平。需要精确测量相对值时,建议指定参考电平。
5、参数4:
cs->以Cent和Span的方式确定扫频范围
ss->以Start和Stop的方式确定扫频范围
如果参数3设置为仅扫描1个频率点,则参数4应当设置为CS。
参数5和6设置中心频率及扫宽,以Hz为单位
根据设备的不同,频率可操作范围有所不同,如下表所示:
中心频率范围 | |
|---|---|
KC901M |
500Hz-9999999500Hz(10GHz–500Hz) |
KC901V |
500Hz-6999999500Hz(7GHz–500Hz) |
KC901S+ |
500Hz-4099999500Hz(4.1GHz-500Hz) |
扫宽范围 | |
KC901M |
1000Hz-10000000000Hz(10GHz) |
KC901V |
1000Hz-7000000000Hz(7GHz) |
KC901S+ |
1000Hz-4100000000Hz(4.1GHz) |
起始频率范围 | |
KC901M |
0-9999999000Hz(10GHz – 1KHz) |
KC901V |
0-6999999000Hz(7GHz – 1KHz) |
KC901S+ |
0-4099999000Hz(4.1GHz – 1KHz) |
终止频率范围 | |
KC901M |
10000Hz-10000000000Hz(10GHz) |
KC901V |
1000Hz-7000000000Hz(7GHz) |
KC901S+ |
1000Hz-4100000000Hz(4.1GHz) |
终止频率应当大于起始频率。
如果参数3设置为仅扫描1个频率点,则参数4选择cs和ss都可以,且仅需要输入参数5就可以了(cent \ start均可),参数6会被KC901解析为新的命令。
7、例程:
当采样点数大于1时:
$spec,run,caloff,lowlo,10,cs,100000000,50000000\n$start,spec\n
$75000000,-74.166\n ;依次为频率和幅度(dBm)
$80000000,-74.385\n
$85000000,-74.228\n
$90000000,-74.249\n
$95000000,-74.125\n
$100000000,-74.456\n
$105000000,-74.422\n
$110000000,-74.147\n
$115000000,-74.077\n
$120000000,-74.295\n
$125000000,-74.314\n
$end\n当扫描点数等于1时:
SPEC属于循环采样,每次采样结果都为一个包,如下所示:
$spec,run,caloff,lowlo,1,cs,100000000\n$start,spec\n
$100000000,-74.307\n
$end\n
$start,spec\n
$100000000,-74.540\n
$end\n
$start,spec\n
$100000000,-74.310\n
$end\n3.3.17 获取场强测量参数(第三代KC901X)
注意:与此功能相关的参数还有:3.2.5 设置输出衰减。
命令 |
选项 |
参数1 |
参数2 |
参数3 |
|---|---|---|---|---|
|
field |
init |
lowlo highlo |
** |
** |
run | ||||
stop |
说明:
1、选项:
init->初始化FIELD功能(在使用FIELD前必须使用此命令)
run->运行FIELD进行扫频采集
stop->停止并关闭FIELD功能(在使用其他工作模式前必须使用此命令)
2、参数1:
lowlo->以低本振方式测试
highlo->以高本振方式测试
3、参数2:天线增益,以dBi为单位。
天线增益范围:-100.00…+100.00dBi
参数3:扫描单点频率以Hz为单位,可以精确到0.1Hz。
根据设备的不同,频率可操作范围有所不同,如下表所示:
频率范围 | |
|---|---|
KC901M |
0Hz-10000000000Hz(10GHz) |
KC901V |
0-7000000000Hz(7GHz) |
KC901S+ |
0-4100000000Hz(4.1GHz) |
5、例程:
场强数据是循环扫描,所以每次接受到的数据都是一个单独的包,比如:
$field,run,lowlo,10,100000000\n$start,field\n
$100000000.0,-18.115,-121.917\n ;依次为频率,场强,绝对强度(dBm)
$end\n
$start,field\n
$100000000.0,-18.875,-122.337\n
$end\n
$start,field\n
$100000000.0,-18.667,-122.087\n
$end\n3.3.18 控制射频信号源输出(第三代KC901X)
命令 |
选项 |
参数1 |
参数2 |
参数3 |
参数4 |
参数5 |
参数6 |
|---|---|---|---|---|---|---|---|
|
rfSource |
init |
off ask fm |
port1 port2 afout |
** |
** |
** |
** |
run | |||||||
stop |
说明:
1、选项:
init->初始化RfSource(在使用RfSource前必须使用此命令)
run->运行RfSource并输出信号
stop->停止并关闭RfSource功能(在使用其他工作模式前必须使用此命令)
2、参数1:
off->关闭调制功能,此时参数4和参数5不需要输入
ask->打开ASK调制
fm->使用FM调制
3、参数2:
port1->选择输出口为端口1输出(PORT 1)
port2->选择输出口为端口2输出(PORT 2)
afout->选择输出口为音频输出(AFOUT)
3、参数3:
根据设备的不同,载波频率可操作范围有所不同,如下表所示:
载波频率范围 | |
|---|---|
KC901M |
0Hz-10000000000Hz(10GHz) |
KC901V |
0-7000000000Hz(7GHz) |
KC901S+ |
0-4100000000Hz(4.1GHz) |
但切换为音频输出时,频率范围为 0-60000000Hz(60MHz)
4、参数4:
载波输出幅度 单位dBm,精度 1dB
端口的输出幅度根据频率不同而不同。
当用户输入幅度高于实际可以输出的最大值时,下位机返回警告,并且以最大值输出。
$start,warn_gtr\n ;用户输入大于最大值
$warn:It is greater than the maximum output!\n
$end\n当用户输入幅度低于实际可以输出的最大值时,下位机返回警告,并且以最小值输出。
$start,warn_lt\n ;用户输入大于最大值
$warn:It is less than the minimum output!\n
$end\n当输出端口为“port2”时,大致取值范围:+10至-30dBm
当输出端口为“port1”,且射频板版本不低于“1.0.5”时,取值范围:+10至-60dBm,否则取值范围依然为:+10至-30dBm
5、参数5:
调制频率 单位Hz 取值范围:0-3000Hz
6、参数6:
当为ASK调试时调制深度,仅有几个固定取值:0,5,10,15,20,30,35,40,45,50,55,60,65,70,75,80,85,90。
当为FM调制时,其可调深度随频率而变化,如下表所示
0 – 60M(不包含60M) |
0 - 10MHz |
|---|---|
60M – 106.25M(不含106.25M) |
0 – 312.5KHz |
106.25M – 212.5M(不含212.5M) |
0 – 625KHz |
212.5M – 425M(不含425M) |
0 – 1.25MHz |
425M – 850M(不含850M) |
0 – 2.5MHz |
850M – 1700M(不含1700M) |
0 – 5MHz |
1700M – 3400M(不含3400M) |
0 – 10MHz |
3400M – 7000M |
0 – 20MHz |
7、例程:
控制射频信号源输出,要求打开调制,载波频率1GHz,输出不衰减,调制频率1KHz,调制深度90%。
第一步 初始化RfSource功能:
$rfsource,init\n第二步 开始运行和设置:
$rfsource,run,ask,port1,1000000000,0,1000,90\n第三步 如果需要使用其它功能,需先退出射频信号源:
$rfsource,stop\n8、处理:
(1)当输入选项为Init时,KC901会立即初始化与射频信号源相关的电路。
(2)当输入选项为STOP时,KC901会关闭与射频信号源相关的电路。
(3)当输入选项为RUN时,此时KC901根据用户设置进行输出。
(4)在信号源输出时,如果下发其它没有明确要求终止信号源输出的命令,信号源继续输出。
3.3.19 控制音频信号源输出(第三代KC901X)
命令 |
选项 |
参数1 |
参数2 |
参数3 |
参数4 |
参数5 |
参数6 |
|---|---|---|---|---|---|---|---|
|
afsource |
init |
off ask fm pm |
afout |
** |
** |
** |
** |
run |
port1 |
||||||
stop |
port2 |
说明:
1、选项:
init->初始化AfSource(在使用AfSource前必须使用此命令)
run->运行AfSource功能进行音频输出
stop->停止并关闭AfSource功能(在使用其他工作模式前必须使用此命令)
2、参数1:
off->关闭调制功能,此时参数4和参数5不需要输入
ask->ASK调制
fm->FM调制
pm->PM调制
3、参数2:
afout->选择输出口为音频输出(AF OUT)
port1->选择输出口为端口1输出(PORT 1)
port2->选择输出口为端口2输出(PORT 2)
3、参数3:
载波频率,单位Hz,取值范围:0-2000000000Hz
4、参数4:
当输出端口为“afout”时,单位mV(VPP),取值范围:0-3000mV
当输出端口为“port1”或pot2时,代表载波输出幅度 单位dBm,精度 1dB
端口的输出幅度根据频率不同而不同。
当用户输入幅度高于实际可以输出的最大值时,下位机返回警告,并且以最大值输出。
$start,warn_gtr\n ;用户输入大于最大值
$warn:It is greater than the maximum output!\n
$end\n当用户输入幅度低于实际可以输出的最大值时,下位机返回警告,并且以最小值输出。
$start,warn_lt\n ;用户输入大于最大值
$warn:It is less than the minimum output!\n
$end\n当输出端口为“port2”时,大致取值范围:+10至-81dBm
当输出端口为“port1”,且射频板版本不低于“1.0.5”时,取值范围:+10至-111dBm,否则取值范围依然为:+10至-81dBm
5、参数5:
调制频率,单位Hz.
在ASK下,取值范围:0-3000Hz
在FM以及PM下,取值范围:16-10000Hz
6、参数6:
调制深度/调制频偏
在ASK下,调制深度范围为0-100%
在FM下,调制频偏为0-1MHz
在PM下,调制相偏移为-180°-+180°
7、例程:
控制音频信号源输出,要求ASK调制,载波频率10MHz,输出1.3V(VPP),调制频率1KHz,调制深度100%。
第一步 初始化AfSource功能:
$afsource,init\n第二步 开始运行并设置:
$afsource,run,ask,afout,10000000,1300,1000,100\n第三步 如需使用其它功能,应先退出本模式。
$afsource,stop\n8、处理:
(1)当输入选项为Init时,KC901会立即初始化与音频信号源相关的电路。
(2)当输入选项为STOP时,KC901会立即关闭音频信号源相关的电路。
(3)当输入选项为RUN时,KC901根据用户设置进行输出。
(4)在信号源输出时,如果下达其它没有明确要求终止信号源输出的命令,信号源继续输出。
3.4上行指令
系统主动返回的指令一般是用于警告及提示,每一个警告就是一个包。上位机编程时,通过包头即可判断错误类型,不需要匹配包内容。说明如下:
3.4.1当指令发送错误时返回字符串
$start,err_cmd\n
$error:Command input error!\n
$end\n3.4.2当选项发送错误时返回字符串
$start,err_opt\n
$error:Option input error!\n
$end\n3.4.3当参数X发送错误时返回此字符串
$start,err_parx\n ;参数x输入错误,此处x是变量,取值范围是1-6
$error:Parameterx input error!\n
$end\n3.4.4在使用某个模式先必须先初始化该模式
$start,err_uninit\n
$error:Please initialize the mode first!\n
$end\n3.4.5发射机失锁(需主动读取,见3.2.23)
$start,err_RfUnlock\n
$error:RF PLL unLock!\n
$end\n3.4.6接收机本振失锁(需主动读取,见3.2.23)
$start,err_LoUnlock\n
$error:Lo PLL unLock!\n
$end\n3.4.7在使用某模式时,必须先停止其他正在运行的模式。
$start,err_S11Stop\n ;使用其他扫描模式前需要先停止S11模式
$error:Please stop S11 mode first!\n
$end\n$start,err_S22Stop\n ;使用其他扫描模式前需要先停止S22模式
$error:Please stop S22 mode first!\n
$end\n$start,err_S21Stop\n ;使用其他扫描模式前需要先停止S21模式
$error:Please stop S21 mode first!\n
$end\n$start,err_S12Stop\n ;使用其他扫描模式前需要先停止S12模式
$error:Please stop S12 mode first!\n
$end\n$start,err_SpecStop\n ;使用其他扫描模式前需要先停止SPEC模式
$error:Please stop Spec mode first!\n
$end\n$start,err_FieldStop\n ;使用其他扫描模式前需要先停止FIELD模式
$error:Please stop Field mode first!\n
$end\n$start,err_RfStop\n ;使用其他扫描模式前需要先停止RFSource模式
$error:Please stop RFSource mode first!\n
$end\n$start,err_AfStop\n ;使用其他扫描模式前需要先停止AFSource模式
$error:Please stop AFSource mode first!\n
$end\n3.4.8电池电压低(需主动读取,见3.2.37)
$start,err_BatVolLow\n
$error:Low battery!\n
$end\n3.4.9外接电压高(需主动读取,见3.2.37)
$start,err_ExVolHigh\n
$error:External Voltage is too high!\n
$end\n3.4.10温度高(需主动读取,见3.2.37)
$start,err_TempHigh\n
$error:Temperature is too high!\n
$end\n3.4.11收到的频率列表中有超出范围的频率(第四代KC901X)
$start,err_freq\n
$error: Frequency out of range!\n
$end\n3.4.12频率列表内个数小于2(第四代KC901X)
$start,err_freq\n
$error: The number of frequencies cannot be less than 2!\n
$end\n3.4.13 频率列表内个数超过10000(第四代KC901X)
已确认频率列表最多支持10000点。下面保留的原文响应示例仍写作10001;固件实际返回文字以及超限列表的处理方式尚待确认。不能据此推断列表上限是10001点。
$start,err_freq\n
$error: Over 10001 points!\n
$end\n4、版本说明
本手册适用于版本在V1.5.6(KC901V/M) ,1.2.9(KC901C+/S+) ,1.2.1(KC901Q),V1.5.6(KC901J/K/R/T)及以上的固件。低于该版本的固件,请参阅旧版手册。
本手册未特别指明不同型号设备的功能区别。如果设备不具备某项功能,则相应的指令无效。例如KC901V不具备S22测试功能和全双端口校准功能,故关于这两种功能的任意组合都属于无效命令。
[结束]